15
ENGLISH
• Never operate while in a tree, in any awkward
position or on a ladder or other unstable surface.
You may lose control of saw causing severeinjury.
• Keep the chain saw running at full speed the entire
time you arecutting.
• Allow the saw chain to cut for you. Exert only light
pressure. Do not put pressure on chain saw at end
ofcut.
WARNING: When not in use always have the chain
brake engaged and batteryremoved.
Setting the Chain Brake (Fig.A, M, N)
Your chain saw is equipped with a chain braking system
which will stop the chain quickly in case ofkickback.
1. Ensure the chain brake/front hand guard
3
is in the
forward position.
2. Insert the battery pack
14
into the tool.
3. Pull the chain brake/front hand guard
3
towards the
front handle
13
into the “set/ready” position as shown
in Fig.N.
4. The tool is now ready to use.
5. After use, return the chain brake/front hand guard to the
forward position.
6. Remove the battery.
NOTE: In the event of kickback, your left hand will come in
contact with the front guard, pushing it forward, toward the
workpiece. This will stop thetool.
Testing the Chain Brake (Fig.A, N)
Test the chain brake before every use to make sure it
operatescorrectly.
1. Place the tool on a flat, firm surface. Make sure the saw
chain
5
is clear of theground.
2. Grip the tool firmly with both hands and turn the chain
sawon.
3. Rotate your left hand forward around the front
handle
13
so the back of your hand comes in contact
with the chain brake/front hand guard
3
and push it
forward, toward the workpiece. The saw chain should
stopimmediately.
NOTE: If saw does not stop immediately, stop use of tool and
bring it to an authorized service center nearestyou.
WARNING: Make sure to set chain brake
beforecutting.
ON/OFF Switch (Fig.O)
Always be sure of your footing and grip the chain saw firmly
with both hands with the thumb and fingers encircling
bothhandles.
1. To turn the unit on, push the lock-off lever
2
in, shown
in Fig.O, and squeeze the trigger switch
1
. Once the
unit is running, you may release the lock-offlever.
2. In order to keep the unit running you must continue
to squeeze the trigger. To turn the unit off, release
thetrigger.
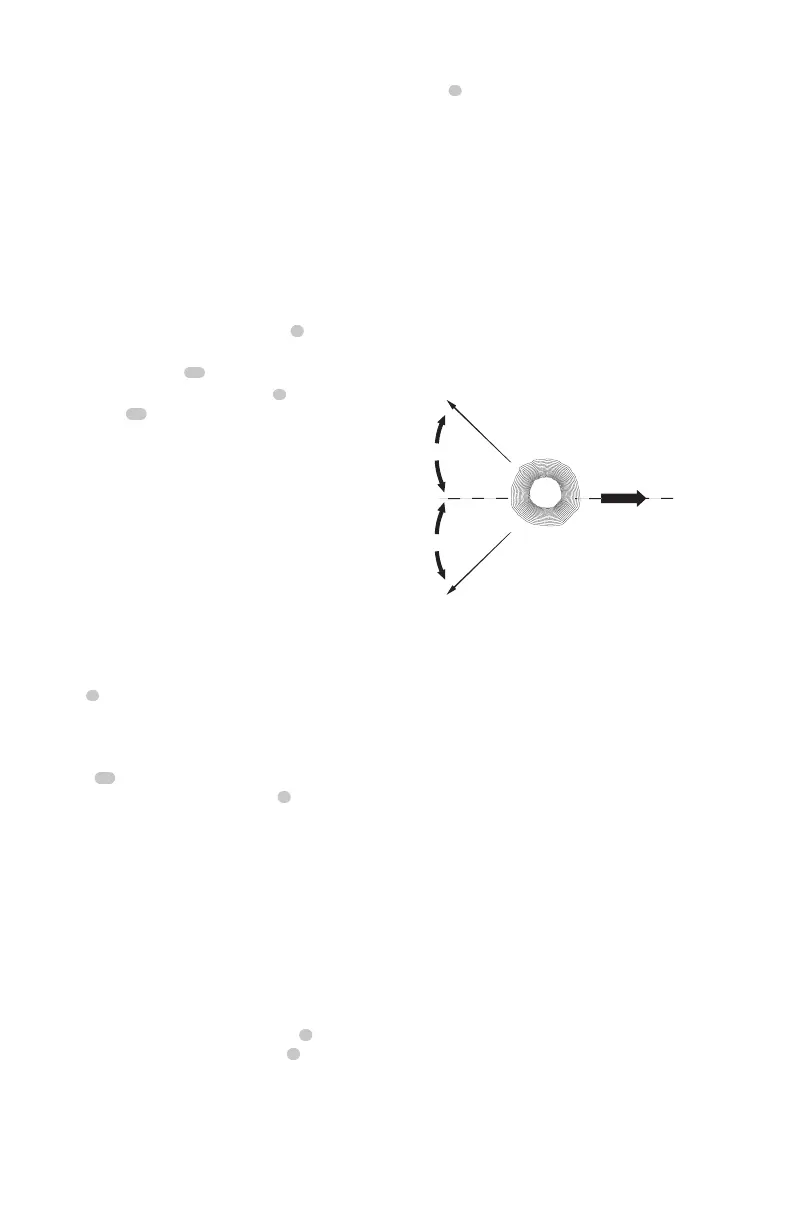
Common Cutting Techniques
Felling
The process of cutting down a tree. Do not fell trees in high
windconditions.
WARNING: Felling can result in injury. It should only
be performed by a trainedperson.
• A retreat path should be planned and cleared as
necessary before cuts are started. The retreat path should
extend back and diagonally to the rear of the expected
line of fall as shownbelow.
DIRECTION
OF
FALL
RETREAT
45°
TREE
45°
RETREAT
• Before felling is started, consider the natural lean of
the tree, the location of larger branches and the wind
direction to judge which way the tree will fall. Have
wedges (wood, plastic or aluminum) and a heavy mallet
handy. Remove dirt, stones, loose bark, nails, staples, and
wire from the tree where the felling cuts are to bemade.
• Notching Undercut - Make the notch 1/3 of the
diameter of the tree, perpendicular to the direction of
the fall. Make the lower horizontal notching cut first. This
will help to avoid pinching of either the saw chain or the
guide bar when the second notch cut is being made as
shownbelow.
• Felling Back Cut - Make the felling back cut at least 2"
(51mm) higher than the horizontal notching cut. Keep
the felling back cut parallel to the horizontal notching
cut. Make the felling back cut so enough wood is left
to act as a hinge. The hinge wood keeps the tree from
twisting and falling in the wrong direction. Do not cut
through the hinge as shownbelow.
• As the felling cut gets close to the hinge the tree should
begin to fall. If there is any chance that the tree may
not fall in the desired direction or it may rock back and
bind the saw chain, stop cutting before the felling cut
is complete and use wedges to open the cut and drop
the tree along the desired line of fall. When the tree
begins to fall remove the chainsaw from the cut, stop the
motor, put the chainsaw down, then use the retreat path
planned. Be alert for overhead limbs falling and watch
yourfooting.
NOTE: If too much force is applied while making a cut the
saw will turn off. To restart saw, you must release the trigger
switch
1
before the saw will restart. Begin your cut again
this time with less force. Allow the saw to cut at its ownpace.
WARNING: Never attempt to lock a switch in the
ONposition.
 Loading...