EasyManua.ls Logo

Datamax M-Class Mark II M-4206 User Manual

Datamax M-Class Mark II M-4206
76 pages
To Next Page IconTo Next Page
To Previous Page IconTo Previous Page
Page #32 background image
26 M-4206
4.6 Label Alignment
The Label Alignment function is intended for use when the label length is less than the distance between the printhead and
the media sensor or where label waste at power-up is a concern. Label Alignment (see table below) is not recommended
for label lengths greater than 6.5 inches or for media containing 2 or more form lengths.
Label Stock Label Alignment Se tting
Continuous NO
6.5 inches or less YES or AUTO
6.5 inches or more NO
Multiple length labels NO
The Label Alignment function is chosen via the menu system (see Section 4.5) or by host commands. The three possible
modes, YES, AUTO, and NO, are detailed in the following sections.
4.6.1 Label Alignment = YES
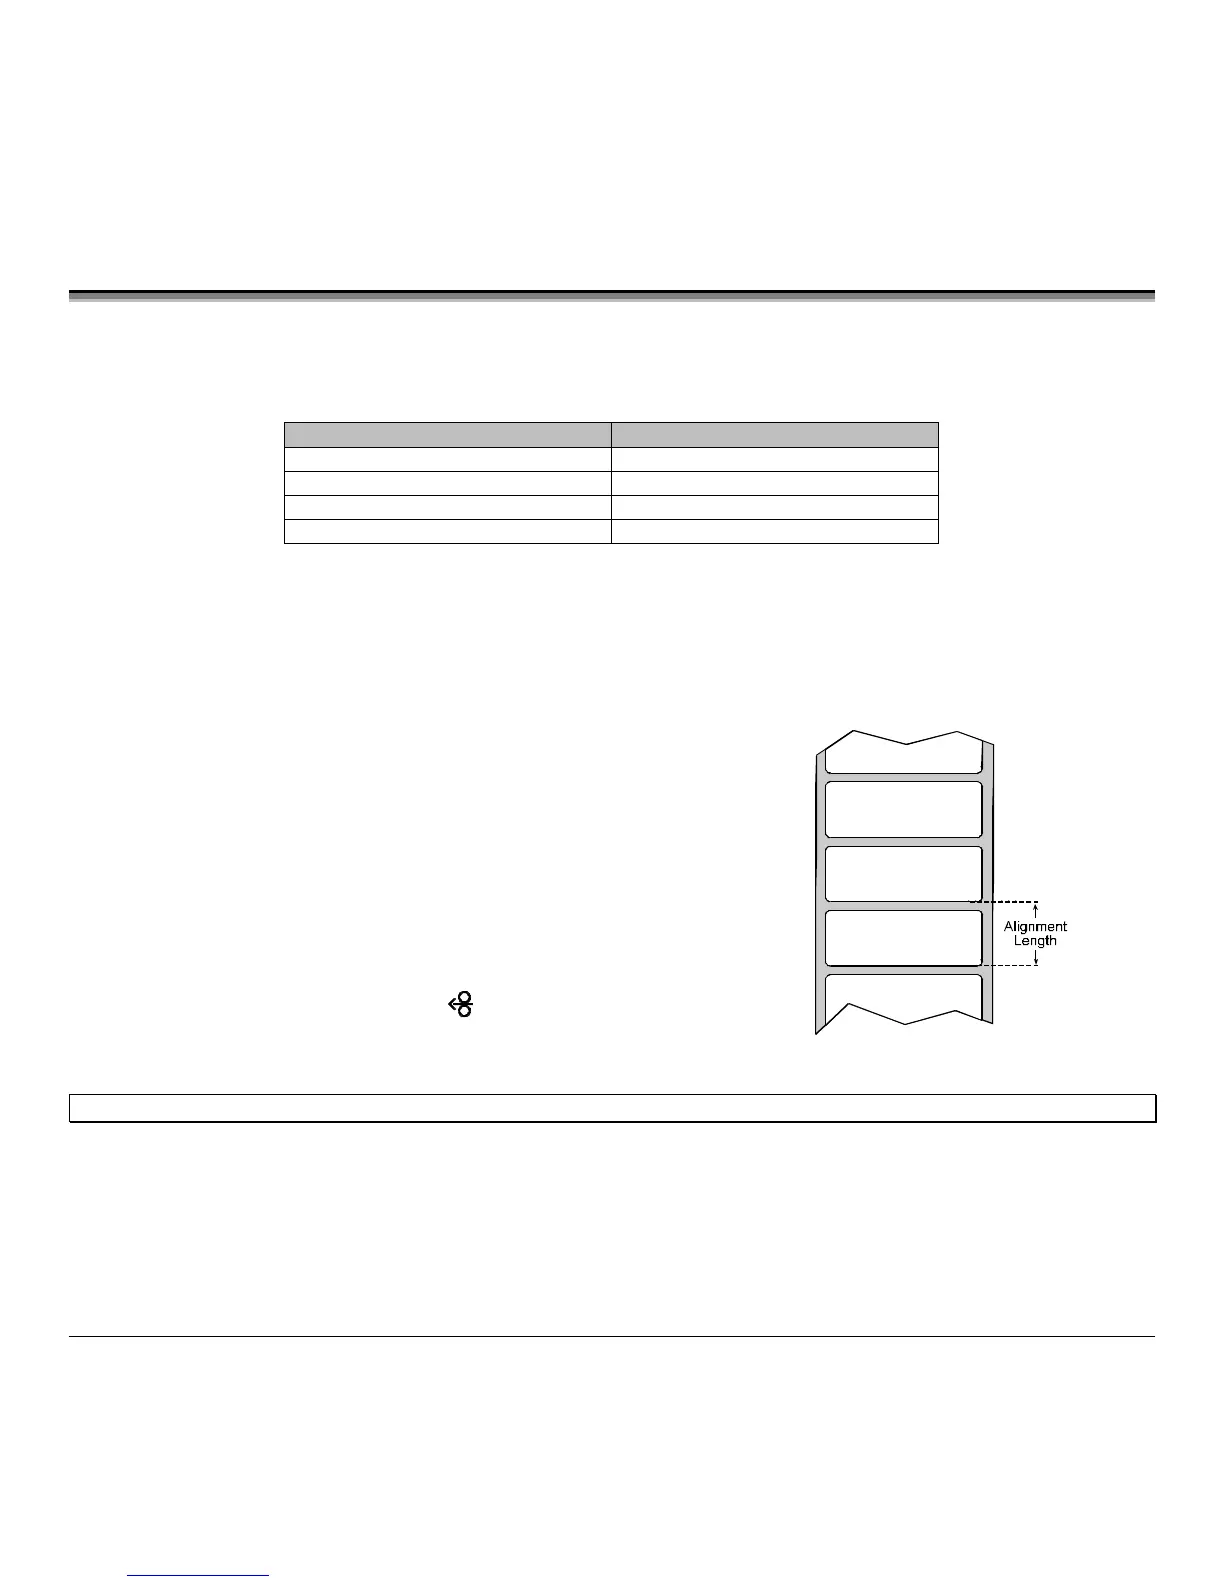
In this mode, the operator must supply an ‘ALIGN LENGTH value.
This value must be physically measured from leading edge to leading
edge of two successive labels, as shown. The measurement must be as
accurate as possible. For very short labels, errors as small as 0.01” can
result in noticeable print variations on the labels between the media
sensor and the printhead.
The measured value must be sent to the printer via the host computer or
entered using the Printer Setup Mode (see Section 4.5).
Then, in Normal Mode, press and hold the
FEED
button (about 4
seconds). The printer will align the label to the top of form position.
; Note: If media with a different label length is subsequently loaded, the ‘ALIGN LENGTH’ must be recalculated and re-entered.

Questions and Answers:

Datamax M-Class Mark II M-4206 Specifications

General IconGeneral
Print Resolution203 dpi
Print MethodThermal Transfer and Direct Thermal
Max Print Width4.25 inches
Max Print Speed6 ips
Memory8 MB Flash
InterfacesSerial, Parallel, USB
Media SensorReflective and Transmissive
Media TypesLabels, Tags
Label Roll Diameter8 inches
Label Thickness0.0025 to 0.01 inches
Maximum Print Length99 inches

Summary

Chapter 1 Printer Overview

1.0 Introduction

Provides a brief overview of the M-4206 printer's capabilities and manual scope.

1.1 About this Printer

Details the standard and optional features of the M-4206 printer.

Chapter 2 Getting Started

2.0 Before Using the Printer

Instructions for unpacking, inspecting, and preparing the printer for initial use.

Chapter 3 Setting Up the Printer

3.1 Connecting the Printer

Details how to connect the printer to a host system via power and interface cables.

3.2 Loading Media

Instructions for properly loading media rolls into the printer.

3.3 Media Sensor Adjustment

Guide on positioning the media sensor for accurate media detection.

3.4 Loading Ribbon

Steps for loading ribbon for thermal transfer printing.

Chapter 4 Using the Front Panel

4.1 Lights

Explains the meaning of different indicator light states on the printer.

4.2 Buttons

Describes the function of the PAUSE, FEED, and CANCEL buttons in various modes.

4.3 Normal Mode Button Functions

Details button operations for pause, feed, and cancel in normal printer mode.

4.4 Express Setup Mode Button Functions

Explains how to quickly access and change common printer settings.

4.5 Printer Setup Mode Button Functions

Guide to navigating and modifying printer operational settings via button controls.

4.6 Label Alignment

Explains how to ensure proper print alignment on labels for optimal results.

4.7 Calibration Mode Button Functions

Describes how to use buttons to perform media calibration automatically or manually.

4.8 Internal Labels

Explains how to print internal configuration and test labels.

Chapter 5 Maintenance and Adjustments

5.1 Cleaning the Printhead

Step-by-step instructions for cleaning the printer's printhead to maintain print quality.

5.2 Media Width Adjustment

How to adjust the printhead-leveling cam for even pressure distribution with different media widths.

5.3 Printhead Burn Line Adjustment

Procedure to adjust the printhead burn line for optimal print quality on various media.

5.4 Printhead Pressure Adjustment

Instructions for adjusting printhead assembly pressure for better imaging.

5.5 Printhead Replacement

Detailed steps for removing and replacing the printer's printhead.

5.7 Resetting Factory Defaults

Procedure to reset printer settings to their original factory default values.

Chapter 6 Troubleshooting

6.1 Troubleshooting Tips

A table listing common printer symptoms and their corresponding causes and solutions.

Chapter 7 Specifications

Mechanical Specifications

Provides physical dimensions, weight, operating temperature, and voltage requirements.

Printing Specifications

Details print method, speed, resolution, and memory capacities.

Media and Ribbon Specifications

Lists media types, width, thickness, and ribbon supply details.

Communications Specifications

Outlines interface types, baud speed, handshaking, parity, and data bits.

Font Specifications

Information on available bit map fonts and scalable fonts.

Embedded Bar Codes

Lists supported barcode symbologies and their character sets.

Appendix A ASCII Control Code Chart

ASCII Control Code Chart

A table mapping ASCII characters to their decimal and hexadecimal codes.

Appendix B Embedded Fonts and Barcodes

Embedded Fonts and Barcodes

Describes character fonts and barcode types available for printer programming.

Appendix C Limited Warranty Statement

Datamax Barcode Products Limited Warranty Statement

Outlines the warranty terms for the printer and its thermal printhead.

Warranty Service Procedures

Instructions on how to return a defective unit for warranty service.

General Warranty Provisions

Standard terms and conditions related to Datamax product warranties.

Limitation of Liability

Specifies limitations on Datamax's liability for damages related to product use.

Related product manuals