4. Empty the cup, wait for the “OK” light to switch on again
and repeat the same operation again.
(It is normal for a small, harmless pu of steam to be released
when the lter-holder is removed).
How to prepare espresso using ground coee
1. After preheating the appliance as described above, place
the ground coee lter in the lter holder, making sure
the node is correctly inserted in the slot as shown in g. 8.
Use the smaller lter to make one coee or the larger lter
to make two coees.
2. To prepare one coee, ll the smaller lter with a level
measuring spoon of ground coee, about 7gr. (g. 9). If
you wish to prepare two cups of coee, ll the larger lter
with two less-than-level measuring spoons of ground cof-
fee (about 6+6 gr). Fill the lter with small amounts at a
time to prevent the coee spilling out.
Important:
For correct use, before lling the lter with ground coee
always make sure there is no residual coee in the lter from
a previous infusion.
3. Distribute the ground coee evenly and press it lightly
using the coee tamper (g. 10).
Pressing the ground coee is very important to obtain a
good espresso. If you press too hard, the coee will run
out slowly and the crema will be dark. If you press too
lightly, the coee will run out too fast and the crema will
be very light.
4. Remove any excess coee from the rim of the lter-holder
and attach it to the machine: turn the grip to the right (g.
5) to prevent water from escaping.
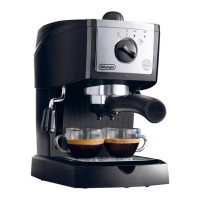
5. Position the cup or cups under the lter-holder outlets
(g. 11). You are recommended to heat the cups before
making the coee by rinsing them with a little hot water
or placing them to warm on the top plate for at least
15-20 minutes (g. 12).
6. Make sure that the OK light (g. 6) is on (if it is o, wait
for it to switch on) then turn the dial to the position
(g. 7) until the required quantity is delivered. To inter-
rupt, turn the selector back in the position (g. 4).
(It is recommended not to run the coee for more than 45
seconds).
7. Turn the grip from right to left to release the lter-holder.
Scalding hazard!
To prevent sprays, do not release the lter-holder while the
machine is dispensing coee.
8. To remove the used coee, let the coee fall out by knock-
ing the over-turned lter-holder (g. 13).
9. To turn the appliance o, rotate the selector dial to the “O”
position (g. 14).
How to prepare espresso using pods
1. Preheat the appliance as described in the section “PRE-
HEATING THE COFFEE UNIT”, making sure the lter holder
is attached This obtains a hotter coee.
Please note:
Use pods conforming to the ESE standard, indicated on the
pack by the following symbol:
The ESE standard is a system accepted by leading pod producers
and enables espresso coee to be prepared simply and cleanly.
2. Place the small 1 coee or pod lter in the lter holder,
making sure the projection is correctly inserted in the slot
as shown in g. 8.
3. Insert a pod, centring it as far as possible on the lter (g.
18). Always follow the instructions on the pod pack to po-
sition the pod on the lter correctly.
4. Attach the lter holder to the appliance. Always rotate as
far as it will go (g. 5).
5. Proceed as in points 5, 6 and 7 in the previous paragraph.
How to make cappuccino
1. Prepare the espresso coee as described in the previous
paragraphs, using larger cups or glasses. Remove the drip
tray to allow for larger glasses.
2. Rotate the selector dial to the position (g. 15) and
wait until the OK light comes on (g. 6).
This indicates that the boiler has reached the ideal tem-
perature for steam production.
3. In the meantime, ll a container with about 100 grams of
milk for every cappuccino to be prepared. For best results
use fresh milk from the refrigerator. When choosing the
container bear in mind that the volume of the milk will
increase by 2 or 3 times.
Please note:
it is recommended to use semi-skimmed milk at refrigerator
temperature (+/- 5°C).
4. Position the container with the milk under the cappuccino
maker (g. 16).
use

 Loading...