36
ENGLISH
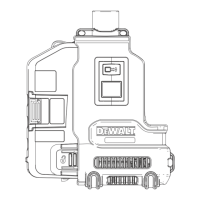
Emptying the Dust Collection Box (Fig. I, J)
WARNING: The vacuum cleaner contains dust particles
that pose a risk to health. Emptying and maintenance
procedures, including the disposal of dust collectors,
should only be carried out by professionals. Suitable
protective equipment is required. Do not operate the
vacuum cleaner without the complete filter system.
Otherwise you endanger yourhealth.
WARNING: Wear approved eye protection and approved
dust mask when performing thisprocedure.
CAUTION: Do not clean with water or compressedair.
The dust collection box
3
should be emptied as soon as the
performance has noticeably decreased or isfull.
1. Press the dust collection box release buttons
4
and pull the
dust collection box away from the dust extraction system.
Once the catch mechanism is clear of the dust extraction
system the upper joint will also release allowing the dust
collection box to be removedcompletely.
2. To empty the dust collection box
3
position it over a
suitable container to catch the dust contained within it.
Lift up the assembly release latch
18
to open the dust
collection box, separating the canister from the lid. Gently
tapping the dust collection box will encourage any dust
trapped within the filter to also be removed. Once the filter
lid and canister are empty reattach them, ensuring the
assembly release latch
18
is securely fastened. Refer to
FigureJ.
3. To reattach the dust collection box to the dust extraction
system first insert the rounded profile of the upper joint
into the recess on the dust extraction system. Pivot the dust
collection box down so that the release buttons click back
into place. Refer to FigureI.
4. With the dust collection box properly installed, depress the
filter cleaning mechanism
5
and turn on the dust extractor.
Allow the system to run for 5seconds and release trigger.
This should be done after every emptying of the dust
collectionbox.
Transporting the Dust Extractor
WARNING: Accidental start-up during transport could
be hazardous. Always transport the dust extractor
with the batteries removed. Refer to the Battery
Packs, Transportation section of this manual for
furtherinformation.
WARNING: Check the tool and batteries for damage after
transport and beforeuse.
Storing the Dust Extractor
WARNING:
a ) Empty the dust collection box before storing the
dustextractor.
b ) Always store your dust extractor with the batteries removed!
c ) Store the tool and batteries in a place that is as cool and
dry aspossible.
d ) Store the tool and batteries in a place that cannot be
accessed by children or unauthorisedpersons.
e ) Check the tool and batteries for damage after long periods
ofstorage.
f ) Refer to the Battery Packs, Transportation section of
this manual for furtherinformation.
MAINTENANCE
WARNING: To reduce the risk of serious personal
injury, turn the dust extractor off and disconnect
battery pack before making any adjustments or
removing/installing attachments or accessories. An
accidental start-up can causeinjury.
The charger and battery pack are notserviceable.
NOTE: Cleaning and user maintenance shall not be made
by children.
Replacing the Dust Collection Box Filter
Assembly (Fig. I, J)
WARNING: Wear approved eye protection and approved
dust mask when performing thisprocedure.
WARNING: Replace any damaged filtersimmediately.
NOTE: The filter should be replaced after every 350full to empty
filter box emptyingcycles.
1. Press the dust collection box release buttons
4
and pull the
dust collection box away from the dust extraction system.
Once the catch mechanism is clear of the dust extraction
system the upper joint will also release allowing the dust
collection box to be removedcompletely.
2. Discard dust collection box
3
and replace with a new
filterbox.
3. Reattach the dust collection box to the dust extraction
system. First insert the rounded profile of the upper joint
into the recess on the dust extraction system. Pivot the dust
collection box down so that the release buttons click back
intoplace.
Lubrication
Your dust extractor requires no additionallubrication.
Cleaning
WARNING: Do not use a spray system, pressure jet washer
or running water forcleaning.
WARNING: Wear approved eye protection and approved
dust mask when performing thisprocedure.
WARNING: Do not use a brush or compressed air to clean
the dust collector orfilter.
WARNING: Never use solvents or other harsh chemicals
for cleaning the non-metallic parts of the dust extractor.
These chemicals may weaken the materials used in these
parts. Use a cloth dampened only with water and mild
soap. Never let any liquid get inside the dust extractor;
never immerse any part of the dust extractor into aliquid.
During intensive use the dust collector becomes clogged
with dust. Refer to Replacing The Dust Collection Box Filter
Assembly, underMaintenance.
 Loading...