(c)
Flame blows
out
If trouble is encountered with the flame blowing out under specially
windy conditions, try to place the vehicle so that the wind does not
blow directly into the vent outlets. If the trouble persists, set the gas
thermostat to ‘MAX’. This can of course, only be a temporary
measure as after a time at this setting, the foodstuffs in the cabinet
may become too cold.
(d)
Cleaning
Flue. Burner and Jet (See fia.
6)
1.
2.
3.
4.
5.
Once
or
twice a year, depending on-use, examine the appearance of
the flame which should be predominantly blue when the gas
thermostat
is set
at MAX. If this is not the case, the flue, burner, and
jet should be cleaned, as follows.
Take off flue top, then lift out flue baffle on its support wire
which will then be visible.
6.
7.
8.
9.
Remove burner shield which is held to bottom of boiler casing by
two screws.
Disconnect and remove gas pipe
(3)
from between flame failure
device and burner.
Pull out burner jet
(4)
and clean it by washing in alcohol or
blowing through with air. DO NOT USE A PROBE.
Disconnect end of thermocouple (2) from flame failure device by
unscrewing union
(1
).
Leave other end of thermocouple secured to
burner bracket.
Remove burner bracket with burner and thermocouple attached,
by undoing screw
(5)
holding it to bottom of boiler.
Clean burner, making
sure
its gauze head and aeration ports are clear.
Clean flue tube, preferably by means of a special brush available from
your supplier.
Refit all parts, ensuring the burner bracket is properly retained, but
do not overtighten the thermocouple union when connecting it.
Gas connections should be tight but not overtightened,
After re-installing, check all gas joints for soundness as described in
the next item.
(e)
Checking for Gas Leaks
Periodically, the entire gas installation should be checked for leaks.
Test all pipe connections with soapy water (not with a flame),
watching for bubbles, -see item 9.
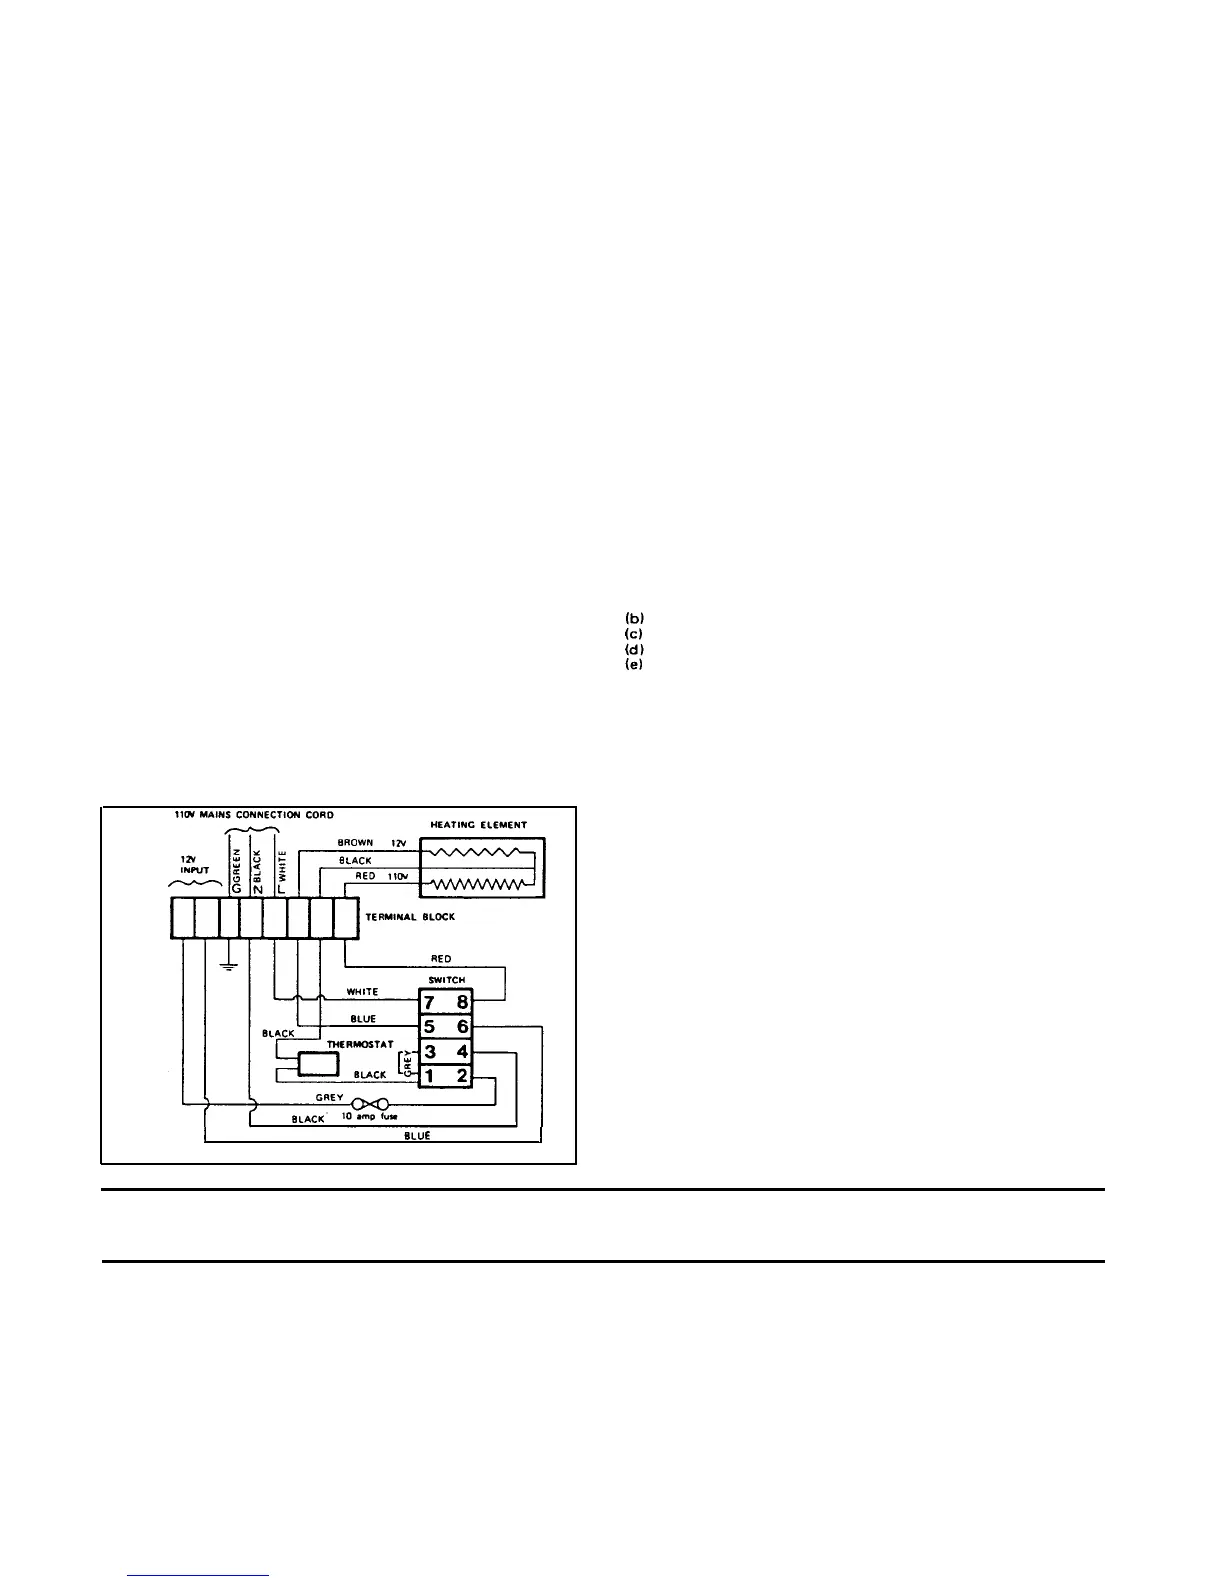
19. ELECTRIC EQUIPMENT
(a)
Heater
Heat is supplied to the boiler of the cooling unit by a 95 watt
heater which has two separate windings, one for use on 12V d.c..
the other for
110V
a.c.
If a new heater has to be fitted at any
time, it will be necessary to disconnect from the electricity supply
and to gain access to the back of the refrigerator.
I
BLUE
I
WIRING
DIAGRAM
1.
2.
3.
4.
5.
6.
7.
Take off the cover from the electric equipment control box by
removing the screw
(H,
fig.
4).
Disconnect the three heater leads
from the terminal block, taking a written note of their respective
positions and being careful not to disturb other connections.
Release the
armoured
sleeve protecting the heater leads from the
top of the control box by removing the retaining plate held by
one screw.
Take out the screws and remove the cover from the opening in the
back of the boiler casing through which the heater is fitted.
Remove sufficient insulation from the boiler through the opening
to gain access to the heater in its metal pocket. Bend back the
retaining wire clip at the top of the pocket, and lift the heater from
the pocket at
the same
time withdrawing its leads from the
armoured
sleeve.
Check that the new heater is of the correct type, then fit it in the
metal boiler pocket, at the same time threading the three leads
through the
armoured
sleeve. (This operation will be assisted if the
ends of the leads are temporarily taped together).
Push the heater fully down in the pocket, then bend the retaining
wire clip over the top to prevent it rising in use.
Connect the leads to the terminal block as before, fix the
armoured
sleeve to the top of the control box with the retaining plate and
screw, and replace the control box cover.
Put back the boiler insulation, packing it around the tubes, refit the
cover. reconnect the refrigerator and test.
If gas connections have been disturbed, test for leaks as in item
9.
(b) Fuse
If there is no circuit when connected to 12 volts, check that the
fuse has not burnt out -see item 7
(c)
20.
TROUBLE
SHOOTING
If refrigerator does not freeze satisfactorily:-
(a)
(f)
(g)
(h)
(i)
(j)
(k)
(I)
(m)
Check that the refrigerator is level in both directions, and that
the proper clearances for air circulation over the cooling unit at
the back have been allowed -see item 3.
Thermostat incorrectly used . . . see item 12.
Evaporator heavily coated with frost . . . see item 15.
Air circulation around cooling unit restricted
.._
see item 3.
Flame has gone out:
i
Gas in bottle used up . . . fit new bottle.
ii Connection between thermocouple and flame failure device
body loose . . . tighten union
(1,
fig. 6) but do not overtighten.
iiiClogged thermostat by-pan screw . . . clean or exchange it.
Flue baffle not inserted into central tube of the cooling
unit
. . . see item 18
(a).
Wrong gas pressure at burner . . . have pressure checked.
Pressure at burner must not fall below 11 ins
w.g.
when thermo-
stat is set on ‘MAX’.
Burner assembly loose . . .
refit.
Jet orifice or burner gauze clogged . . see item 18 (d).
Faulty operation of the thermostat
._.
thermostat will have to be
exchanged for new one.
Electric operation . . . burnt out winding in heater, see item 19
(a).
12V operation . voltage drop due to defective battery. or wiring
from battery to refrigerator not heavy enough . . . see item 7
(b).
12V operation . . . burnt out fuse, see item 7
(c).
Odor from fumes:-
(n)
Flame touches side of the boiler due to displacement of
burner through loose screw or bent bracket . . . correct position
or fit new burner and bracket. Burner displacement may cause
smoke and sooting of the flue.
(o) Burner damaged or gauze choked.
(p)
Flame touches flue
baffle:-
i
Baffle too low in flue . . . see item 18 (a).
ii Gas pressure too high . . . see item 20 (g).
iii Jet orifice has been opened out . . . fit new jet of correct size
(size
4).
(q)
Dirty flue tube; clean flue,, burner and jet as described in item
18
(d).
All the above instructions are to be followed closely. This refrigerator is quality guaranteed, however, we are not responsible for any failures caused
by improper adjustments and unfavorable installation conditions. Contact service point or distributor service department for assistance if
required.

 Loading...