EasyManua.ls Logo

Emerson Fisher EWT User Manual

Emerson Fisher EWT
60 pages
To Next Page IconTo Next Page
To Previous Page IconTo Previous Page
Page #3 background image
Instruction Manual
D100399X012
EW Valve
July 2017
3
Figure 2. Cutaway Detail of the Fisher WhisperFlo Trim, Valve Body Typical
W6825‐1
Description
These single‐port globe‐style valves have cage guiding, clamped seat rings, and push‐down‐to‐close valve plug action.
Valve configurations are as follows:
EWD: Balanced valve plug with metal‐to‐metal seating for all general applications over a wide range of pressure drops
and temperatures.
C‐seal trim is available for EWD valves, CL300 and CL600, in sizes NPS 6x4x2‐1/2, 6x4, 8x4, 8x6, 12x6, 10x8, and 12x8.
With C‐seal trim, a balanced valve can achieve high‐temperature, Class V shutoff. Because the C‐seal plug seal is
formed from metal (N07718 nickel alloy) rather than an elastomer, a valve equipped with the C‐seal trim can be
applied in processes with a fluid temperature of up to 593_C (1100_F), provided other material limits are not
exceeded.
EWS: Unbalanced valve plug with metal‐to‐metal or optional metal‐to‐PTFE seating for all general applications
requiring better shutoff capabilities than can be obtained with the EWD valve.
EWT: Balanced valve plug with either metal‐to‐PTFE seating (standard for all except Cavitrol III cages) for stringent
shutoff requirements or metal‐to‐metal seating (standard for Cavitrol III cages, optional for all others) for higher
temperatures.
Control valves with WhisperFlo cages (figure 2) provide additional attenuation for aerodynamic noise in very
demanding vapor or gas applications with high‐pressure drops. A WhisperFlo cage with an appropriately sized valve
body is designed to reduce the noise level up to -40 dBA. For special applications, -50 dBA attenuation can be
achieved.
Specifications
Typical specifications for these valves are shown in table 1.
Question and Answer IconNeed help?

Do you have a question about the Emerson Fisher EWT and is the answer not in the manual?

Emerson Fisher EWT Specifications

General IconGeneral
BrandEmerson
ModelFisher EWT
CategoryControl Unit
LanguageEnglish

Summary

Introduction to Fisher EWD, EWS, and EWT Valves

Scope of Manual

Details installation, maintenance, and parts for Fisher NPS 4x2 through 12x8 EWD, EWS, and EWT valves.

Specifications for EW Valves

End Connection Styles

Describes flanged and buttwelding end connection styles for various valve sizes and pressure ratings.

Maximum Inlet Pressures, Temperatures, and Pressure Drops

Lists pressure/temperature ratings per ASME B16.34, not exceeding ordered conditions.

Shutoff Classifications

Details shutoff classes for C-seal and WhisperFlo trims, referencing tables.

Flow Characteristics

Outlines flow characteristics for standard, Cavitrol, and WhisperFlo cages.

Flow Directions

Specifies flow directions for EWS, EWD, and EWT valves with standard cages.

WhisperFlo Trim Material and Selection

Lists materials like 410 Stainless Steel for WhisperFlo trims.

WhisperFlo Pressure/Temperature Capability

Provides pressure/temperature range for WhisperFlo trims.

WhisperFlo Velocity Limits

Defines inherent outlet velocity limit for WhisperFlo trim.

Description of EW Valve Types

EWD Valve Description

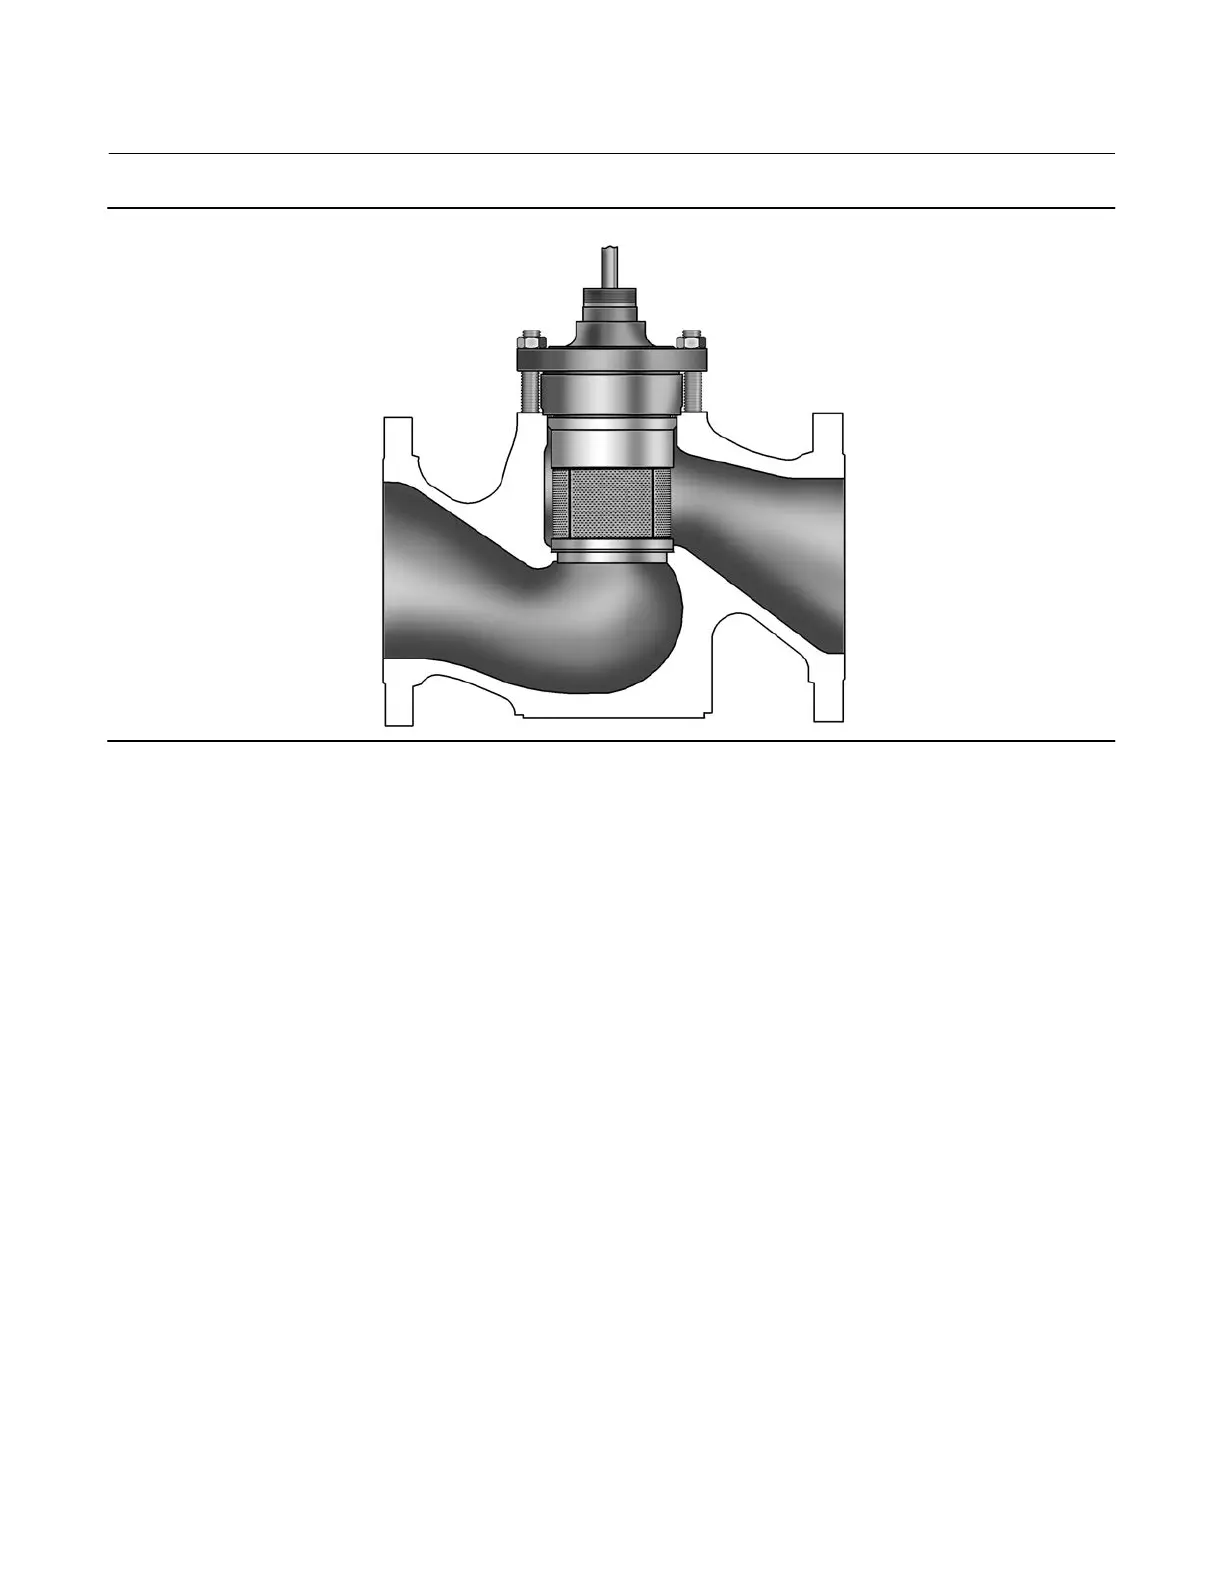
Describes EWD valves with metal-to-metal seating for general applications.

C-seal Trim for EWD Valves

Details C-seal trim for EWD valves, achieving high-temperature, Class V shutoff.

EWS Valve Description

Describes EWS valves with metal-to-metal or PTFE seating for better shutoff.

EWT Valve Description

Describes EWT valves with PTFE or metal-to-metal seating for shutoff or high temperatures.

Educational Services Information

Contact for Training Courses

Contact information for educational services and training courses for EW valves.

Installation Procedures and Safety

Safety Warnings for Installation

Safety warning about protective gear and conditions exceeding limits to prevent injury or damage.

Pre-installation Checks

Pre-installation check for damage or foreign material in the valve and pipelines.

Valve Assembly Orientation

Guidance on valve assembly orientation and potential wear issues.

Strainer Recommendation

Suggestion to use upstream strainers for valves with small flow passages like WhisperFlo.

Caution on Post-Weld Heat Treatment

Caution regarding post-weld heat treatment and its effect on valve parts.

Leak-off Bonnet Connections

Procedure for connecting leak-off piping or installing a bypass.

Handling Separately Shipped Components

Instruction to refer to actuator manual if shipped separately.

Inverted Globe Valve Applications

Safety Warning for Inverted Valves

Warning about potential component dropping during disassembly/assembly of inverted valves.

Disassembly Procedures for Inverted Valves

Step-by-step instructions for disassembling inverted valve assemblies.

Assembly Procedures for Inverted Valves

Step-by-step instructions for assembling inverted valve assemblies.

Maintenance Operations

Safety Warning for Maintenance

Warning about personal injury/property damage from sudden pressure release during maintenance.

Packing Lubrication Procedures

Caution on Graphite Packing Lubrication

Caution against lubricating graphite packing to avoid slip-stick movement.

Warning on High-Temperature/Oxygen Packing

Warning against lubricating packing in oxygen service or high temperatures to prevent fire/explosion.

Packing Arrangements

Single Arrangements

Illustrates PTFE V-ring packing arrangements for single configurations.

Double Arrangements

Illustrates PTFE V-ring packing arrangements for double configurations.

Packing Maintenance and Replacement

Referencing Packing Manuals

Refers to specific manuals for ENVIRO-SEAL and HIGH-SEAL packing instructions.

Adjusting Spring-Loaded Packing

Guidance on checking packing follower for sealing force.

Addressing Undesirable Packing Leakage

Steps to limit leakage and establish stem seal by tightening packing nuts.

Safety Warning Before Replacing Packing

Warning about personal injury/damage from sudden pressure release before maintenance.

Replacing Packing Step-by-Step

Warning on Bonnet Movement Control

Warning on uncontrolled bonnet movement when loosening.

Caution: Seating Surface Protection

Caution to avoid damage to seating surfaces when lifting bonnet.

Step 5: Removing Bonnet Hex Nuts

Step 5: removing hex nuts and bonnet.

Completing Packing Replacement

Step 6: Separating Plug and Stem

Step 6: removing locknut and separating plug/stem.

Step 7: Removing Bonnet Gasket

Step 7: removing bonnet gasket and covering opening.

Step 8: Removing Packing Components

Step 8: removing packing parts and cleaning.

Step 9: Inspecting Stem and Packing Box

Step 9: inspecting stem threads and packing box surfaces.

Step 10: Installing New Bonnet Gasket

Step 10: installing new bonnet gasket and assembling valve.

Final Steps in Packing Replacement

Note on Gasket Tightening Procedures

Proper performance of tightening procedures for gasket and bonnet seal.

Warning on Stud/Nut Materials

Warning about using unapproved stud/nut materials causing potential failure.

Step 11: Lubricating and Tightening Bolting

Step 11: lubricating and tightening bolting to specified torque.

Step 14: Tightening Packing Flange Nuts

Step 14: tightening packing flange nuts for various packing types.

Trim Maintenance Procedures

Safety Warning for Trim Maintenance

Warning about personal injury/damage from sudden pressure release before maintenance.

Trim Removal Procedures

Caution on Bellows Assembly Handling

Caution to avoid damaging bellows assembly parts.

Warning: Leakage During Trim Removal

Warning about personal injury/damage from valve or packing leakage.

Step 1: Removing Actuator and Bonnet

Step 1: removing actuator and bonnet.

Step 6: Removing Cage/Baffle Assembly

Step 6: removing cage/baffle assembly and gaskets.

Completing Trim Removal

Step 7: Removing Seat Rings and Adapters

Step 7: removing seat ring, adapter, disk seat etc.

Step 8: TSO Trim Removal Steps

Step 8: specific steps for TSO trim removal.

Step 9: Inspecting Trim Parts

Step 9: inspecting parts for wear or damage.

Lapping Metal Seats

Caution: Lapping ENVIRO-SEAL Bonnet

Caution against lapping metal seats on ENVIRO-SEAL bellows seal bonnet assembly.

Lapping Metal Seats Procedure

Procedure for Lapping Metal Seats

Procedure for lapping metal seats using a temporary handle.

Valve Plug Maintenance

Caution: Piston/Seal Ring Replacement

Caution when replacing piston or seal rings to avoid scratching.

Valve Plug Maintenance Details

Installing EWD Piston Rings

Instructions for installing EWD carbon-filled PTFE piston rings.

Installing EWT Seal Rings

Instructions for removing and installing EWT two-piece and spring-loaded seal rings.

Caution: Reusing Stems/Adaptors

Caution against reusing old stems or adaptors with new valve plugs.

Trim Replacement Procedures

Step 1: Installing Restricted-Trim Parts

Step 1: installing adaptor gasket and seat ring adaptor.

Step 4: Sliding Valve Plug into Cage

Step 4: sliding valve plug and stem assembly into cage.

Step 5: TSO Trim Replacement Steps

Step 5: trim replacement steps for TSO constructions.

C-seal Trim Replacement

Caution: Seating for C-seal Trim

Caution to avoid leakage by properly seating valve plug with sufficient force.

Note on Actuator Thrust for C-seal

Note on additional actuator thrust for C-seal trim.

Caution: C-seal Trim Assembly Sealing

Caution to protect sealing surfaces during C-seal trim assembly.

Step 3: Pressing C-seal Plug Seal

Step 3: pressing C-seal plug seal onto valve plug using tool.

Step 5: Securing C-seal Retainer

Step 5: staking threads to secure C-seal retainer.

Completing C-seal Trim Replacement

Step 8: Removing Actuator and Bonnet

Step 8: removing actuator and bonnet.

Caution: Valve Stem Removal

Caution against removing valve stem unless replacing it.

Step 11: Reassembling Valve Package

Step 11: installing new parts and reassembling valve.

Replacement of Installed C-seal Trim

Trim Removal (C-seal Constructions)

Instructions for removing C-seal trim parts from the valve.

Caution: C-seal Trim Maintenance Leakage

Caution to avoid leakage during maintenance of C-seal trim.

Detailed C-seal Trim Replacement Steps

Step 3: Drilling Staked Thread on Plug

Step 3: drilling out staked thread on valve plug.

Step 6: Rotating Retainer to Free Plug

Step 6: rotating retainer to free it from valve plug.

Step 7: Prying C-seal Plug Seal Off Plug

Step 7: prying C-seal plug seal off the plug.

Final Inspection and Lapping for C-seal

Step 8: Inspecting C-seal Seating Surfaces

Step 8: inspecting seating surfaces for wear or damage.

Lapping Metal Seats (C-seal Constructions)

Lapping Lower Seating Surface

Instruction to lap lower seating surface before installing new C-seal plug seal.

Remachining Metal Seats (C-seal Constructions)

Caution: Matching Metal Removal

Caution about matching metal removal for C-seal trim to avoid crushing.

Trim Replacement (C-seal Constructions)

Step 1: Lubricating C-seal Plug Seal

Step 1: lubricating C-seal plug seal and valve plug.

Step 2: Orienting C-seal Plug Seal

Step 2: orienting C-seal plug seal based on flow direction.

Note: C-seal Installation Tool

Note about using a C-seal installation tool.

Completing C-seal Trim Replacement

Step 5: Securing C-seal Retainer

Step 5: staking threads to secure C-seal retainer.

Caution: Seating for C-seal Trim

Caution to avoid leakage by properly seating valve plug with sufficient force.

ENVIRO-SEAL Bellows Seal Bonnet

Replacing Bonnet with ENVIRO-SEAL Assembly

Instructions for replacing bonnet with ENVIRO-SEAL assembly.

ENVIRO-SEAL Bonnet Installation Steps

Step 1: Removing Actuator and Bonnet

Step 1: removing actuator and bonnet.

Step 3: Removing Bonnet Gasket

Step 3: removing and discarding bonnet gasket.

Note: ENVIRO-SEAL Assembly Availability

Note about ENVIRO-SEAL stem/bellows assembly availability.

ENVIRO-SEAL Bonnet Assembly Details

Step 4: Inspecting Valve Plug and Adaptor

Step 4: inspecting existing valve plug for reuse.

Caution: Valve Stem Rotation

Caution against rotating valve stem when installing plug on ENVIRO-SEAL assembly.

Step 6: Attaching Valve Plug to Stem

Step 6: attaching valve plug to stem of new assembly.

Completing ENVIRO-SEAL Bonnet Installation

Step 7: Completing ENVIRO-SEAL Installation

Step 7: completing installation per ENVIRO-SEAL instructions.

Purging the ENVIRO-SEAL Bellows Seal Bonnet

Step 1: Removing Purging Plugs

Step 1: removing pipe plugs for purging.

Step 3: Installing Piping for Purging/Testing

Step 3: installing piping for purging or leak testing.

Bonnet Bolt Tightening and Packing Installation

Warning: Unapproved Stud/Nut Materials

Warning about using unapproved stud/nut materials causing potential failure.

Step 12: Tightening Bonnet Stud Bolts

Step 12: lubricating and tightening bonnet stud bolts.

Step 14: Installing Packing Flange

Step 14: installing packing flange.

Replacement of an Installed ENVIRO-SEAL Bellows Seal Bonnet

Step 1: Removing Actuator and Bonnet

Step 1: removing actuator and bonnet.

Step 2: Lifting Cage and Removing Gaskets

Step 2: lifting cage and removing gaskets.

Caution: Reusing Plug/Adaptor

Caution regarding ENVIRO-SEAL stem/bellows assembly reuse of plug/adaptor.

Step 4: Replacing Plug/Adaptor Assembly

Step 4: removing and replacing plug/adaptor assembly.

Parts Ordering Information

Warning: Use Genuine Replacement Parts

Warning to use only genuine Fisher replacement parts to avoid warranty voidance or damage.

Available Parts Kits

Gasket Kits

Lists gasket kits by valve size, trim type, and part number.

Standard Packing Repair Kits

Lists standard packing repair kits by stem diameter and yoke boss diameter.

Packing Retrofit and Repair Kits

Packing Retrofit Kits

Lists retrofit kits for HIGH-SEAL and ENVIRO-SEAL packing conversions.

ENVIRO-SEAL Packing Repair Kits

Lists repair kits for ENVIRO-SEAL packing arrangements.

Parts List - General

Note on Part Numbers

Note about part numbers and contacting sales for unlisted parts.

Bonnet Parts List

Lists bonnet parts with keys, descriptions, and part numbers.

Valve Body Parts List

Note on Valve Body Part Numbers

Note on part numbers for standard valves and Whisper Trim I cages.

Fisher EWD Valve Plug Part Numbers

Fisher EWS Valve Plug Part Numbers

EWT Valve Plug Part Numbers (Two-Piece Seal Ring)

EWT Valve Plug Part Numbers (Spring-Loaded Seal Ring)

C-seal Parts List for Fisher EWD Valve

C-seal Parts List for Fisher EWD Valve (Continued)

C-seal Parts List for Fisher EWD Valve (Continued)

TSO Parts List for Fisher EWT Valve

Cage Part Numbers (Except Whisper Trim III/Cavitrol III)

Actuator Groups by Type Number

Group 1 Actuator Details

Actuator group details based on yoke boss size.

Group 100 Actuator Details

Actuator group details based on yoke boss size.

Group 101 Actuator Details

Actuator group details based on yoke boss size.

Group 403 Actuator Details

Actuator group details based on yoke boss size.

Valve Stem Part Numbers

Valve Stem Part Numbers (Continued)

Metal-Seat Seat Ring Part Numbers

Gasket Descriptions and Materials

Gaskets and Shims Part Numbers

Related product manuals