24
Troubleshooting
Servicing Check
Operations concerning the integral slam-shut version are
in italic.
• 2 times per year
• Set point verication
• Regulator valve plug tightness
• Tripping and setpoint value
• Slam-shut valve tightness
• Inlet valve à Open
• Outlet valve à Open
• Slam-shut valve plug à Open
• Regulator à In operation
Inlet and outlet side of the regulator are under pressure.
for versions with integral slam shut)
• Inlet valve à Closed
• Outlet valve à Closed
• Regulator Observe the evolution of the
outlet pressure
Control regulator tightness
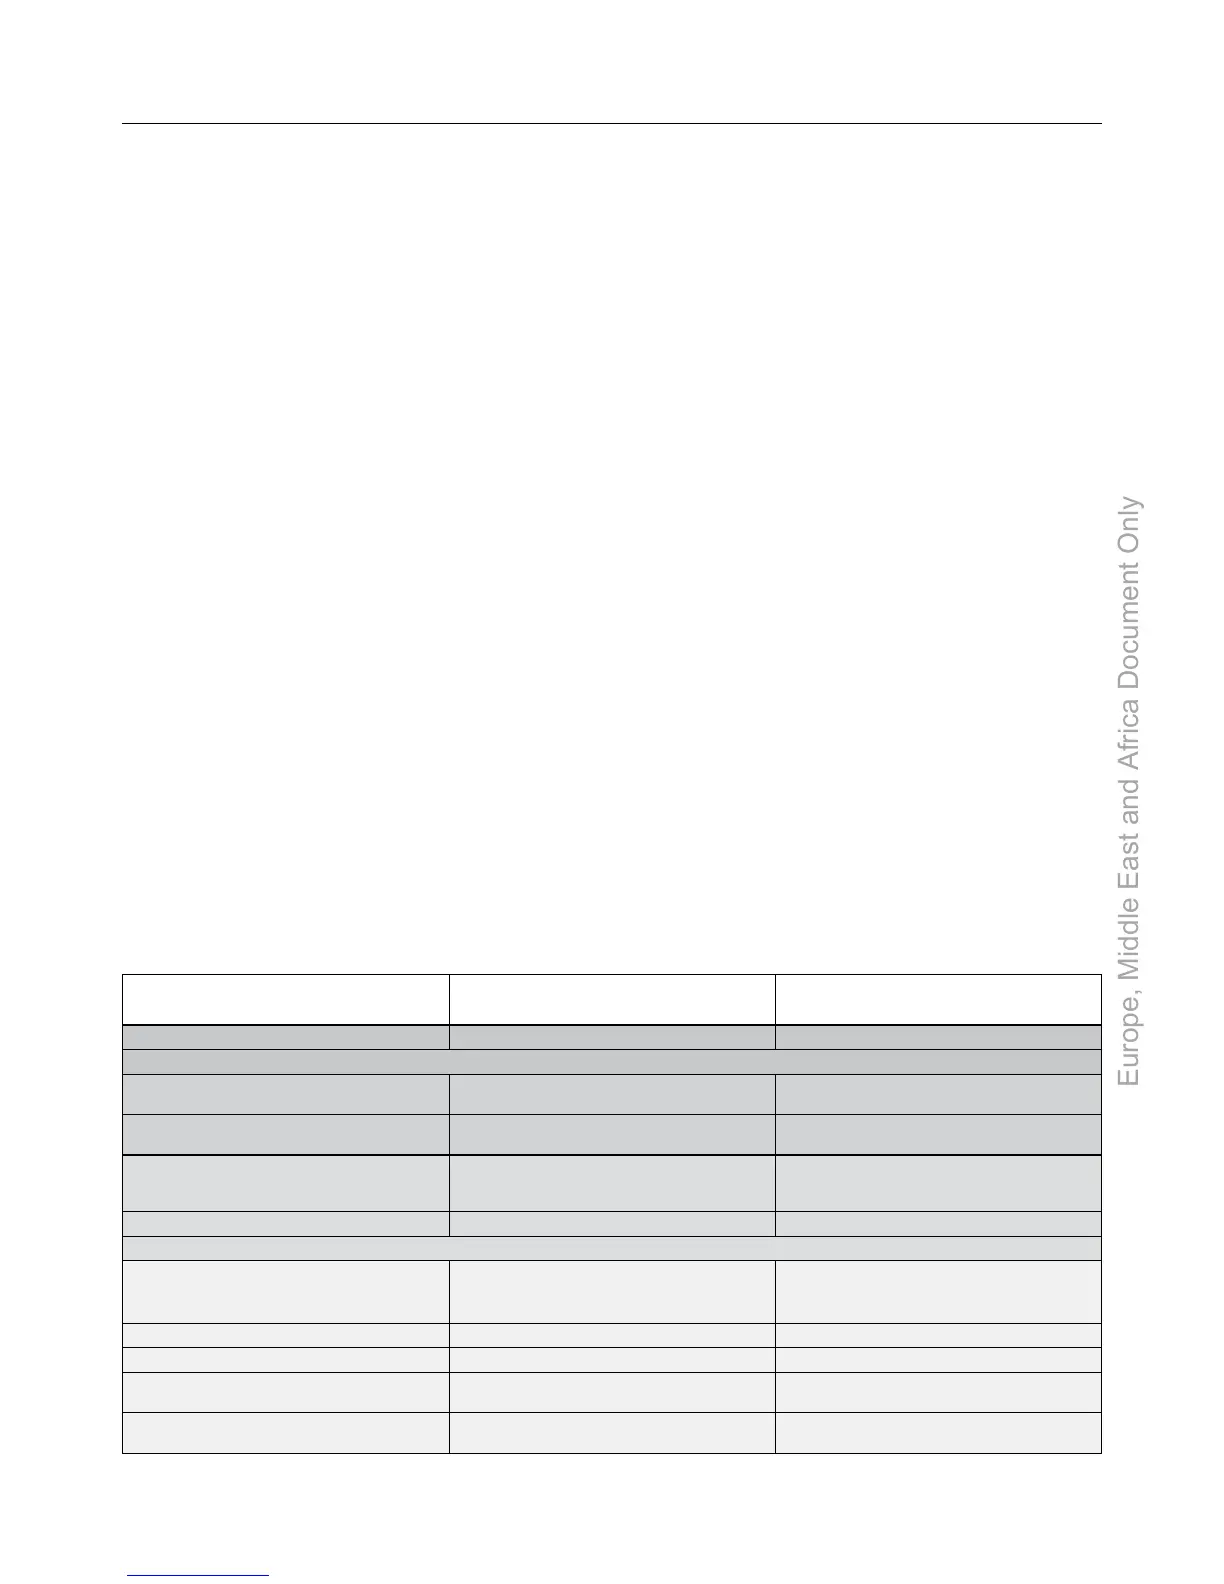
SYMPTOM CAUSE ACTION
If outlet pressure is stable
Observe the evolution of the inlet pressure
If inlet pressure decreases External leak
Locate and repair leak
or contact after-sales
If inlet pressure is stable The regulator is tightshut
Increase the set point until tripping occurs
(without exceeding the outlet limits)
If the slam-shut valve plug will not close Operation faulty
Control the release relay
Control the slam-shut valve plug
or contact after-sales
If the slam-shut valve plug closes Operation correct Bleed off outlet side
Close the vent and observe the evolution of the outlet pressure
If the outlet pressure increases Valve plug internal leak
Control the release relay
Control the valve plug and slam-shut orice
or contact after-sales
If the outlet pressure is stable The valve plug is tightshut
If the outlet pressure increases Internal leak Close pilot feed
If the outlet pressure stabilises Pilot leak
Control the pilot valve plug
or contact after-sales
If the outlet pressure increases Regulator internal leak
Control valve plug and orice
or contact after-sales
Table 9. Troubleshooting for Types EZH and EZHSO Regulators
A108
screw unit (key 17) for erosion, scratches, spurs or
other damage and replace if necessary.
6. Unscrew and remove the regulator seat (key 5).
Inspect the O-ring (key 6) for damage or wear and
replace if necessary. Lightly lubricate the O-ring and
place it on the regulator seat.
7. Pull pad holder unit (key 15) out of the body (key 7).
Inspect the seat for damage, replace if necessary.
8. Set the lter net (key 8) on the spring (key 14) and
insert the regulator seat (key 5). Tighten the regulator
seat until it stops.
9. Lightly lubricate the outer and inner rims of the
diaphragm (key 18). Place the diaphragm assembly
on top of the regulator seat (key 5). The screw unit
(key 17) will slide into the regulator seat (key 5). Take
care to avoid damage to parts when reassembling.
10. Set the spring (key 1, version Type EZH spring
diameter 3, on top of the nut (key 21).
11. Align the regulator cover (key 19) over the body
(key 7), with the sense port (V) opposite the pilot
supply port (R).
12. Place the lter pad (key 12) and nets (key 8), one on
each side of the lter pad, on the lter cover (key 11).
13. Pick up the body (key 7) and place it on the lter
cover (key 11), with the inlet port (M) aligned vertically
with the sense port (V).
14. Insert bolts (key 2). Place washers (key 9) and nuts
(key 10) on the end of the bolts. Tighten the nuts.

 Loading...


