Sides……………2″ (50mm)
Top………………..2″ (50mm)
Back………………2″ (50mm)
Do not over fill your beverage and wine center for proper cooling.
Note: If your beverage and wine center has been tilted for any reason, wait 24 hours before plugging it in.
Drip Tray
WARNING: ELECTRICAL REQUIREMENT – SHOCK HAZARD
Electrical Requirement
Make sure there is a suitable power outlet (115 volts, 15 amps outlet) with proper grounding to power the
beverage and wine center.
Avoid the use of three prong adapters or cutting off the third grounding prong in order to accommodate a two
prong outlet. This is a dangerous practice since it provides no effective grounding for the beverage and wine
center and may result in shock hazard.
Installation Limitations
Do not install your beverage and wine center in any location not properly insulated or heated (e.g., garage etc.).
Your beverage and wine center was not designed to operate in ambient temperature settings below 55˚
Fahrenheit.
Select a suitable location for the beverage and wine center on a hard even surface away from direct sunlight or
heat source (e.g., radiators, baseboard heaters, cooking appliances, etc.). Any floor unevenness should be
corrected with the leveling legs located on the front and rear bottom corners of the beverage and wine center.
Your beverage and wine center is designed for freestanding installation only. It is not designed for built-in
application.
Note: This unit is for indoor use only.
Use of Extension Cord
Avoid the use of an extension cord because of potential safety hazards under certain conditions. If it is
necessary to use an extension cord, use only a 3-wire extension cord that has a 3-blade grounding plug and a
3-slot outlet that will accept the plug. The marked rating of the extension cord must be equal to or greater than
the electrical rating of the appliance.
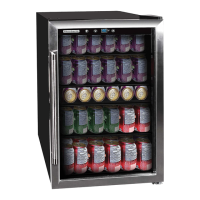
Using Your Beverage Center
Startup
Connect the power cord to a standard wall outlet. Do not use a GEO outlet to connect the unit (see page 4). After
connection, you will immediately hear a short beep.
Temperature – Adjustable Thermostat Control
The default temperature is 43°F. Use the and buttons to set the desired temperature between the range of
40°F – 61°F.
The display will flash while the temperature is being set. After a few seconds, it will revert to its current internal
temperature reading The digital display readine:7ill adjust as the unit cools. While the unit is adjusting to the new
setting, press the or buttons to view the selected temperature setting.
If there is a power outage. the unit will revert to the last temperature setting once power is restored.
Loading Beverages
When first loading the beverage center to full capacity, we recommend the following steps to effectively cool a large
number of beverages.
1. Use the Adjustable Thermostat Control to set the temperature to 43°F (also the default temperature).
2. Allow the beverage center to cool for a minimum of two hours.
3. Load the beverages. To achieve maximum capacity, refer to the loading diagrams.
4. After initially filling with beverages, the internal temperature will rise as indicated on the display.
5. Once the beverage center has cooled the beverages to 43°F, use the Adjustable Thermostat Control to select a
 Loading...