P
P
G
G
-
-
6
6
0
0
0
0
0
0
T
T
h
h
r
r
e
e
a
a
d
d
D
D
i
i
a
a
m
m
e
e
t
t
e
e
r
r
G
G
a
a
g
g
e
e
O
O
p
p
e
e
r
r
a
a
t
t
i
i
o
o
n
n
M
M
a
a
n
n
u
u
a
a
l
l
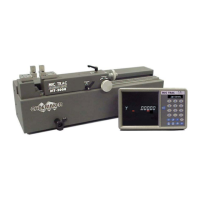
Setup Procedures
The accuracy and repeatability of your PG-6000 gage depends on the correct attachment and
set up of the components. Each of the procedures on the following pages will help you to set
up your PG-6000 gage properly.
Setting Up the PG-6000 Gage
Materials Needed:
•
• 1/8” hex wrench (supplied with gage)
• Thread rolls (proper pitch)
• Cloth
• Thread Disk for Windows software
Setting up the PG-6000 gage, involves determining the thread roll type for your application and installing
them on the gage. Entering some minimal thread information into the Thread Disk for Windows program
will provide you with the proper type thread rolls, gage setting dimensions, and the gauging tolerances
for your application.
1. Start the Thread Disk for Windows program.
2. Select the Thread Type and Thread Class.
3. Type the Nominal Diameter and Threads per
Inch.
4. Select the Number of Thread Starts.
5. Click the Calculate button.
6. Click the Gagemaker tab.
7. Based on the Roll # displayed on the
Gagemaker screen, select the proper thread
roll.
8. Print the Gagemaker screen for future
reference in determining gage settings and
product tolerances.

 Loading...