Dishwasher Installation
PUSH DISHWASHER
INTO
FINAL POSITION (CONT.)
•
Open and close the dishwasher door to be sure it
operates smoothly, and does not rub on the adjacent
cabinet.
Tip: Prevent unnecessary service charges for
panel damage or wash performance.
Check dishwasher alignment prior to opening
dishwasher door to prevent panel damage.
Make sure utility lines are not trapped or crushed behind
dishwasher. Crushed lines will restrict water flow.
LEVEL DISHWASHER
(CONT.)
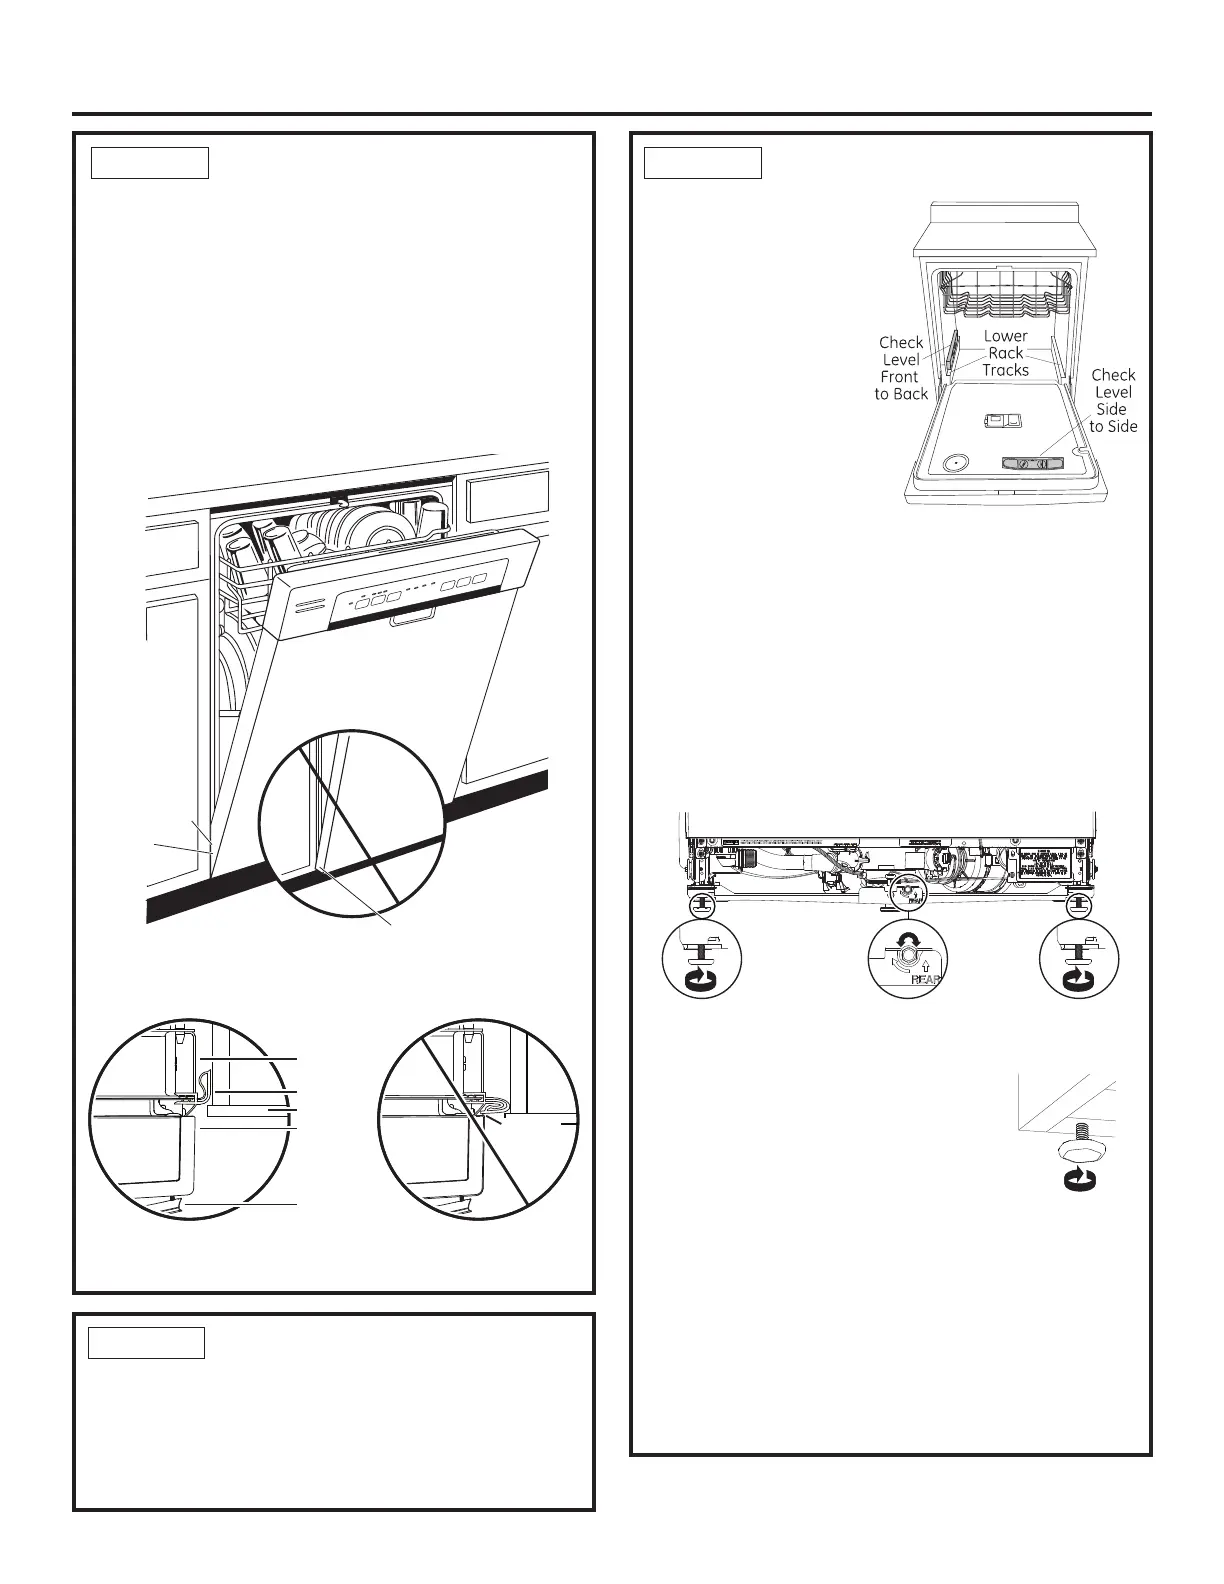
•
Remove the lower dish
rack and place a level on
the door and lower rack
track as shown in figure.
If your model has a rear leveling system, the rear height
is adjusted from the front of the dishwasher along with the
2 front legs on the bottom of the dishwasher. Begin the
leveling process with the front legs by individually turning the
front 2 legs. Adjust the front legs first. When the front legs
are adjusted to a height resulting in an appropriate gap to
the upper cabinet, proceed to adjust the rear leveling system
by adjusting the leveling bolt as illustrated in the figure.
Turn the bolt to adjust the rear leveling system. Slowly rotate
the bolt clockwise to raise the back of the dishwasher, and
counterclockwise to lower it. Continue to adjust the feet until
the dishwasher is level as illustrated in the figure. Ensure all 3
legs are firmly in contact with the floor.
If your model has 4 leveling feet, adjust the
level of the dishwasher by individually turning
the 4 legs on the bottom of the dishwasher
as shown in figure.
•
The dishwasher is properly leveled when the level indicator is
centered left to right and front to back. Also, the dishwasher
door should close without hitting the side of the tub.
• Replace the lower rack.
Tip: Prevent unnecessary service charges. Verify
dishwasher is leveled.
Pull the dish racks half way out. They should stay put. Open
and close the door. The door should fit in the tub opening
without hitting the side of the tub. If the racks roll on their
own, or the door hits the side of tub, re-level the dishwasher.
10
STEP 13 STEP 14
LEVEL DISHWASHER
IMPORTANT – Dishwasher must be level for proper dish
rack operation, wash performance and door operation. The
dishwasher must be leveled left to right and front to back.
This ensures the dish racks will not roll in or out on their own,
circulation water will flow to the pump inlet, and the door will
close without hitting the side of the tub.
STEP 14
Figure U
Door Catches
on Cabinet Frame
Correct
Alignment
Incorrect Alignment
will result in door damage
Door
Fits and
Swings
Back
Behind
Cabinet
Frame
Check that tub trim does not
contact the door at all points
Tub trim may be trimmed if
necessary to ensure proper
door operation
Top
View
Handle
Door
Tub trim
Tub frame
Do not allow tub trim to get
trapped by or come into
contact with the door
Top
View
Tub trim
trapped
by door!
Cabinet
B
Turn front
leg to adjust
front height
Turn leveling system
bolt to adjust rear height
Turn front
leg to adjust
front height
 Loading...