Installation Instructions
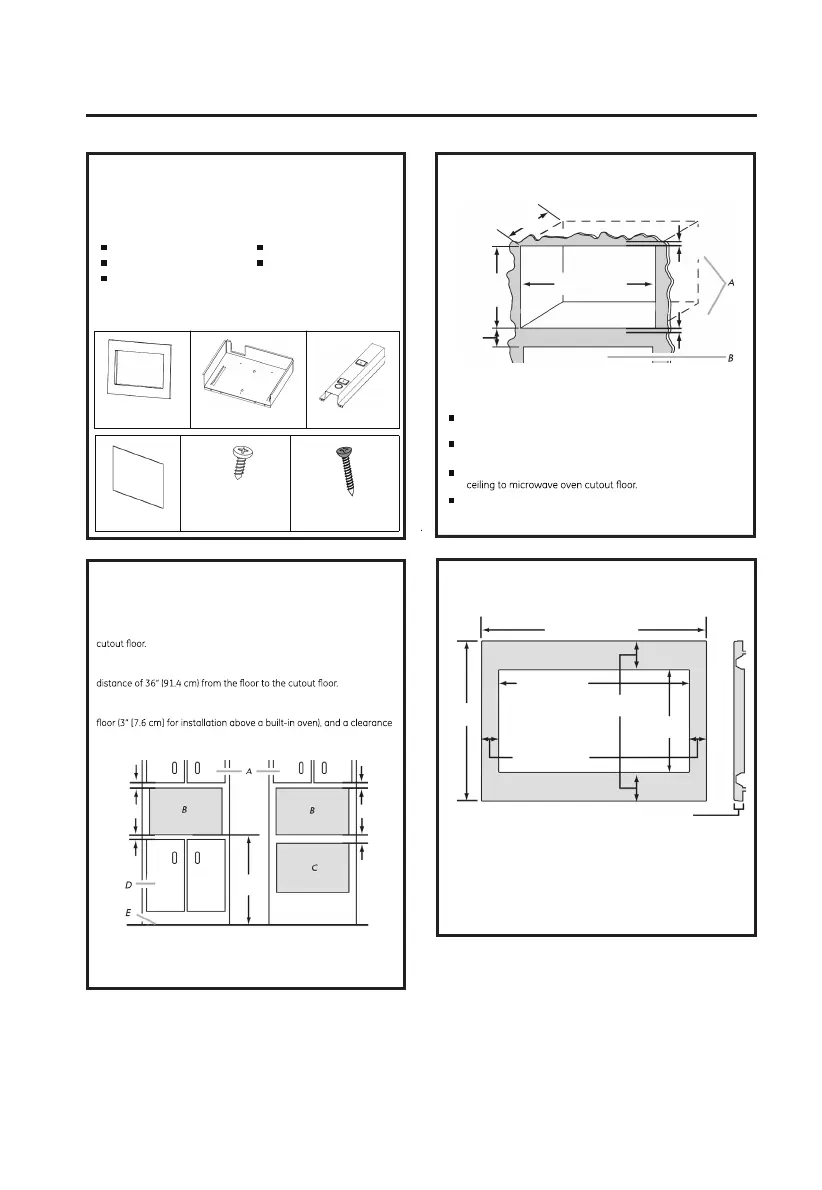
Tools and Parts
Tools Needed
Gather the required tools and parts before starting installation.
Read and follow the instructions provided with any tools listed
here.
Measuring tape
Pencil
Phillips screwdriver
Parts Supplied (not shown to scale)
The insulating strip
Drill
7/64” drill bit
Bottom duct
Short screws (14)
(11 + 3 extra)
Rails (2)
Long wood screws
(6 - painted) (4 + 2 extra)
Location Requirements
The microwave oven may be installed over a built-in oven. If installing
over a built-in oven, make sure there is a minimum of 3” (7.6 cm)
between the top of the lower oven cutout and the microwave oven
The microwave oven may also be installed in a cabinet by itself (without
a built-in oven below). For best usability, we recommend a minimum
Make sure the surrounding cabinetry has clearance to open and close
freely. Allow a clearance of at least 1 9/16 “ (4. 0cm) below the cutout
of at least 2” (5.1 cm) above the cutout opening.
EN-2
Required Cutout Dimensions
NOTES:
Height dimension is critical: 17” (43.2 cm) minimum, 17
1/8”
(43.5 cm) maximum.
Width and depth measurements have ±1/16” (2 mm)
tolerance.
3” (7.6 cm) minimum dimension is from lower oven cutout
Trim kit frame extends 1
1/16
“ (2.7cm) above and below the
cutout opening.
Trim Kit Frame Dimensions
* 27“ (68.6 cm) trim kit
** 30“ (76.2 cm) trim kit
Trim kit frame
2”
(5.1 cm)
1
9/16“
(4.0 cm)
36”
(91.4 cm)
2”
(5.1 cm)
A. Upper cabinet
B. Microwave oven cutout
C. Lower oven cutout
D. Lower cabinets
E. Floor
3”
(7.6 cm)
17” (43.2 cm)
min.
22
3/4
”
(57.8 cm)
3”
(7.6 cm)
A. Trim kit frame overhang
B. Cutout for lower oven
1
1/16”
(2.7 cm)
1
1/16
”
(2.7 cm)
17
1/8” (43.5 cm)
max.
19 1/11
“
(48.5 cm)
26
7/8
” (68.2cm) *
29
3/4
” (75.6cm) **
26” (66.1 cm)
2/5” (1.05 cm)*
17/8 (4.75 cm)**
2 3/5 “
(7.25 cm)
13
2/5“
(34.0 cm)
1
3/16”
(3.0 cm)
26
11/32
” (66.8 cm)
 Loading...