EN - 21
3. Operate engine for 1 minute and recheck
oil levels.
4. Add hydraulic oil, if needed. See Add
Hydraulic Oil on page 21.
Add Hydraulic Oil
1. Place the unit in service position and
open the rear access panel. See Service
Position on page 19.
2. Remove hydraulic oil expansion tank
caps.
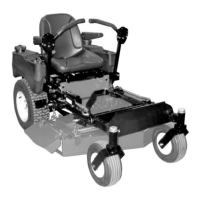
3. Fill the expansion tank with 15W-50
synthetic motor oil (Gravely p/n
00057100) or equivalent until oil reaches
the cold fill indicator mark. See Figure 18.
4. Reinstall the expansion tank cap.
Change Hydraulic Oil and Filter
1. Operate unit for a few minutes to warm
hydraulic oil.
2. Stop engine, remove key and wait for all
moving parts to stop and for hot parts to
cool.
3. Lift and properly support rear of unit and
remove wheel.
4. Position container under oil filter to catch
used oil.
See Figure 19.
5. Remove filter guard and oil filter from
transaxle.
6. Remove the drain plug from the fill port
and allow transaxle to drain completely.
7. Wipe filter mounting surface clean.
8. Lubricate rubber gasket on new oil filter
with clean hydraulic oil.
9. Spin filter onto filter housing until it makes
contact, and then turn filter 3/4 turn to
tighten.
10. Reinstall filter guard and torque to 0.61
N•m (5.4 lb-in). DO NOT overtighten.
11. Loosen, but do not remove the purge
plug.
NOTICE: Loosening the purge plug when
adding hydraulic fluid helps air escape and
aids in the purging process.
12. Add 15W-50 synthetic motor oil (Gravely
p/n 00057100) or equivalent until oil
appears at the bottom of the drain plug
(about 1.9L (2 Qt) per transaxle).
13. Reinstall the drain plug and torque to 20.3
N•m (15 lb-ft).
14. Repeat steps 1 – steps 13 for the other
transaxle.
15. Purge hydraulic system. See Purge
Hydraulic System on page 21.
Purge Hydraulic System
Purge air from hydraulic system after draining
oil or changing the filter.
1. Park unit facing a wall or chock wheels.
2. Release parking brake.
Figure 18
1. Cold Fill Indicator Mark
1
WARNING: AVOID INJURY.
This adjustment requires
operating the engine. Use
extreme care to avoid contact
with moving parts and hot
surfaces. Be sure rear of unit is
well supported and secure
before starting engine.
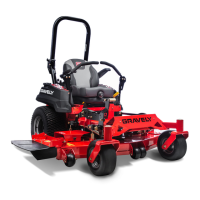
Figure 19
3
2
1
4
1. Purge Plug
2. Oil Filter
3. Filter Guard
4. Mounting Hardware
 Loading...