PH Calibration Sequence
The pH Calibration applies to Anderson pH electrodes or pH electrodes using the Anderson P/N 11552 pH Converter Module
connected to a pH digital input. Electrodes assigned to an analog input (4-20ma) may or may not require calibration to this
monitor. See instructions below right.
Read the separate Instructions for the P/N 06916 pH Electrode Calibration Kit. before advancing to the pH calibration sequence.
You must have prepared solutions and have access to the electrode to calibrate.
NOTE: Some sections of the kit instructions apply specifically to the P-1 pH monitor and will not apply here. Ignore those specific
instructions and follow the procedure below.
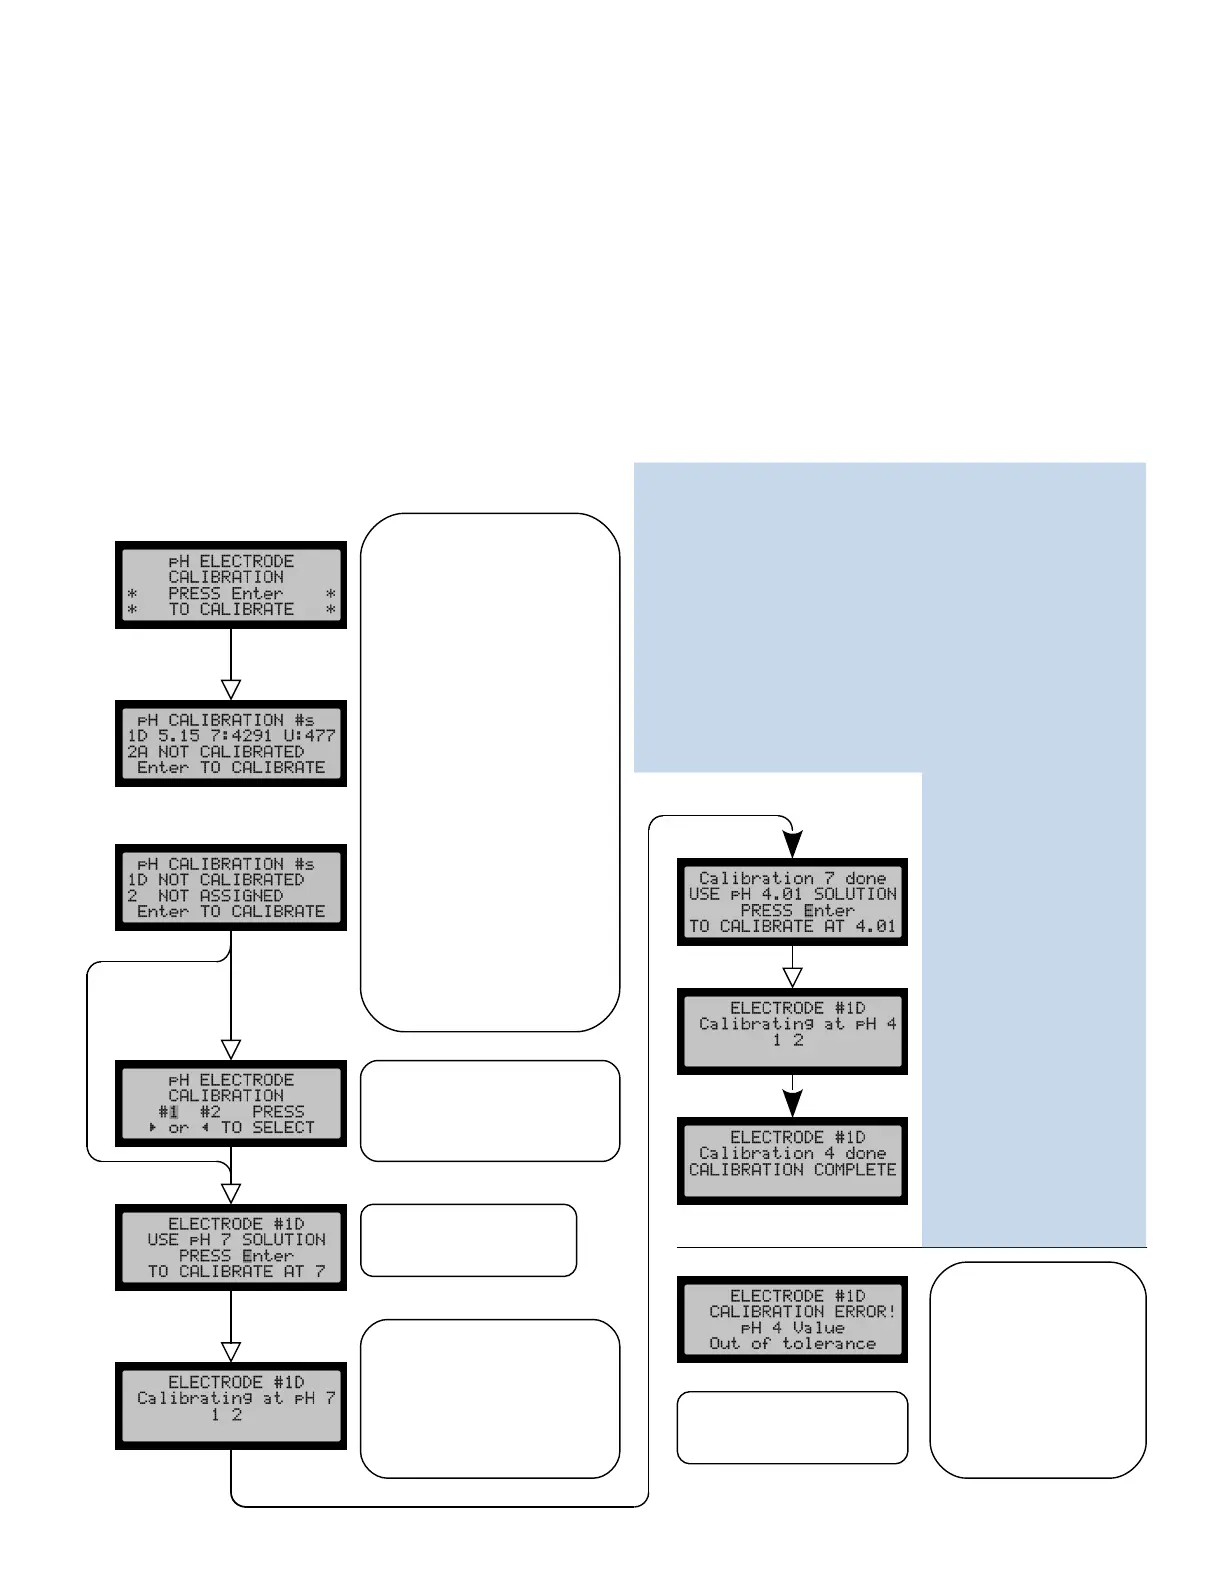
Once you start through the calibration sequence for an electrode the Enter key to proceed through the sequence. You may abort
the sequence at any point before completion and no new calibration numbers will be recorded.
The sequence must be repeated for each of two possible electrode hook-ups.
The monitor will perform all its functions with either one, or two electrodes. If two electrodes are attached the pH display will
display “Avg.” to the right of the reading. If only one calibrated electrode is attached, the display will show either “#1” or “#2”.
The calibration process will go
through several measurement
iterations to determine if the
readings have stabilized.
The left number (line 3) is the
iteration #, and the right # is
second tics per iteration.
If an electrode has previously
been calibrated the display
will show two calibration
numbers designated 7: and
U:. They are determined by
the calibration routine. The
numbers are likely different
for each electrode and and
will change with each re-
calibration as an electrode
ages. You may be asked for
these numbers when
contacting customer service.
If an electrode has not been
calibrated it will be shown as
such. A pH input which has a
defective , or no electrode
attached will show as not
calibrated on this screen
An input which has not been
assigned to a digital or analog
input will be shown as such.
Unassigned inputs cannot be
calibrated..
Press Enter to advance to
the next step.
OR
Other error displays you
may encounter will be self
explanatory.
Place the electrode in the
pH 7 solution and Press
Enter to continue..
Enter
Error displays
Select the electrode to calibrate
and press Enter to advance to
the next step. (Displayed only if
both pH inputs are assigned)
A calibration error at pH
7 or 4 indicates the
electrode is too old or
has otherwise failed and
will not calibrate. The
calibration will abort, but
the monitor will continue
operation with the
previous calibration
numbers.
Page 2
Enter
Enter
Enter
Example 2
Example 1
Clearing the Analog
Calibration Settings:
With power ON to the unit,
open up the door to the
enclosure.
Locate the small reset
push-button on the
processor board.
With the door open, on the
front panel press and hold
the '7' Key (for Input #1) or
the '9' key (for Input #2),
and while holding the key,
press the reset button to
restart the processor. This
will clear the settings and it
will revert to the default
settings. A message
showing the values have
been cleared will display
for 5 seconds.
NOTE: This procedure
may be easier with two
prople.
Using a Calibrated 4-20ma Analog Input
If you are using this monitor with a separately calibrated pH
transmitter with 4ma = pH 0 and 20ma = pH 14 you do not need to
calibrate the analog input on the EP-2 monitor. Instead you should
use the default (uncalibrated) settings for that input.
If the EP-1 input has already been calibrated, the settings must be
cleared before re-calibrating See below.
Using an Uncalibrated, Blind Transmitter, or a
Transmitter Calibrated to a Different pH Range.
In these cases you may also calibrate an analog input just as you
would a digital input. (using pH 7 and pH 4 solutions)
Note: Any adjustment you make to the pH transmitter will affect the
readings on the monitor. You should re-calibrate the monitor to the
transmitter after any adjustments.
 Loading...