EasyManua.ls Logo

Hamax OUTBACK User Manual

Hamax OUTBACK
71 pages
To Next Page IconTo Next Page
To Previous Page IconTo Previous Page
Page #12 background image
p. 12
Verify that the folding mechanism is locked on both sides by trying to push it back down.
Lock the push bar with the release handle.
[7] Folding the trailer
Ensure that the push bar is unlocked.
Push the folding lock buon [7a] in and than pull the straps towards you [7b] until the auto-lock is disengaged on both sides.
Guide the trailer down into its folded position.
[8] Installing the quick release wheels
Ensure that the parking brake is not engaged [2m].
Make sure that you remove the cap that is protecting the wheel axle [8a]. Press the push buon [8b] and insert the wheel axle
into the socket. Verify that the wheel is securely fastened by pulling the wheel.
[9] Mounting the safety flag
Place the flag pole [9a] into the socket [9b] on the side of the bicycle trailer that is most exposed to the road.
USE
[10] Aach the accessory [1c] [1f] at the safe connection point
Make sure the slider [10b] is upwards. Slide the accessory [10c] into the opening at the front until it locks into place.
Move the slider downwards until it snaps into place. The green color indicates that the connection point is locked. Verify that
the slider is locked by pulling it upwards.
[11] Remove the accessory [1c] [1f] from the safe connection point
Push the grey buon and move the slider upwards until it snaps in place.
Push and hold the buon on the accessory down. Pull the accessory out of the Safe Connection Point.
TIP: You can use the handle [10a] in the connection point when changing your accessories.
[12] Aaching the bicycle arm to the bicycle
Securely aach draw bar & safety strap prior to use. Ensure that the trailer is unloaded when aaching & disconnecting it to/
from your bicycle.
Slide the bicycle arm onto the hitch [12a]. Insert the retaining pin [12b] through the hole in bicycle arm and close it. Verify that
the bicycle arm is securely fixed by pulling the bicycle arm. Wrap safety strap around bike frame and fasten hook to D-ring
[12c].
Make sure that you put the safety strap around the chain stay [12d] or seat stay [12e] of your bicycle frame.
TIP: When you are not using the bicycle arm you can store it in the trailer.
TIP: When the safety strap is too long you can wrap it twice around the frame to ensure that the strap does not interfere with
any moving part of the rear wheel.
[13] Adjusting the push bar
Turn the push bar release handle [2k] upwards to unlock the push bar [2a].
Rotate the push bar to the desired position.
Turn the push bar release handle downwards until you feel it locks into its end position and secures the push bar. Verify that the
push bar is locked by gently pushing the push bar down.
[14] Using the parking brake
To engage: Push the parking brake pedal down. The trailer can move slightly back and forth due to the movement in the
adjustable suspension.
To disengage: Pull the parking brake pedal until it releases. Push or pull the trailer slightly to make sure the brake is disengaged
at the wheels.
[15] Front covers and shades
The Outback bicycle trailer has a plastic front cover [15c], a mesh front cover [15d] and an additional sun shade [15b]. To open
and close the front covers, use the zippers along the sides. To fix the sunshade use the Velcro. The front covers can be stored
into the front cover pocket [15a] when not in use.
The top window of the exterior also has an optional sunshade. [15e]
TIP: For heavy rain Hamax supplies a full rain cover.
[16] 5-point safety harness
Seat your child and guide the arms through the opening between the shoulder [16a] and waist belt [16c]. Check that the
shoulder straps are aligned with your child’s shoulders. Adjust the height by sliding the buckles [16e] behind the headrest up or
down.
Question and Answer IconNeed help?

Do you have a question about the Hamax OUTBACK and is the answer not in the manual?
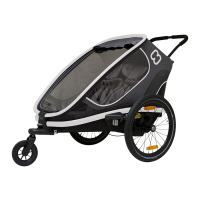
Hamax OUTBACK Specifications

General IconGeneral
MaterialAluminum
Product colorBlack, Grey
Number of seats2 seat(s)
Number of wheels3 wheel(s)
Belt fastening type5-point
Bicycle trailer typeChild
Quick release wheelsYes
Wheel size (imperial)20 \
Maximum weight capacity40 kg
Recommended genderAny gender
Number of pieces1 pc(s)

Summary

Specifications

Towing Speed

Specifies recommended and maximum towing speeds for the bicycle trailer.

Drawbar Load

Details the minimum and maximum drawbar load requirements for safe operation.

Physical Requirements

Outlines minimum age and maximum child height for using the trailer.

Weight Capacity (Outback)

Specifies the maximum load and child weight capacity for the Outback model.

Seating Positions (Outback)

Indicates the number of children the Outback model can accommodate.

Weight Capacity (Outback One)

Specifies the maximum load and child weight capacity for the Outback One model.

Seating Positions (Outback One)

Indicates the number of children the Outback One model can accommodate.

Safety Guidelines

Fall Hazard Warning

Warns about tip-over hazards and the need for a separate jogging wheel for running.

Child Suitability Requirements

Details age and sitting ability requirements for children using the trailer.

General Safety Precautions

Crucial safety measures: restraints, helmets, avoiding moving parts.

Operational Safety

Trailer stability, braking, lighting, tire pressure, and cleaning instructions.

Intended Use and Limitations

Clarifies intended use and warns against unintended use.

Getting Started - Installation

Bicycle Safety Check

Ensures bicycle suitability and brake function before attaching the trailer.

Riding Behavior Guidance

Explains how trailer weight affects bicycle handling, braking, and cornering.

High Visibility Features

Details reflective elements and the use of a safety flag for increased visibility.

Intended Use Definition

Specifies intended use on public roads and lists examples of unintended use.

Packaging Content and Tools

Lists package contents and required tools for assembly.

Product Overview

Identifies key components of the trailer.

Installing the Hitch

Attaching the trailer hitch to the bicycle's rear wheel axle.

Installing Wheel Guards

Guides on correctly attaching the wheel guards to the trailer.

Setting Adjustable Suspension

Adjusting suspension for a comfortable ride based on child's weight.

Unfolding the Trailer

Steps to unfold the trailer from its stored position.

Folding the Trailer

Instructions for safely folding the trailer for storage or transport.

Installing Quick Release Wheels

Step-by-step guide to attach and secure quick-release wheels.

Mounting the Safety Flag

Instructions for attaching the safety flag for increased visibility.

Use

Attaching Accessories

How to connect accessories like the bicycle arm or stroller wheel to the trailer.

Removing Accessories

Procedure for detaching accessories from the trailer's safe connection point.

Attaching Bicycle Arm

Detailed steps for connecting the trailer's bicycle arm to the hitch on the bike.

Adjusting the Push Bar

Guide on how to adjust the push bar height for comfortable handling.

Using the Parking Brake

Instructions on how to engage and disengage the trailer's parking brake.

Front Covers and Shades

Information on using and storing the different front covers and sunshades.

5-Point Safety Harness

Detailed instructions for properly securing a child in the 5-point safety harness.

Mounting LED Lights

Instructions for attaching the front white and rear red LED lights.

Care and Maintenance

Pre-Use Checks

Checklist of essential items to verify before each use of the trailer.

Storage Recommendations

Recommendations for storing the trailer indoors in a dry, well-ventilated area.

Maintenance Procedures

Covers adjusting the push bar, brake, connection point, and seat rest.

Warranty Information