6 – English
UNPACKING
Thisproductrequiresassembly.
Carefullyremovetheproductandanyaccessoriesfrom
thebox.MakesurethatallitemslistedinthePacking
List areincluded.
WARNING:
Do not use this product if any parts on the Packing
List are already assembled to your product when you
unpackit.Partsonthislistarenotassembledtothe
product by the manufacturer and require customer in-
stallation.Useofaproductthatmayhavebeenimprop-
erlyassembledcouldresultinseriouspersonalinjury.
Inspect the product carefully to make sure no breakage
ordamageoccurredduringshipping.
Donotdiscardthepackingmaterialuntilyouhavecare-
fullyinspectedandsatisfactorilyoperatedtheproduct.
If any parts are damaged or missing, please call
1-800-776-5191forassistance.
PACKING LIST
Chemical Sprayer
Hose
Measuring Cap
SprayWandAssembly(Includeso-ring,threadedcoupling,
andnut)
Handle
Operator’sManual
WARNING:
If any parts are damaged or missing do not operate
thisproductuntil the parts arereplaced.Useofthis
product with damaged or missing parts could result in
seriouspersonalinjury.
WARNING:
Do not attempt to modify this product or create ac-
cessoriesnotrecommendedforusewiththisproduct.
Anysuchalterationormodificationismisuseandcould
resultinahazardousconditionleadingtopossibleseri-
ouspersonalinjury.
WARNING:
Topreventaccidentalstartingthatcouldcauseserious
personalinjury,alwaysremovethebatterypackfrom
theproductwhenassemblingparts.
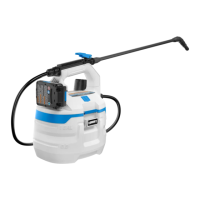
CONNECTING THE SPRAY WAND TO THE
HANDLE
See Figure 2.
Insertthespraywandintothethehandleasshown.
Slidetheo-ringdownuntilittouchesthehandle.
Install the threaded coupling onto the handle and tighten
securely.
Rotatethenozzleuntilitisalignedwiththehandle(point-
ingdown)andreadyforuse.
Slide the threaded coupling onto the handle and tighten
securely.
Pullonthespraywandtobecertainitisproperlysecured.
Placetheassembledhandleintothehandlestoragearea.
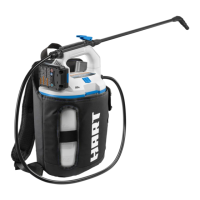
ATTACHING THE HOSE
See Figures 3 - 4.
To attach the hose to the tank:
Slidethenutonthehoseawayfromthehoseend.
Insertthehoseendintothehoseconnectorasshown.
Makesuretheconnectionissecure.
Slide the nut over the opening and hose end. Hand
tighten.Donotovertighten.
To attach the hose to the handle:
Thehosecomespreassembledtothehandle.Ifitbecomes
loose,followtheinstructionsbelow.
Install the threaded coupling onto the handle and tighten
securely.
Slidethenutonthehoseawayfromthehoseend.
Insert the hose end into the opening on the threaded
coupling.Makesuretheconnectionissecure.
Slidethenutoverthehoseandthreadedcoupling.Hand
tighten.Donotovertighten.
ASSEMBLY
 Loading...