Installation Instructions MB-Secure 1000/2000/3000/4000/5000/6000 11
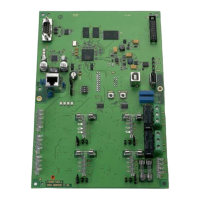
3 = USB device port (currently only for factory use)
4 = USB host port (Firmware update and USB stick as video data storage)
5 = Connector for connection cable to I-BUS users (in preparation)
6 = Power supply/charger unit connection
7 = Contact area for ground connection to mounting bottom
8 = Grounding bridges
9 = Relay 2 screw terminals (Switching capacity max. 8 A / 250 V AC, 5 A / 30 V DC min. 10 mA / 5 V DC)
10 = Relay 1 screw terminals (Switching capacity max. 8 A / 250 V AC, 5 A / 30 V DC min. 10 mA / 5 V DC)
11 = Fine-wire fuse 5 x 20 mm terminal for external load 1 (max. 500 mA)
12 = Fine-wire fuse 5 x 20 mm terminal for external load 2 (max. 500 mA)
13 = Fuse for external load 1 connection (0.5 AF)
14 = Fuse for external load 2 connection (0.5 AF)
15 a-d = BUS-2 / IB2 / Modulbus/RS-485 terminal programming jumpers (Controller 2)
(Exclusive wired connection: data bus connection)
15 a = Fine-wire fuse 5 x 20 mm max. 500 mA (operating voltage controller)
15 b = Connection (BUS-2 branch / IB2 controller/RS-485 interface)
Operating mode IB2 /
Modulbus/RS-485
not used (Connection must not be used)
15 c = Jumper for terminating resistors RS-485 interface
Jumper set → terminating resistors active
Either both jumpers must be set, or none!
15 d = Programming jumpers - operating mode Port
Jumpers 1 - 2 set → Operating mode BUS-2
Jumpers 2 - 3 set → Operating mode IB2/ RS-485* (* not currently available)
16 a-d = BUS-2/ IB2 / Modulbus/RS-485 terminal programming jumpers (Controller 1)
(Exclusive wired connection: data bus connection)
17 = "REVISION” key; If programmed using IQ Panel Control, all alarm notifications within this main zone are
cleared when the revision button is pressed.
This clearing is necessary to return the control panel to the alarm state and close the control unit
housing again following maintenance for example. Procedure:
- Press the revision button
- Close the control panel door within 30 seconds.
- The clearing operation takes place. The control panel is in the alarm state.
18 = "ABORT” key; process data (main zone conditions etc.) are stored in the Flash EPROM.
The "ABORT" key must be pressed before the control panel can be switched powerless.
19 a-d = BUS-2 / IB2 / Modulbus/RS-485 terminal programming jumpers (Controller 4)
(Exclusive wired connection: data bus connection)
20 a-d = BUS-2 / IB2 / Modulbus/RS-485 terminal programming jumpers (Controller 3)
(Exclusive wired connection: data bus connection)
21 = LED status information (from left to right)
LED 7 (yellow): Initialization in progress
LED 3 (green): Blinking -> Not programmed
Permanent On -> Operation/ Initialization successful, programmed
LED 6 (yellow): Revision mode (in preparation)
LED 4 (green): Blinking -> - Firmware update in progress
Permanent On -> - Abort active (after the "ABORT" key is pressed, the LED will
remain lit till the operating voltage can be disconnected.
22 = Analog inputs; the inputs are equipped with clearing transistors for automatic storing detectors.
The end-of-line resistance as well as the sensitivity can be programmed for each input. (Exclusive wired
connection: direct connection)
23 = Programmable outputs; active 12 V DC / 50 mA
24 = Ethernet connection RJ 45, 10/100
 Loading...