BATTERY POWER MODULE 9
45
9.5 BATTERY CHARGER_______________________________________________________
The battery charger is designed to fully charge the
battery pack. Read the instruction manual included with
the charger for proper operating procedure.
Before charging, the following should be observed:
The charging must take place in an area that is well
ventilated and capable of removing the hydrogen gas that
is generated by the charging process. A minimum of five
air exchanges per hour is recommended.
The charging connector components are in good
condition and free from dirt or debris. It is suggested to
apply white lithium grease to both terminals to prevent
corrosion.
The charger connector is fully inserted into the battery
pack receptacle.
The charger connector/cord set is protected from
damage and is located in an area to prevent injury that
may result from personnel running over or tripping over
the cord set.
Install all chargers in accordance with the manufacturers
instructions.
If the charger is operated in an outdoor location, rain
and sun protection must be provided.
Remove AC power cord from outlet before connecting or
disconnecting battery charger to battery pack.
The charging (DC) cord is equipped with a polarized
connector which fits into a matching receptacle on the
battery pack.
If the charger is not operating correctly, unplug charger
from both the AC outlet and the battery pack and check
the fuse. If a new fuse is required, order part number
4102780 from your Jacobsen Dealer. There is one spare
fuse included in the fuse holder.
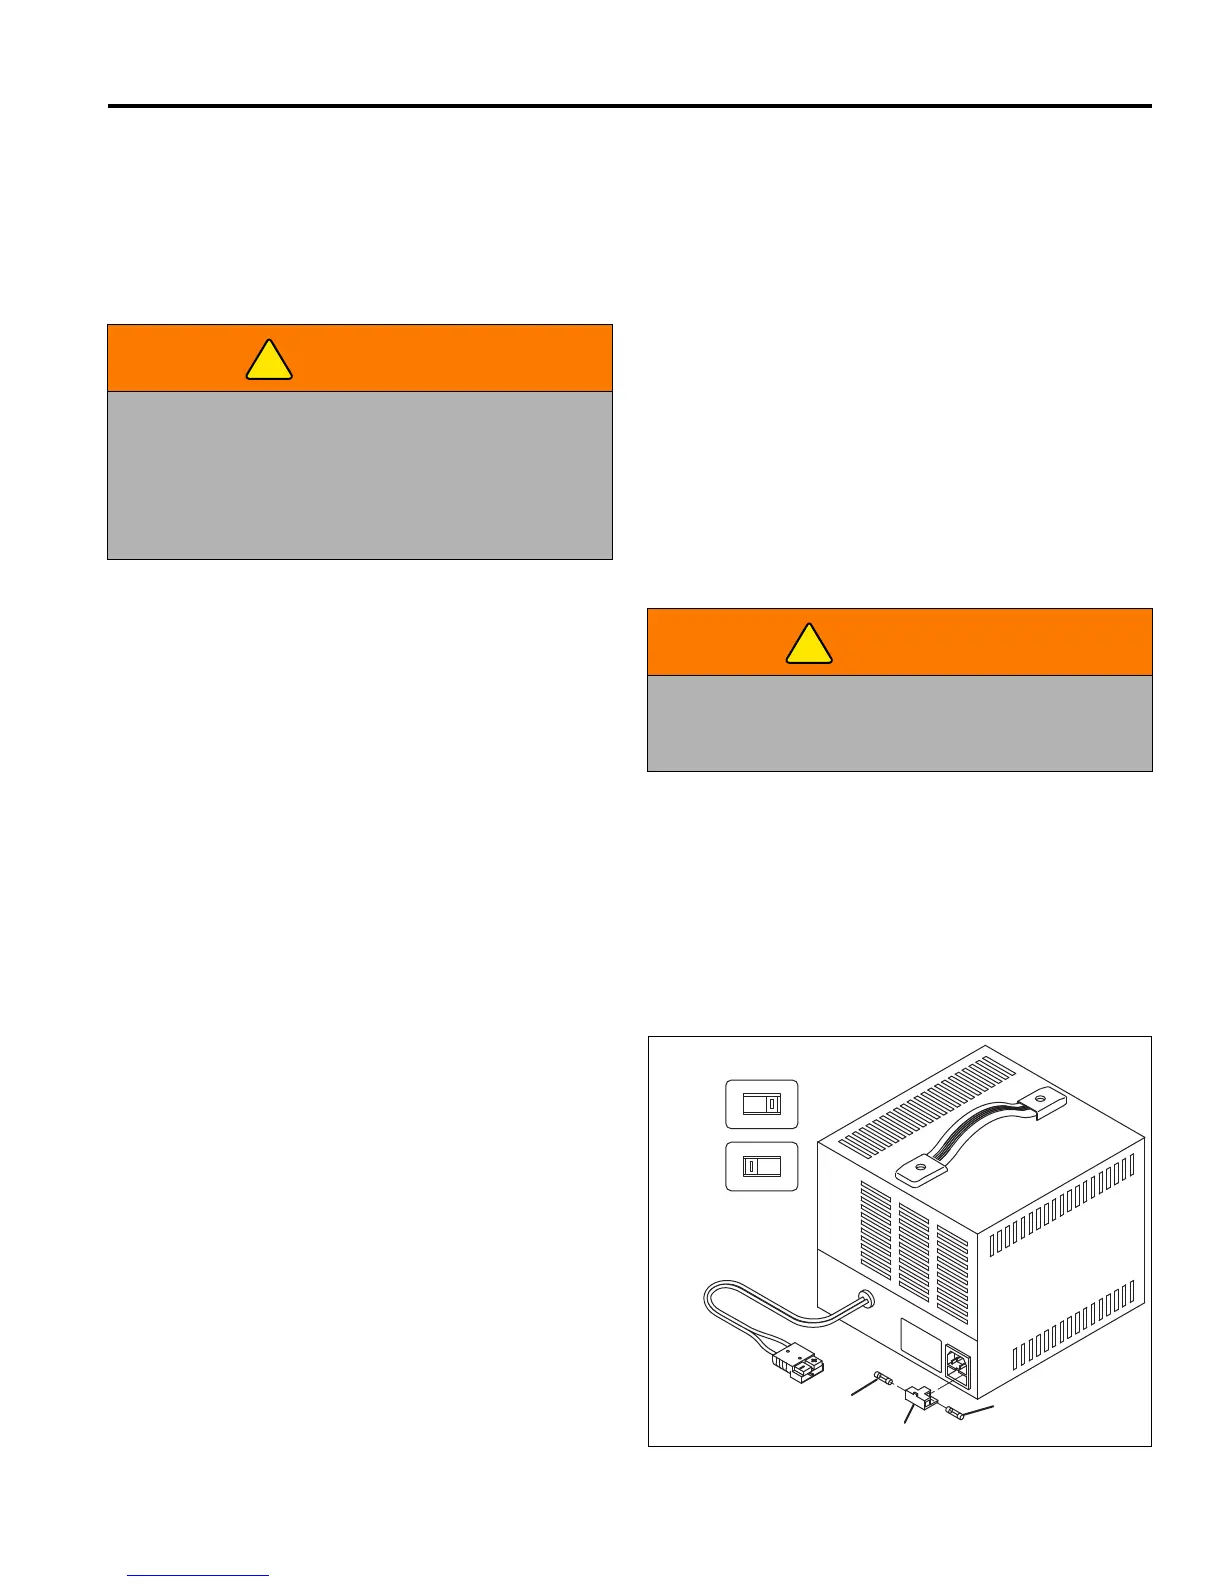
AC Voltage
The charger is equipped with an input voltage selector
switch located on the rear of the charger. Determine what
input voltage is used in your area and set switch
accordingly before connecting AC power cord. This
charger can be used with the following AC input voltages:
100 - 130 V (Set voltage selector to 115 V (Position 1))
200 - 240 V (Set voltage selector to 230 V (Position 2))
NOTE: Charger will operate with either a 50 or 60 Hz
input voltage.
Make certain the AC power cord is equipped with an
appropriate plug for the area you live in. The charger is
equipped with a grounding plug, do not attempt to
defeat its functionality.
Note: The AC power cord included with the battery
charger is used with 115 V - 60 Hz (North America) input
voltage only. If you live in an area where 115 V - 60 Hz
input voltage is not used, a new AC power cord must be
purchased locally.
The battery charger should fully charge the battery pack
in approximately 5 hours with 115V AC input voltage.
Battery charging times may exceed 8 hours in areas
where 100V AC input voltage is used.
WARNING
Portable chargers should be mounted on a platform
above the ground, or in such a manner as to permit
the maximum air flow underneath and around the
charger. Serious damage to the charger, overheating
and potential for fire may result if the charger does not
have sufficient air flow.
WARNING
An ungrounded electrical device may become a
physical hazard that could result in an electrical shock
or electrocution
WA
R
N
ING
- For contin
ued
prote
ction
ag
ainst fire, re
place only w
ith sam
e
size and type fu
se
.
INT
ERAC
TE
R
INC
O
RP
OR
A
TED
M
OD
EL:
BATCH
:
S
ER
IAL NO
:
INP
UT:
1. Connect and di
sconnect batter
y leads o
nly when
supp
ly cord is disc
o
nn
ec
ted or arcing
and b
urning
m
ay re
sult.
2. B
A
TTERY LEAD CO
N
N
ECTIO
N
S - For a batter
y
installed in a
veh
icle, first conne
ct charge
r output
lead to ungrounded batter
y post - not conn
ected to
auto
m
obile chassi
s - in acco
rda
nce w
ith polar
ity
indication, and
th
en opposite
p
olarity lead to
chas
sis a
way
from
b
atter
y; do not co
nne
ct
to
carburetor or fuel
line
s.
D
isconn
ect chassis l
ead
first. F
or batter
y n
ot in
stalled
in a vehicle
, refer to
instru
ction
m
an
ual.
3. Do not over
-charge battery - see instruction
m
anual
4. D
o not smok
e,
strike a m
atch, or cau
se a spar
k in
vicinity of batte
r
y during char
ging.
5. U
se only in a w
e
ll ve
ntilated area.
This equipm
ent e
m
ploys parts, s
uch
as sw
itches and
relays
, that tend to pro
d
uce arcs and spar
ks and
therefore, if used
in a
garage
, locate in a
r
oom
or
enclosure pro
vided for the p
ur
po
se
or not less than 18
inches from the floor.
C
A
U
T
IO
N
- D
O
N
O
T EX
POSE
T
O
R
AIN:
replace
defective cords or w
ires i
mm
ediately.
CAUTIO
N
:
NE PAS
EXP
O
SER
A
LA
PLUIE.
ADVERTISSEM
EN
T
: R
ISQU
E D
E M
ELANG
E
GAZE
AUX
EXPLO
SIF.
LIRE LA NOTICE A
VANT D
'U
TILIS
ER
LE
CHARG
EU
R.
WARNING - RISK OF EXPLOSIVE GAS MIXTURE
115V
230V
Input Voltage Selector
Position
1
Position
2
Spare Fuse
Fuse Holder
Fuse

 Loading...