Using the USB port
Use the USB port to quickly and easily load firmware
upgrades, back up the current settings, and restore
settings to the TEC3000 by using a USB drive. The TEC3000
can recognize eight configuration files or firmware
package files. The USB drive format must be FAT or FAT32.
The drive cannot be NTFS format or USB 3.0. If you are
upgrading firmware or copying configuration files, you
need the passcode if one has been set up. Do not remove
the USB drive until the firmware upgrade is complete.
The TEC3000 may restart and go offline to the NAE after
a firmware upgrade. The upgrade takes approximately
three minutes.
Configurations are copied, except for the Communication
mode. See Choosing the Communication mode (TEC3622
and TEC3623 Models) to configure the networked devices.
Loading the firmware
1. Ensure that the TEC screen is on.
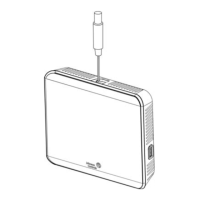
2. Insert the USB drive into the right side of the TEC.
See Figure 1 for the USB port location.
3. Press the Menu icon.
4. Scroll down the menu and press Update.
5. Press Load Firmware.
6. Select the correct firmware version. The correct file
name has the .pkg extension.
7. Press Confirm if you have the correct firmware
version.
The firmware is loaded from the USB drive into
the TEC3000 operating system. The TEC3000
locates the new firmware only if the new
firmware is on the root drive of the USB drive.
See Table 16 if the firmware is not loaded
correctly.
8. Remove the USB drive from the TEC3000 controller
when the update is complete.
The TEC3000 firmware update is complete when
the TEC3000 restarts and returns to the home
screen.
Backing up the settings
About this task:
Note: When you back up the settings, the network
settings are not backed up or restored.
1. Ensure that the TEC screen is on.
2. Insert the USB drive into the right side of the TEC.
See Figure 1 for the USB port location.
3. Press the Menu icon.
4. Scroll down the menu and press Update.
5. Press Backup.
A message appears stating that the file is saved
locally and on a USB drive.
6. Press Confirm to save locally and on USB.
The setting files are named based on the
TEC3000 model name, date, and time stamp. For
example, TEC3xx1-00_2018-07-01T1. The files
are saved locally and on the USB drive’s root
directory. See Table 16 if the settings are not
backed up correctly.
7. After the settings are saved onto the USB drive,
remove the USB drive from the TEC3000.
Restoring the settings
About this task:
If the TEC3000 is connected to a network (for example,
MSTP or wireless), you must manually set or verify the
BACnet
®
Instance ID and BACnet Address, or both, in
the Network Setup page after the restore so they do not
conflict with other devices on the same network.
1. Ensure that the TEC screen is on.
2. Insert the USB drive into the right side of the TEC.
See Figure 1 for the USB port location.
3. Press the Menu icon.
4. Press Update.
5. Press Restore.
6. Select Local Storage or the correct configuration
file created from a previous backup operation.
The setting files are named based on the
TEC3000 model name, date, and time stamp (for
example, TEC3xx1-00_2018-07-01T1). The files
are saved locally and on the USB drive’s root
directory.
7. Press Confirm if you have the correct file name.
The settings are loaded from the USB drive.
8. After the settings are loaded from the USB drive,
remove the USB drive from the TEC3000.
Choosing the Communication mode
(TEC3622 and TEC3623 Models)
1. Ensure the TEC screen is on.
2. Press the Menu icon.
3. Press Setup.
4. Press Network Setup.
5. Press FC Comm Mode.
6. Select BACnet or N2 by pressing the up and down
arrows.
Proceed to Step 7 to perform BACnet communication
and Step 15 to perform N2 communication.
7. Press the back arrow to return to the previous
screen.
8. Press BACnet Instance ID.
9. Enter the unique BACnet
®
instance ID using the
keypad. This value should be different to the other
controllers on the site.
10. Press Save.
11. Press the back arrow to return to the previous
screen.
12. Press BACnet Address.
TEC3000 Series Proportional Fan Coil Thermostats Installation Guide 13
 Loading...