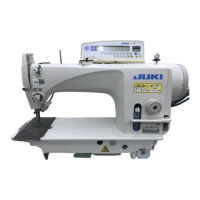
20. ONE-TOUCH TYPE REVERSE FEED STITCHING MECHANISM
The moment switch lever
1
is pressed, the machine
performs reverse feed stitching.
The machine resumes normal feed stitching the mo-
ment the switch lever is released.
WARNING :
Turn OFF the power before starting the
work so as to prevent accidents caused
by abrupt start of the sewing machine.
[Adjusting the position of switch]
1) Loosen setscrew
2
and move the switch itself
up and down to adjust the height.
2) Switch
1
can be used in two positions by turn-
ing it.
3) In addition, when you desire to lower the posi-
tion of switch
1
, loosen setscrew
3
located in
the back of the machine head and lower switch
base
4
.
1
2
3
4
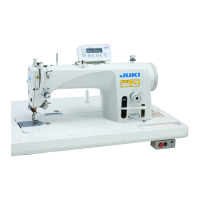
The following functions can be performed by one-touch operation using optional switch (23632656)
5
.
1. Needle up/down compensating stitching ... Ev-
Optional switch
ery time the switch is pressed, needle up/down
compensating stitching is performed.
2. Back compensating stitching ... Every time the
switch is pressed, reverse feed stitching is per-
formed at low speed. (It is effective only when a
constant-dimension stitching pattern is selected
on the panel.)
3. Function to cancel once reverse feed stitching at
the end of sewing ... When the switch is pressed,
the next automatic reverse feed stitching at the
end of sewing only can be canceled once.
4. Thread trimming function ... When the switch is
pressed, thread trimming is performed.
5. Presser lifting function ... When the switch is
pressed, automatic presser lifting can be executed.
6. One stitch compensating stitching ... Every time
the switch is pressed, one stitch compensating
stitching is performed.
* When using the optional switch, it is necessary to set the function with the control box. For the
details, see the Instruction Manual for the control box.
5
( s e p a r a t e l y -
available)
6
7
8
9
WARNING :
Turn OFF the power before starting the work so as to prevent accidents caused by abrupt start of
the sewing machine.
[Connection of the optional switch]
Insert the cord of the optional switch into
7
and
8
of 4P connector
6
coming from the machine head. (There
is no polarity.)
The pin is provided with the inserting direction. Insert it with protruding portion
9
upward.
– 17 –
 Loading...