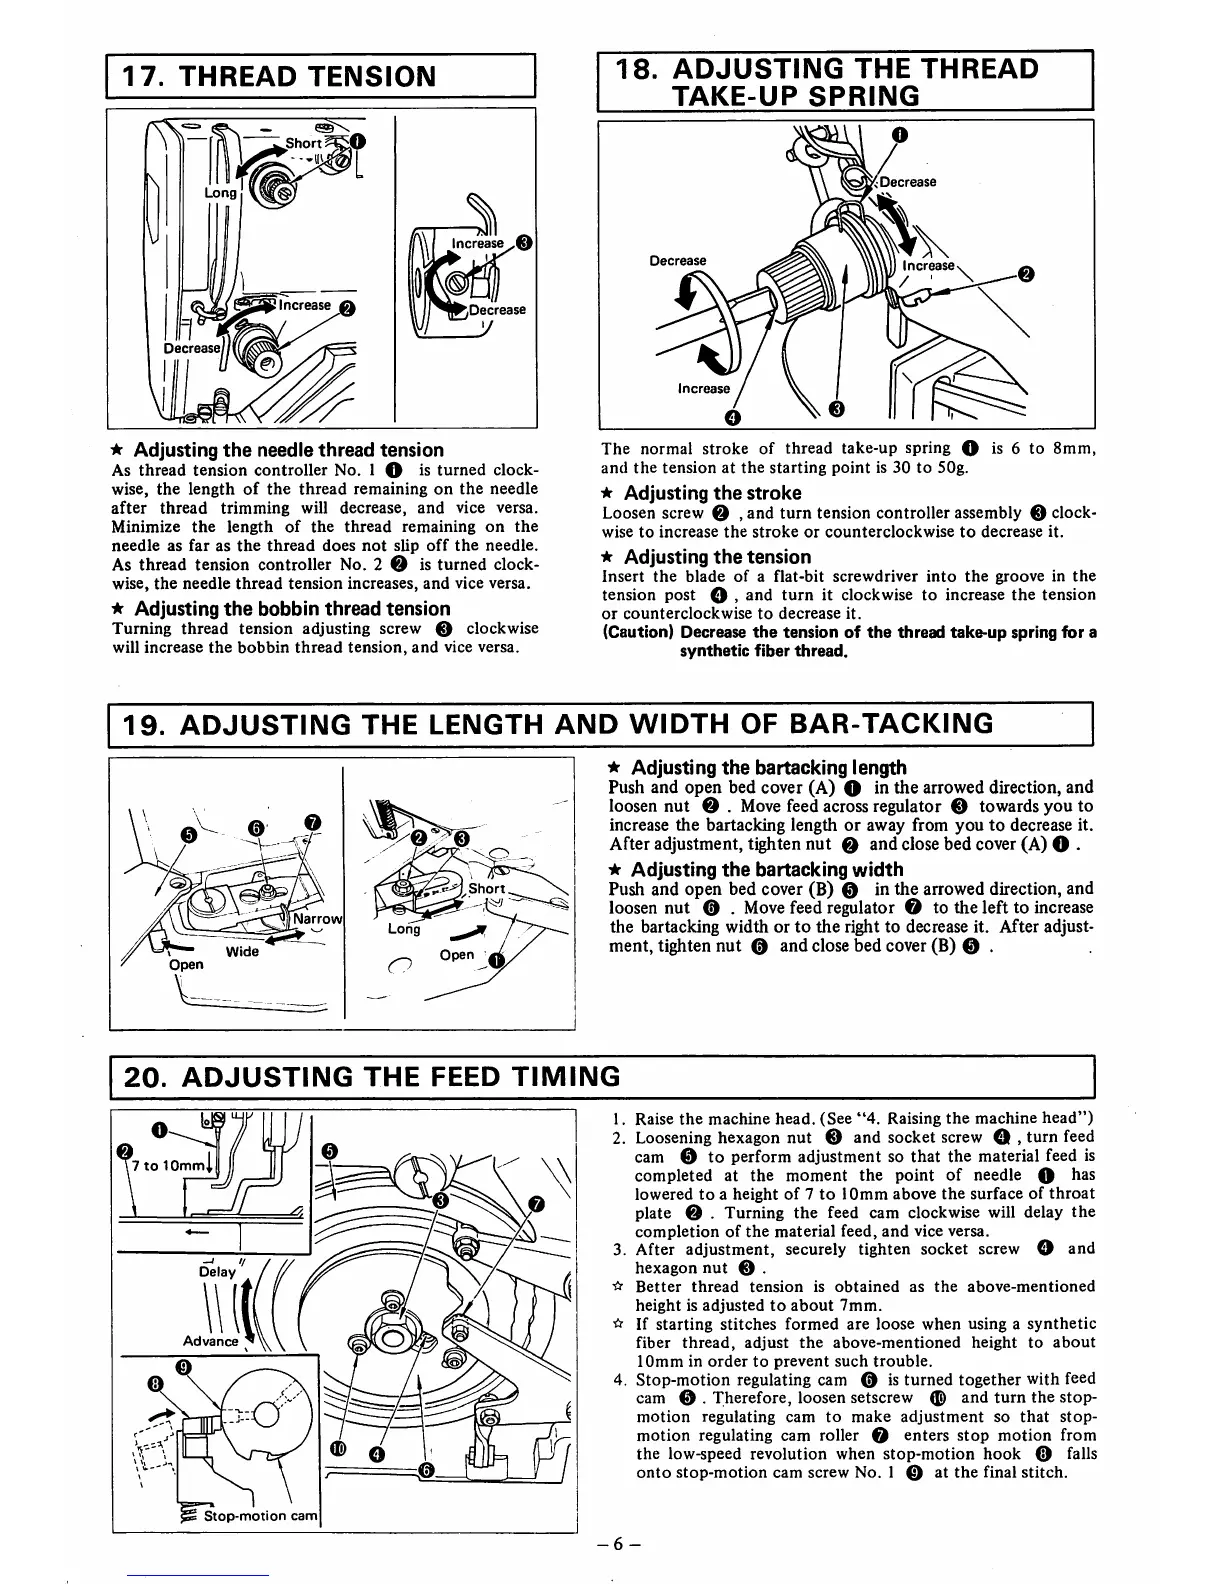
17.
THREAD
TENSION
Short
\j
Increas^©
ncrease
Decrease
^
Adjusting
the
needle
thread
tension
As
thread
tension controller No. 1 O is
turned
clock
wise,
the
length
of
the
thread
remaining
on
the
needle
after
thread
trimming
will
decrease,
and
vice versa.
Minimize
the
length
of
the
thread
remaining
on
the
needle
as
far
as
the
thread
does
not
slip
off
the
needle.
As
thread
tension
controller
No. 2 0 is
turned
clock
wise,
the
needle
thread
tension
increases,
and
vice
versa.
*
Adjusting
the
bobbin
thread
tension
Turning
thread
tension
adjusting
screw
0
clockwise
will
increase
the
bobbin
thread
tension,
and
vice
versa.
18.
ADJUSTING
THE
THREAD
TAKE-UP
SPRING
Decrease
Decrease
ncrease
Increase
The
normal
stroke
of
thread
take-up
spring O is 6 to
8mm,
and
the
tension
at
the
starting
point
is
30
to
50g.
ir
Adjusting
the
stroke
Loosen screw 0 , and
turn
tension controller assembly 0 clock
wise
to
increase
the
stroke
or
counterclockwise
to
decrease
it.
*
Adjusting
the
tension
Insert
the
blade
of
a
flat-bit
screwdriver
into
the
groove
in
the
tension post O , and
turn
it clockwise to increase
the
tension
or
counterclockwise
to
decrease
it.
(Caution) Decrease
the
tension of
the
thread take-up spring for a
synthetic
fiber
thread.
19.
ADJUSTING
THE
LENGTH
AND
WIDTH
OF
BAR-TACKING
!/0:^
Short
Narrow
Open
•
*
Adjusting
the
bartacking
length
Push and open bed cover (A) O in the arrowed direction, and
loosen nut 0 .
Move
feed acrossregulator 0 towardsyou to
increase
the
bartacking length or away from
you
to
decrease it.
After adjustment, tighten nut 0 and closebed cover (A) O .
-k
Adjusting
the
bartacking
width
Push and open bed cover (B) 0 in the arrowed direction, and
loosen nut 0 .
Move
feed regulator 0 to the left to increase
the bartacking width or
to
the right to decrease it. After adjust
ment, tighten nut 0 and close bed cover (B) 0 .
20.
ADJUSTING
THE
FEED
TIMING
Advance
Stop-motion
cam
1. Raise
the
machine
head.
(See
"4.
Raising
the
machine
head")
2. Loosening hexagon nut © and socket screw Q , turn feed
cam 0
to
perform adjustment so
that
the
material feed is
completed
at
the
moment
the
point
of
needle 0 has
lowered
to
a height
of
7
to
10mm
above
the
surface
of
throat
plate 0 . Turning
the
feed cam clockwise will delay
the
completion
of
the
material
feed,
and
vice versa.
3. After adjustment, securely tighten socket screw O and
hexagon
nut
0 .
Better
thread
tension
is
obtained
as
the
above-mentioned
height
is
adjusted
to
about
7mm.
•ir
If
starting
stitches
formed
are
loose
when
using
a
synthetic
fiber
thread,
adjust
the
above-mentioned
height
to
about
10mm
in
order
to
prevent
such
trouble.
4.
Stop-motion
regulating cam 0 is
turned
together
with
feed
cam 0 . Therefore, loosen setscrew 0 and
turn
the
stop-
motion
regulating
cam
to
make
adjustment
so
that
stop-
motion
regulating cam roller 0 enters
stop
motion
from
the
low-speed
revolution
when
stop-motion
hook
0 falls
onto
stop-motion
cam screw No. 1 0 at
the
final
stitch.
-6-
 Loading...