13
CAUTION
Wear gloves and safety goggles. Use extreme CAUTION when installing these handles.
NOTE
All set screws should be tightened so the screw is below the surface of the handle. The handles should be drawn tight
to freezer and refrigerator doors with no gaps. Opening the opposite door while tightening the Allen screw makes
installation easier.
The door handle may loosen over time or if it was installed improperly. If this happens, tighten the set screws on the
handles.
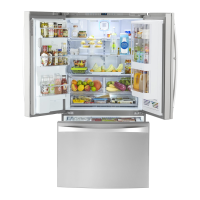
Installing Door Handles
Door Handle Mounting Instructions for Kenmore Elite®
1. Remove handles from carton and any other protective packaging.
2. Position fresh food handle end over upper and lower pre-installed shoulder bolts (A) that are fastened into door,
ensuring the holes for the set screws are facing towards the opposite door.
3. While holding handle rmly against door, fasten upper and lower Allen set screws (B) with supplied Allen wrench.
4. Repeat steps 2 and 3 to install opposite handle. Ensure the holes for the set screws are facing towards the rst
door.
5. Position freezer handle end over left and right pre-installed handle mounts that are fastened to the door, ensuring
the holes for the set screws are facing down.
6. While holding handle rmly against door, loosely tighten far right Allen set screw (B) with supplied Allen wrench
until there is no gap between handle and door.
7. Still holding the handle rmly to the door, rmly tighten far left Allen set screw (B) with supplied Allen wrench.
8. Return to the far right Allen set screw (B) and rmly tighten with supplied Allen wrench.
Mounting Refrigerator Handles Mounting Freezer Handle
 Loading...