Quick Reference
Learning about the printer
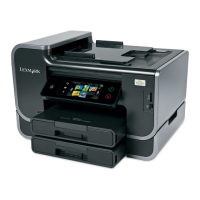
Using the printer control panel
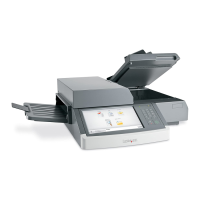
1
2
3
4
5
6
7
8
9
11
12
13
10
Use the To
1 Display
• View the printer status and messages.
• Set up and operate the printer.
2 Arrow buttons Scroll up and down or left and right.
3 Select button
• Select menu options.
• Save settings.
4 Address book
button
View all the stored addresses.
5 Redial button View the last number dialed.
6 Keypad Enter numbers, letters, or symbols.
7 Sleep button Enable Sleep mode or Hibernate mode.
Do the following to wake the printer from
Sleep mode:
• Press any hard button.
• Open a door or cover.
• Send a print job from the computer.
• Perform a power‑on reset using the main
power switch.
8 Cancel button Cancel all printer activity.
Use the To
9 Start button Start a job, depending on which mode is
selected.
10 Fax button Send faxes.
11 Back button Return to the previous screen.
12 Home button Go to the home screen.
13 Indicator light Check the status of the printer.
Understanding the colors of the Sleep
button and indicator lights
The colors of the Sleep button and indicator lights on the control panel
signify a printer status or condition.
Indicator light Printer status
Off The printer is off or in Hibernate mode.
Blinking green The printer is warming up, processing data,
or printing.
Solid green The printer is on, but idle.
Blinking red The printer requires user intervention.
Sleep button light Printer status
Off The printer is off, idle, or in Ready state.
Solid amber The printer is in Sleep mode.
Blinking amber The printer is entering or waking from
Hibernate mode.
Blinking amber for 0.1
second, then goes
completely off for 1.9
seconds in a slow, pulsing
pattern
The printer is in Hibernate mode.
Loading paper and specialty
media
Setting the paper size and type
1 From the printer control panel, navigate to:
> Settings > > Paper Menu > > Paper
Size/Type >
2 Press the up or down arrow button to select the tray or feeder size,
and then press
.
3 Press the up or down arrow button to select the paper size, and
then press
.
4 Press the up or down arrow button to select the tray or feeder type,
and then press
.
5 Press the up or down arrow button to select the paper type, and
then press
.
Configuring Universal paper settings
The Universal paper size is a user‑defined setting that lets you print on
paper sizes that are not preset in the printer menus.
Notes:
• The smallest supported Universal paper size is 76.2 x 76.2 mm
(3 x 3 inches), and is supported only from the multipurpose
feeder.
• The largest supported Universal paper size is 215.9 x 359.92 mm
(8.5 x 14.17 inches), and is supported from all paper sources.
1 From the printer control panel, navigate to:
> Settings > > Paper Menu > > Universal
Setup >
> Units of Measure > > select a unit of
measure >
2 Select Portrait Width or Portrait Height, and then press .
3 Press the left or right arrow button to change the setting, and then
press
.
1