9 ENGLISH
Battery indicator status Remaining
battery
capacity
On
Off
Blinking
50% to 100%
20% to 50%
0% to 20%
Charge the
battery
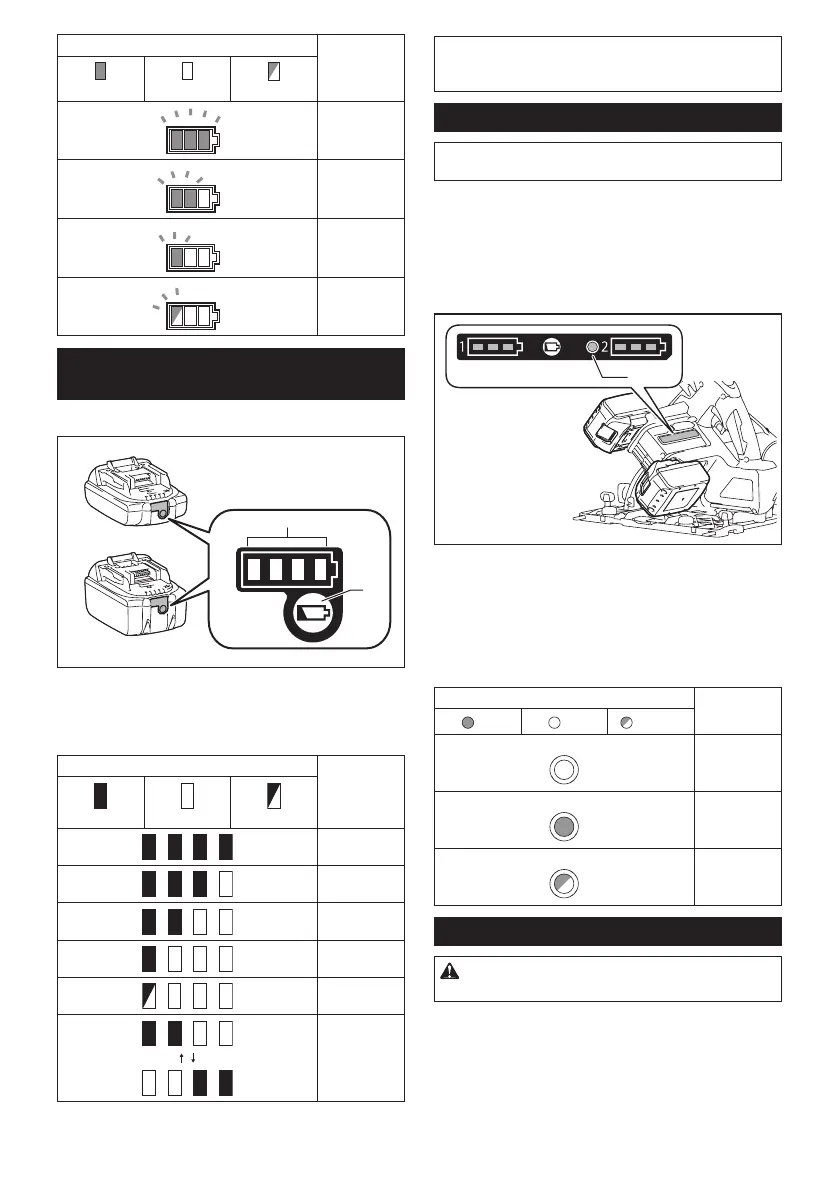
Indicating the remaining battery
capacity
Only for battery cartridges with the indicator
1
2
►1. Indicator lamps 2. Check button
Press the check button on the battery cartridge to indi-
catetheremainingbatterycapacity.Theindicatorlamps
light up for a few seconds.
Indicator lamps Remaining
capacity
Lighted Off Blinking
75% to 100%
50% to 75%
25% to 50%
0% to 25%
Charge the
battery.
Thebattery
may have
malfunctioned.
NOTE: Depending on the conditions of use and the
ambient temperature, the indication may differ slightly
from the actual capacity.
Automatic speed change function
NOTE:Automaticspeedchangefunctionisonly
availablewhenthespeedadjustingdialisin5.
Thistoolhas"highspeedmode"and"hightorquemode".
Thetoolautomaticallychangestheoperationmode
depending on the work load. When the work load is low,
thetoolwillruninthe"highspeedmode"forquicker
cutting operation. When the work load is high, the tool
willruninthe"hightorquemode"forpowerfulcutting
operation.
1
►1. Mode indicator
Themodeindicatorlightsupingreenwhenthetoolis
runningin"hightorquemode".
If the tool is operated with excessive load, the mode
indicatorwillblinkingreen.Themodeindicatorstops
blinking and then lights up or turns off if you reduce the
load on the tool.
Mode indicator status Operation
mode
On Off Blinking
High speed
mode
Hightorque
mode
Overload
alert
Adjusting depth of cut
CAUTION: After adjusting the depth of cut,
always tighten the clamping screw securely.
Loosen the clamping screw on the depth guide and
move the blade lower limit stopper to the desired depth
onthescaleplate.Atthedesireddepthofcut,tighten
theclampingscrewrmly.
For cleaner, safer cuts, set cut depth so that no more
thanonebladetoothprojectsbelowworkpiece.Using
proper cut depth helps to reduce potential for dangerous
KICKBACKSwhichcancausepersonalinjury.
 Loading...