17 ENGLISH
Thehookisconvenientfortemporarilyhangingthetool.
This can be installed on either side of the tool. To install
the hook, insert it into a groove in the tool housing on
either side and then secure it with a screw. To remove,
loosen the screw and then take it out.
Using hole
WARNING: Never use the hanging hole for
unintended purpose, for instance, tethering the
tool at high location.Bearingstressinaheavily
loadedholemaycausedamagestothehole,result-
ingininjuriestoyouorpeoplearoundorbelowyou.
1
Fig.16
►1. Hanging hole
Use the hanging hole at the bottom rear of the tool to
hang the tool on a wall using a hanging cord or similar
strings.
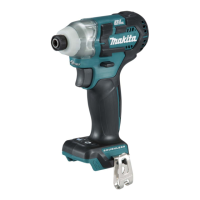
OPERATION
Fig.17
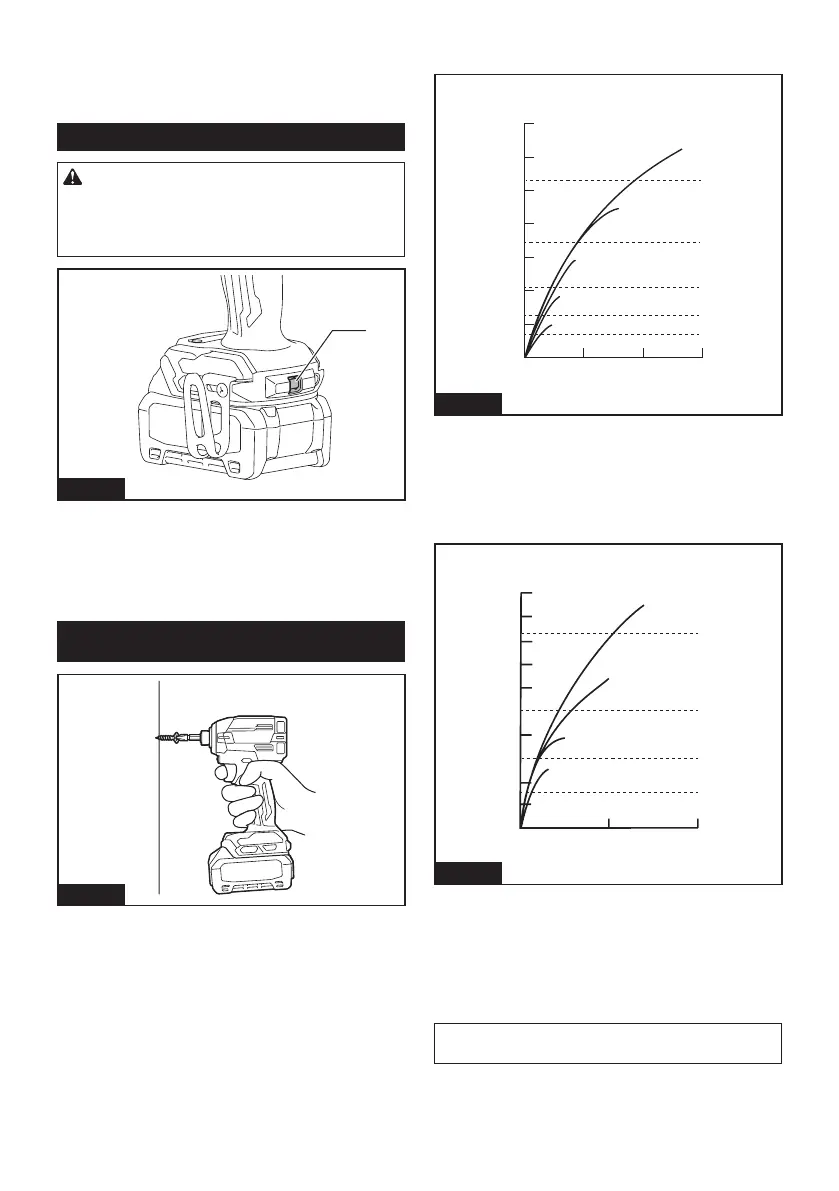
Theproperfasteningtorquemaydierdependingupon
the kind or size of the screw/bolt, the material of the
workpiece to be fastened, etc. The relation between fas-
teningtorqueandfasteningtimeisshowninthegures.
The relation between fastening torque and fasten-
ing time for standard bolt (when impact force is 4)
N•m
(kgf•cm)
M14
M12
M10
M8
(M16)
(M14)
(M12)
(M10)
(M8)
M16
140
(1428)
(1224)
(1020)
(816)
(612)
(408)
(204)
120
100
80
60
40
20
0
1
0.60.20.4
Fig.18
►1. Fastening time (second) 2. Fastening torque
3. Proper fastening torque corresponding to each
bolt diameter
The relation between fastening torque and fasten-
ing time for high tensile bolt (when impact force
is 4)
200
180
160
140
120
100
80
60
40
20
N•m
(kgf•cm)
(2040)
(1836)
(1632)
(1428)
(1224)
(1020)
(816)
(612)
(408)
(204)
012
1
M14
M12
(M14)
(M12)
(M10)
(M8)
M10
M8
Fig.19
►1. Fastening time (second) 2. Fastening torque
3. Proper fastening torque corresponding to each
bolt diameter
Holdthetoolrmlyandplacethepointofthedriverbit
inthescrewhead.Applyforwardpressuretothetoolto
theextentthatthebitwillnotslipothescrewandturn
the tool on to start operation.
NOTICE: If you use a spare battery to continue
the operation, rest the tool at least 15 min.

 Loading...