7 ENGLISH
ASSEMBLY
CAUTION:
• Alwaysbesurethatthetoolisswitchedoffand
thebatterycartridgeisremovedbeforecarrying
outanyworkonthetool.
Installing or removing driver bit or
socket bit
►Fig.5
Useonlybitsthathasinsertingportionshowninthe
gure.
For tool with shallow bit hole
A=12 mm
B=9 mm
Use only these type of bit. Follow the
procedure (1).
(Note) Bit-piece is not necessary.
For tool with deep bit hole
To install these types of bits, follow
the procedure (1).
To install these types of bits, follow
the procedure (2).
(Note) Bit-piece is necessary for
installing the bit.
A=17 mm
B=14 mm
A=12 mm
B=9 mm
Procedure (1)
►Fig.6: 1. Bit 2. Sleeve
To install the bit, pull the sleeve in the direction of the
arrow and insert the bit into the sleeve as far as it will
go. Then release the sleeve to secure the bit.
Procedure (2)
In addition to the procedure(1) above, insert the bit-
piece into the sleeve with its pointed end facing in.
►Fig.7: 1. Bit 2. Bit-piece 3. Sleeve
To remove the bit, pull the sleeve in the direction of the
arrow and pull the bit out.
NOTE:
• If the bit is not inserted deep enough into the
sleeve, the sleeve will not return to its original
position and the bit will not be secured. In this
case,tryre-insertingthebitaccordingtothe
instructions above.
• Afterinsertingthebit,makesurethatitisrmly
secured. If it comes out, do not use it.
Hook (Optional accessory)
►Fig.8: 1. Groove 2. Hook 3. Screw
Thehookisconvenientfortemporarilyhangingthetool.
This can be installed on either side of the tool.
To install the hook, insert it into a groove in the tool
housing on either side and then secure it with a screw.
To remove, loosen the screw and then take it out.
OPERATION
►Fig.9
CAUTION:
• Donotcovervents,oritmaycauseoverheating
and damage to the tool.
►Fig.10: 1. Vent
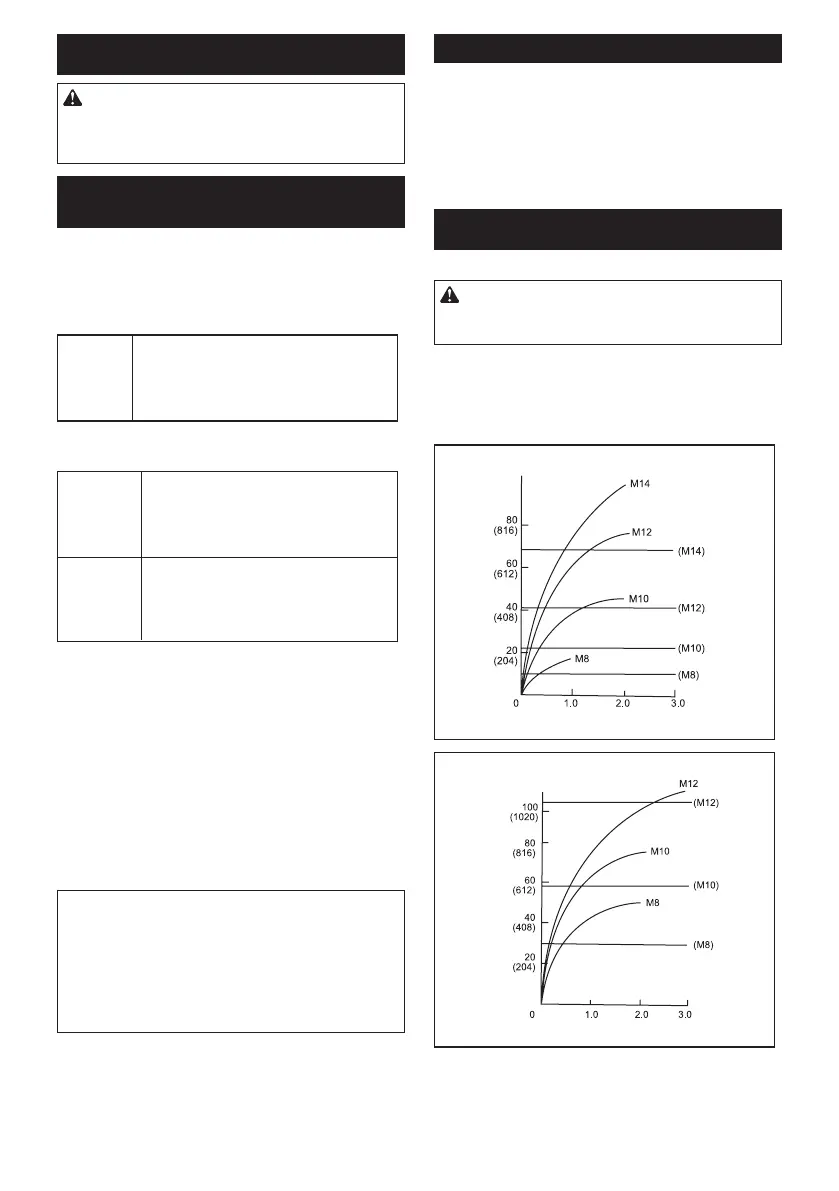
Theproperfasteningtorquemaydifferdependingupon
the kind or size of the screw/bolt, the material of the
workpiece to be fastened, etc. The relation between fas-
teningtorqueandfasteningtimeisshowninthegures.
Standard bolt
N m
(kgf.cm)
(S)
Fastening time
Fastening torque
Proper fastening torque
.
High tensile bolt
N m
(kgf.cm)
(S)
Fastening time
Fastening torque
Proper fastening torque
.
Holdthetoolrmlyandplacethepointofthedriverbit
inthescrewhead.Applyforwardpressuretothetoolto
the extent that the bit will not slip off the screw and turn
the tool on to start operation.
 Loading...