41
MAINTENANCE
1–4
5
Flushing The Cooling System
Flush the internal water passages of the outboard with fresh water
after each use in salt, polluted, or muddy water. This will help prevent
a buildup of deposits from clogging the internal water passages.
A nose cone flushing attachment for the Sport Master Gear Case P/N
848998A1 is available thru Quicksilver Accessories.
WARNING
!
WARNING – To avoid possible injury when flushing, remove
the propeller. Refer to Propeller Replacement.
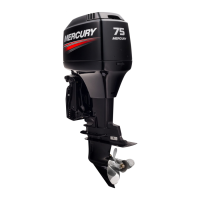
1 Remove propeller (refer to Propeller Replacement). Install the
flushing attachment so the nose cone cup fits tightly over the
cooling water intake.
2 Attach a water hose to the flushing attachment. Turn on water
and adjust flow so water is leaking around flushing attachment to
ensure the engine receives an adequate supply of cooling water.
3 Start engine and run at idle speed in neutral shift position.
4 Adjust water flow (if necessary) so excess water continues leak-
ing out from around the flushing attachment to ensure the engine
is receiving an adequate supply of cooling water.
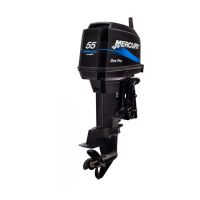
5 Check for a steady stream of water flowing out of the water pump
indicator hoses at back of engine. Continue flushing the outboard
for 3 to 5 minutes, carefully monitoring water supply at all times.
(continued on next page)
 Loading...