PAGE 10
Line, faulty or arcing power tube issues, and other forms of duress your amplifier might encounter. If the Fuse
should ever blow, ALWAYS replace your Fuse with the same type and power rating Fuse. In the US/Domestic
MARK VII Simul Class model, the Fuse is a 4 Amp SLO-BLO Type Fuse. For export models, see the sticker under
the fuse on the rear panel of your amplifier.
Now that we’ve got some tips for Tone covered, let’s get into the Channels and their Modes and get some
insight into applications. First, though, let’s make sure you know how to access them.
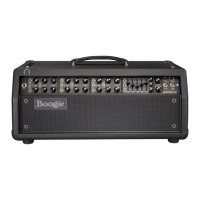
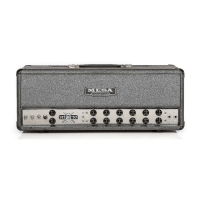
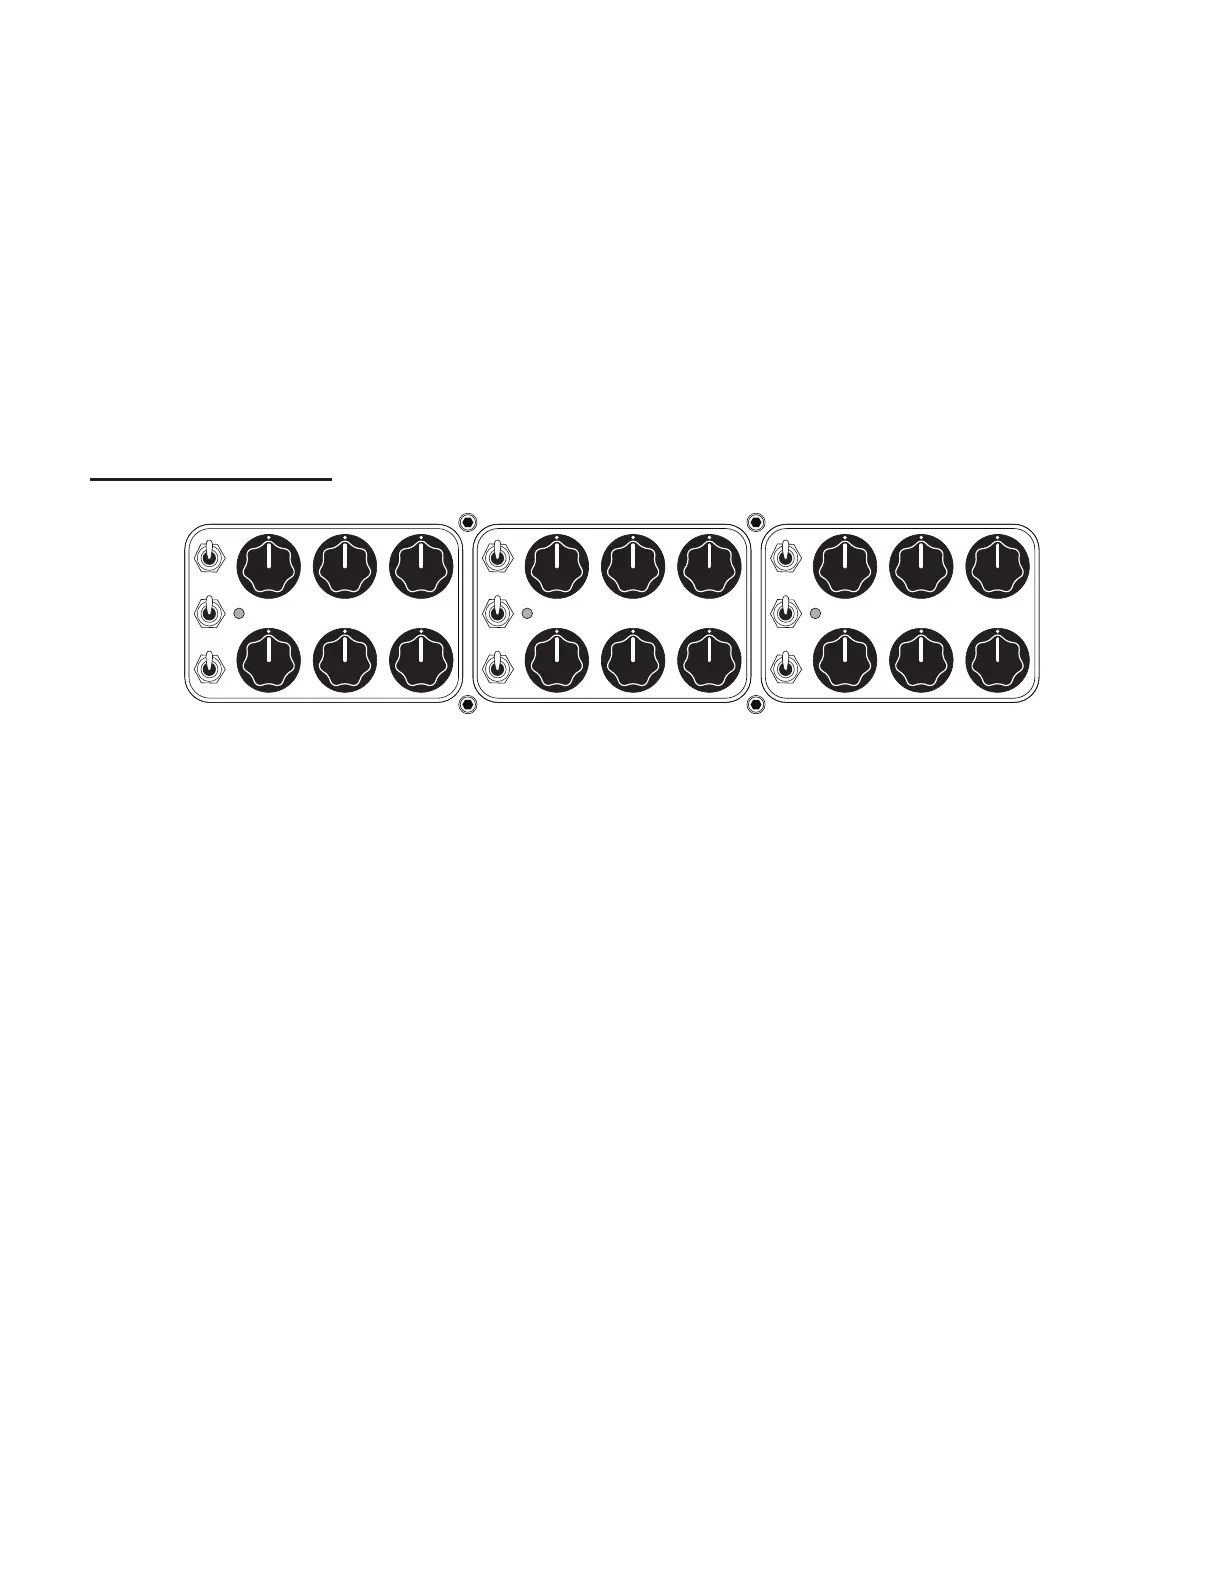
CHANNEL SELECT This mini toggle located in the upper right-hand corner of the Graphic EQ (cutout) window
allows the selection of the Channels when the MARK VII Footswitch is not in use or is unavailable. The switch
calls up the Channels and also provides a “routing map” of sorts for storing/accessing the Channels under MIDI
Programs. (See the MIDI section of this Manual for programming instructions.)
THE CHANNELS
MODE SELECT
The mini toggle switches located in the upper left corner of the three Channel Windows (cutouts) determine
which Mode in each Channel will be called up. All three Channels contain this switch in the same location;
uppermost (switch) in the stack of 3 switches to the left of the controls, though in each Channel, the Modes
themselves are dierent except for the two duplicated Modes, and they are in dierent switch positions (upper,
middle, lower) according to gain structure (least gain on top, most gain on the bottom).
A combination of the two switches outlined above - the Channel Select switch in the far upper right EQ window
and the individual Mode Select switches located in the upper left of each Channel’s window, will determine the
sounds (Channel and Mode) you will play and hear.
EQ 0/FS
This 2 -position mini toggle located in the center spot of the 3-switch stack at the left of each Channel deter-
mines the status – in or out of the signal path - of the 5-Band Graphic EQ. The upper position of the switch
turns the EQ on in each of the Channels. To use the MESA Footswitch, you must have the switch in the lower
0/FS position. See the section later in this manual for more info and settings tips for the 5-Band Graphic EQ.
NOTE: If you connect the MESA Footswitch while powered up or power down and back up after connecting it, you may need
to toggle the Front Panel EQ (and Reverb as well) switch on and o once to reset the circuit and engage the switching via
the Footswitch.
MULTIWATT™ POWER SELECT
This 3-position switch located at the lowermost left corner of each Channel Window determines the power
rating and wiring style for each of the 3 Channels. The three options cover three distinct power ratings and
3 wiring styles; 90 Watts Simul-Class™, whereby two of the power tubes run in Class A and two run in Class
A/B, 45 Watts Class A Pentode, and 25 Watts Class A Triode. Each has its own character and application,
however, the most vocal, boldest, punchiest, tightest-tracking, and maximum headroom are attained with the
amp running in the 90 Watt Simul-Class position.
FX LOOP
SPEAKERS
8 OHM 4 OHM
8 OHM 4 OHM
USE WITH TWO 16Ω CABS
USE WITH TWO 8Ω CABS
CH1
C
H
1
C
H
2
C
H
3
CH3
FX
0/FS
REV
0/FS
CH2
FS
REVERB
REVERB
80Hz 240 750 2200 6600
GAIN MASTER PRESENCE
TREBLE MID BASS
EQ
ON
FX
ON
REV
ON
CLIP
CLEAN
CRUNCH
0/FS
90W
4
5
F
A
T
25W
EQ
GAIN MASTER PRESENCE
TREBLE MID BASS
FAT
MKVII
0/FS
90W
4
5
C
R
U
N
C
H
25W
EQ
GAIN MASTER PRESENCE
TREBLE MID BASS
MKIIB
MKIV
0/FS
90W
4
5
IIC
25W
EQ
120 V~
60 Hz
4 A
AMPLIFIER
44YV
MESA
FT SW
MIDI
THRU/OUT
MIDI
IN
MIDI
CHAN
STORE
BIAS
EL34
6L6
LIFT
GND
USBDIRECT OUTHEADPHONE
LINE OUT
(DRY)
INPUT OUTPUT
CH3
FUSE
FUSE
4 A
SLO
BLO
POWER
CH2 CH1
WARNING:
Replace fuse with same type/rating only.
Do not expose to rain or moisture.
CAUTION:
Risk of Electric Shock. Do Not Open.
No user serviceable parts inside.
MARK SEVEN
™
VACUUM TUBE AMPLIFIER
SIMUL-CLASS
™
POWER
SIMUL-SEVEN
™
PATENTED 7,602,927 AND 9,917,560
HAND-WIRED IN PETALUMA, CALIFORNIA, USA
8
2
1
3
4 5
6
7
8
2
1
3
4 5
6
7
8
2
1
3
4 5
6
7
CAB SELECT
SEND
RETURN
CABCLONE
™
IR
TUBE GUIDE
5 x 12AX7
4 x 6L6
INTERNAL LOAD ACTIVE WHEN SPEAKER DISCONNECTED
CAUTION:
Bias setting must
match tubes in use
WARNING:
Unplug power
before replacing
fuse or removing
bolts mounting
chassis
INPUT
POWER
I
O
I
O
STANDBY
0
1
2
3
4
5
6
7
8
9
A
B
C
D
E
F
 Loading...