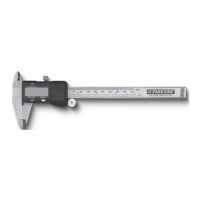
24 GB/IE
After measurement:
After carrying out the measurement, move the external
measuring jaws
11
/ internal measuring jaws
2
together
again by turning the handwheel
7
inwards clockwise.
Switch the LCD display
5
off again by pressing the
ON / OFF key
10
.
Tip: The LCD display
5
automatically switches itself off
after approx. 5 minutes.
Tighten the locking screw
4
again by turning it clockwise
until you feel some resistance.
Examples of use
Tip: When measuring, always proceed as described in the
chapter on using the calliper.
Comparison of plug and socket (see Fig. C):
First measure the dimensions of the plug (see Fig. C.1).
You may wish to make a note of the measurement.
Then, measure the socket (see Fig. C.2).
Deviation from a reference value (see Fig. D):
Measure a reference object (in this case A) (see Fig. D.1).
Leave the measuring jaws
2
/
11
in this position and
press the key to obtain the zero setting (ZERO)
9
.
Then measure the second object (see Fig. D.2). The LCD
display
5
now shows the deviation of the measurement of
the second object to that of the reference object (A).
Measuring the thickness of the floor of an object
(see Fig. E):
First measure the depth of the object (see Fig. E.1).
Leave the depth blade
6
in this position and press the key
to obtain the zero position (ZERO)
9
.
Now measure the entire object (see Fig. E.2). The LCD
display
5
now shows the thickness of the floor of the
object.
Measuring the distance between two identical
holes (see Fig. F):
First measure one of the two, equally sized holes
(see Fig. F.1).
Leave the measuring jaws
2
/
11
in this position and
press the key to obtain the zero position (ZERO)
9
.
Now measure the total dimension (see Fig. F.2). The LCD
display
5
now shows the average distance.
 Loading...