EasyManua.ls Logo

Parkside PKGA 16 A1 User Manual

Parkside PKGA 16 A1
76 pages
Go to English
To Next Page IconTo Next Page
To Previous Page IconTo Previous Page
Page #37 background imageLoading...
Page #37 background image
GB MT
3 7
5. Allow the unlocking lever (5) to
slide back into position
Allow the unlocking lever (5) to
.
6. Check that the appliance attach-
ment is secure by pulling on it.
Switching on/off
1. Switching on: Press the on/off switch
(
11).
By using the on/off switch (
11) you
can progressively control the speed.
Gentle pressure: low speed
Increase pressure: higher speed.
2. Switching off: Release the on/off
switch (
11).
If you place the direction switch
(
7) in the middle position, the de-
vice is secured against being switched
on.
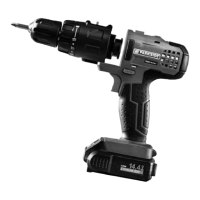
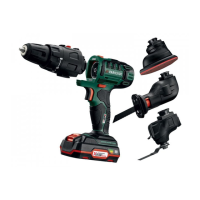
Motor unit with drill attach-
ment PKGA1
Changing the tool
Secure the appliance against
switching on (see “Switch-
ing on/off”). If the appliance
is switched on accidentally,
there is a danger of injury.
1. Rotate the keyless chuck (1)
counter-clockwise, until the drill
chuck aperture is large enough
to accommodate the tool.
2. Insert the tool as far as possible
into the keyless chuck (1).
3. Rotate the keyless chuck (1)
clockwise in order to clamp the
tool.
4. To remove the tool again, rotate
the keyless chuck (1) and pull out
the tool.
Choice of gear
Stop appliance before
changing gear.
1. Wait for the appliance to come to a
standstill.
2 Slide the gear selector (
3) into the
required position:
1: low speed preselection.
2: high speed preselection.
Set the direction of rotation
The appliance’s direction of rotation can be
changed with the rotational direction switch.
1. Wait for the appliance to come to a
standstill.
2. Push the rotational direction speed
(
7) into the desired position:
Clockwise rotation:
to drill and
screw in screws.
Anticlockwise rotation:
to un-
screw screws.
3. If you place the direction switch (
7) in the middle position, the device is
secured against being switched on.
The direction change may only be
actuated when at a standstill!
Torque adjustment
You can preselect the maximum torque. The
torque settings are labelled 1 - 19 +
1. Wait for the appliance to come to a
standstill.
2. Turn the torque adjusting ring (2) to se-
lect the desired torque:
Screws: Steps 1 - 19
Drilling: Step

Table of Contents

Questions and Answers:

Parkside PKGA 16 A1 Specifications

General IconGeneral
BrandParkside
ModelPKGA 16 A1
CategoryPower Tool
LanguageEnglish

Summary

Product Introduction and Intended Use

Introduction

General introduction to the product and congratulatory message.

Intended Use

Details the specific applications for which the tool is designed.

General Description and Scope of Delivery

General Description Overview

Identifies the principal functioning parts of the appliance.

Scope of Delivery

Lists all components included in the product package.

Technical Data

Safety Symbols Explained

Manual, Equipment, Battery, Charger Symbols

Explains various symbols used in the manual and on the device components.

General Safety Instructions: Work Area and Electrical

Work Area Safety

Guidelines for maintaining a safe and clear work environment.

Electrical Safety Precautions

Precautions to mitigate risks of electric shock during operation.

General Safety Instructions: Personal Use and Care

Personal Safety

Ensures user alertness, proper equipment use, and protective measures.

Power Tool Use and Care

Instructions for safe operation, maintenance, and handling of the tool.

Battery Device Handling

Safe practices for handling and using battery-powered devices.

Additional Safety Instructions

Battery Safety

Specific warnings for battery handling, charging, and disposal.

Attachment Specific Safety Instructions

Sawing Safety

Safety guidelines for operating the saw attachment safely.

Sanding and Scraping Safety

Precautions for safe operation during sanding and scraping tasks.

Residual Risks and Charger Handling

Residual Risks

Identifies potential hazards that remain even with proper operation.

Battery Charger Handling

Instructions for the safe and correct use of the battery charger.

Battery Charging Procedures

Charging the Battery

Steps for safely charging the rechargeable battery.

Battery Removal, Insertion, and Recharging

Procedure for battery handling and details on the recharging process.

Starting Operation and Attachments

Checking Battery Status

How to check the remaining charge of the battery using indicators.

Starting Operation and Replacing Attachments

Basic steps for turning the appliance on/off and replacing accessories.

Drill Attachment Operation Details

Drill Bit Changes and Gear Selection

Instructions for changing tools and selecting gears for the drill attachment.

Direction and Torque Adjustment

Setting rotational direction and pre-setting torque for drilling/screwing.

Sander and Sabre Saw Attachment Operation

Multi-Sander Attachment PKGA2

Instructions for using the multi-sander attachment and connecting dust extraction.

Sabre Saw Attachment PKGA3

Instructions for installing and operating the sabre saw attachment.

Multifunction Tool and Practical Tips

Multifunction Tool PKGA4

Guide for changing tools and sanding sheets for the multifunction tool.

Practical Tips for Use

General advice on wearing protective equipment and ensuring correct operation.

Usage Guides: Sawing, Sanding, Scraping

Sawing Techniques and Blade Selection

Safe practices and sawblade selection for sawing tasks.

Sanding Techniques and Sheet Selection

Guide to sanding sheet selection and techniques for optimal results.

Scraping Techniques

Recommendations for effective and safe scraping operations.

Maintenance, Storage, and Disposal

Cleaning, Maintenance, and Storage

Instructions for cleaning, maintenance, and proper storage of the appliance.

Waste Disposal and Environmental Protection

Guidelines for environmentally friendly disposal of the product and its components.

Guarantee Information

Guarantee Terms and Claims Processing

Details guarantee duration, coverage, conditions, and claim processing.

Service and Support Contacts

Service-Center and Repair Services

Contact details for service centers and information on repair services.

Importer Contact Information

Contact information for the product importer.

Spare Parts and Accessories

Trouble Shooting Guide

Exploded Drawings

Related product manuals