4
ASSEMBLY
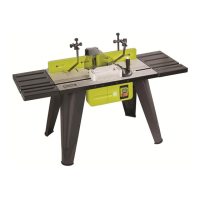
PRESSURE CLAMP ASSEMBLY (Fig. 5)
PRESSURE CLAMP
■ Screw the small guard post securely into one of the
threaded holes on the top of the left / right side of the
fence.
■ Loosen the black colour lock screw by turning the
screw counterclockwise.
■ Slide the connection ring over the small guard post
and tighten lock screw.
Note: Set the proper height between the press
plate and the wood piece before routing.
MITRE GAUGE / FEATHER
BOARD ASSEMBLY (Fig. 6)
MITRE GAUGE
■ Assemble protractor and gauge.
■ Position the pointer so that it is perpendicular to the
scale on the protractor. Locate the #6 pan head screw
and feed it through the hole in the pointer and into the
threaded hole in the protractor. Tighten using a flat
head screwdriver.
■ Slide entire mitre gauge assembly into mitre gauge
track.
FEATHER BOARD
■ Place the router table right side up with the front edge
closest to you.
■ Position the feather board on the table with the two
black knobs facing you.
■ Align the knob with the appropriate holes in the table
and screw in to secure feather board. For smaller
workpieces use the holes nearest the cutter.
WARNING
Failure to unplug your router table could result in
accidental starting causing possible serious
personal injury.
WARNING
Do not wear loose clothing or jewelry when
operating table mounted router. They could get
caught in moving parts causing serious injury.
Keep head away from router and routing area.
Hair could be drawn into rotating bit causing
serious injury.
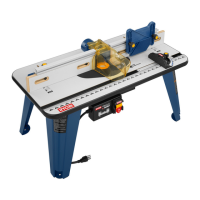
ATTACH ROUTER TO TABLE (Fig. 7)
■ Carefully turn the table right side up and check to
make sure it rests on all four legs and does not rock.
Locate the nine counter sunk holes surrounding the
throat of the table.
■ Using a screw driver, remove the screws holding the
plate to the base of the router and retain. Do not
discard the base plate or screws as they may be
required for future use when routing by hand.
■ With the base plate removed from the router, hold the
router upside down so that the flat edge of the router
base is facing the front of the table. Align holes in the
table with the corresponding five threaded holes in the
base of the router. Holding the router with one hand,
use the other hand to securely tighten each screw.
MOUNTING TO A STABLE WORK
SURFACE (Fig. 8 & 9)
■ Place the router table right side up with the front edge
closest to you.
WARNING
All four legs must be securely bolted to a stable
work surface. Failure to heed this warning could
result in serious personal injury.
WARNING
Check extension cords before each use. If the
supply cord is damaged, it shall be replaced by the
manufacturer or its service centre or similar qualified
person in order to avoid a hazard. Never use tool
with a damaged cord since touching the damaged
area could cause electrical shock, resulting in
serious injury.
OPERATION
WARNING
Your router or router table should never be
connected to a power supply when you are
assembling parts, making adjustments, installing
or removing cutters or when not in use.
Disconnecting your router table will prevent
accidental starting that could cause serious
injury.
INSTALL/CHANGE CUTTER
■ Unplug your router and router table.
ART3-manual(RTA).qxd 9/10/04 4:23 PM Page 4
 Loading...