4
Figure 7
16. Knob
Figure 8
17. Pivot button
Figure 11
18. Line release button
19. Line
Figure 12
5. Rotating rear handle
8. Edger guide
11. Line cut-off blade
15. Locking coupling
Figure 14
21. Spool retainer
22. Spool
23. Spool retainer lock buttons
24. Slots
25. Eyelet
Figure 15
22. Spool
26. Slot
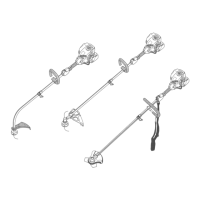
ATTACHING GRASS DEFLECTOR
See Figure 2-3.
WARNING
The line cut-off blade on the grass deflector is sharp.
Avoid contact with the blade. Failure to avoid contact can
result in serious personal injury.
■ Fit the grass deflector into the slots on trimmer head.
■ Line up the screw holes in the grass deflector with the
holes in the trimmer head.
■ Install supplied screws and tighten by turning clockwise
with a Phillips screwdriver.
OPERATION
WARNING
Do not allow familiarity with products to make you
careless. Remember that a careless fraction of a second
is sufficient to inflict serious injury.
WARNING
Always wear eye protection with side shields marked to
comply with standards. Failure to do so could result in
objects being thrown into your eyes resulting in possible
serious injury.
WARNING
Never use blades, flailing devices, wire, or rope on this
product. Do not use any attachments or accessories not
recommended by the manufacturer of this product. The
use of attachments or accessories not recommended
can result in serious personal injury.
This product will accept Ryobi One+ 18V lithium-ion battery
packs and Ryobi One+ 18V nickel-cadmium battery packs.
For complete charging instructions, refer to the Operator’s
Manuals for your Ryobi One+ battery pack and charger
models.
NOTE: To avoid serious personal injury, always remove
the battery pack and keep hands clear of the lock-out
button when carrying or transporting the tool.
STARTING/STOPPING THE LINE TRIMMER
See Figure 4.
■ To start the line trimmer, push the lock-out button to
either the right or left side and pull the switch trigger.
■ To stop the line trimmer, release the switch trigger.
TO INSTALL BATTERY PACK
See Figure 5.
■ Insert the battery pack into the product as shown.
■ Make sure the latches on each side of the battery pack
snap into place and the battery pack is secured before
beginning operation.
TO REMOVE BATTERY PACK
See Figure 5.
■ Depress the latches on each side of the battery pack.
■ Remove the battery pack.
TELESCOPING BOOM
See Figure 6.
The boom can be extended or shortened for ease of use.
■ Remove the battery pack.
■ Loosen the telescoping boom locking coupler by turning
it counterclockwise. Slide the boom to the desired
position.
■ Tighten the coupler by turning clockwise. Make sure
the boom is securely tightened before reinstalling the
battery pack.
ADJUSTABLE FRONT HANDLE
See Figure 7.
The angle of the front handle can be adjusted 180°.
■ Remove the battery pack.
■ Set the trimmer on a flat surface and turn the knob
counterclockwise to loosen the handle.
■ For trimming, adjust the handle upward.
■ For edging, adjust the handle downward.
■ Turn the knob clockwise until the handle is securely
tightened before reinstalling the battery pack.
 Loading...