www.scheppach.com / service@scheppach.com / +(49)-08223-4002-99 / +(49)-08223-4002-58
26
|
GB
2.
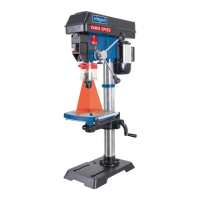
Mounting the drilling table holder, g. 1+8
1.
2. -
3.
groove, ensure that the tooth meshing between the
4.
into the bottom rack guide on the column foot.
5. Ensure
downwards. Tighten the integrated Allen screw
6.
Installing the drilling table, g. 5
1.
2.
3.
Installing the machine head and column, g. 10
1.
2. Align the drill’s spindle with the table and the
base plate and tighten the Allen screw that is lo-
cated on the side of the machine head. (Allen key
Installing the handles, g. 11+12
1.
bracket’s thread.
to do this.
2.
Use the hexagon
Installing the folding swarf protector and the drill
chuck, g. 13
1.
spindle on the machine head and use a Phillips
head screwdriver to secure it.
2.
3.
drill spindle.
reaches the stop and then turn it until it slides a
little further into the spindle.
Vibration emissions value ah = 1,7 m/s
2
Uncertainty K = 1,5 m/s
2
measured according to a standardised testing proce-
dure and can be used for comparison of one power
tool with another; and may change depending on the
way in which the power tool is used and in excep-
compare one power tool with another.
used for an initial estimation of the impair.
7. Before commissioning
• Open the packaging and carefully remove the de-
vice.
• Remove the packaging material, as well as the
packaging and transport safety devices (if pre-
• Check whether the scope of delivery is complete.
• Check the device and accessory parts for trans-
port damage.
• If possible, keep the packaging until the expiry of
the warranty period.
ATTENTION
The device and the packaging are not children‘s
toys! Do not let children play with plastic bags,
lms or small parts! There is a danger of chok-
ing or suocating!
8. Assembly
Column and machine foot, g. 3
1.
the workbench.
2.
3.
the column into the base plate and tighten them
Removing the rack, g. 4
1.
2.
Pre-installing the drilling table holder, g. 5+6
1.
 Loading...