5
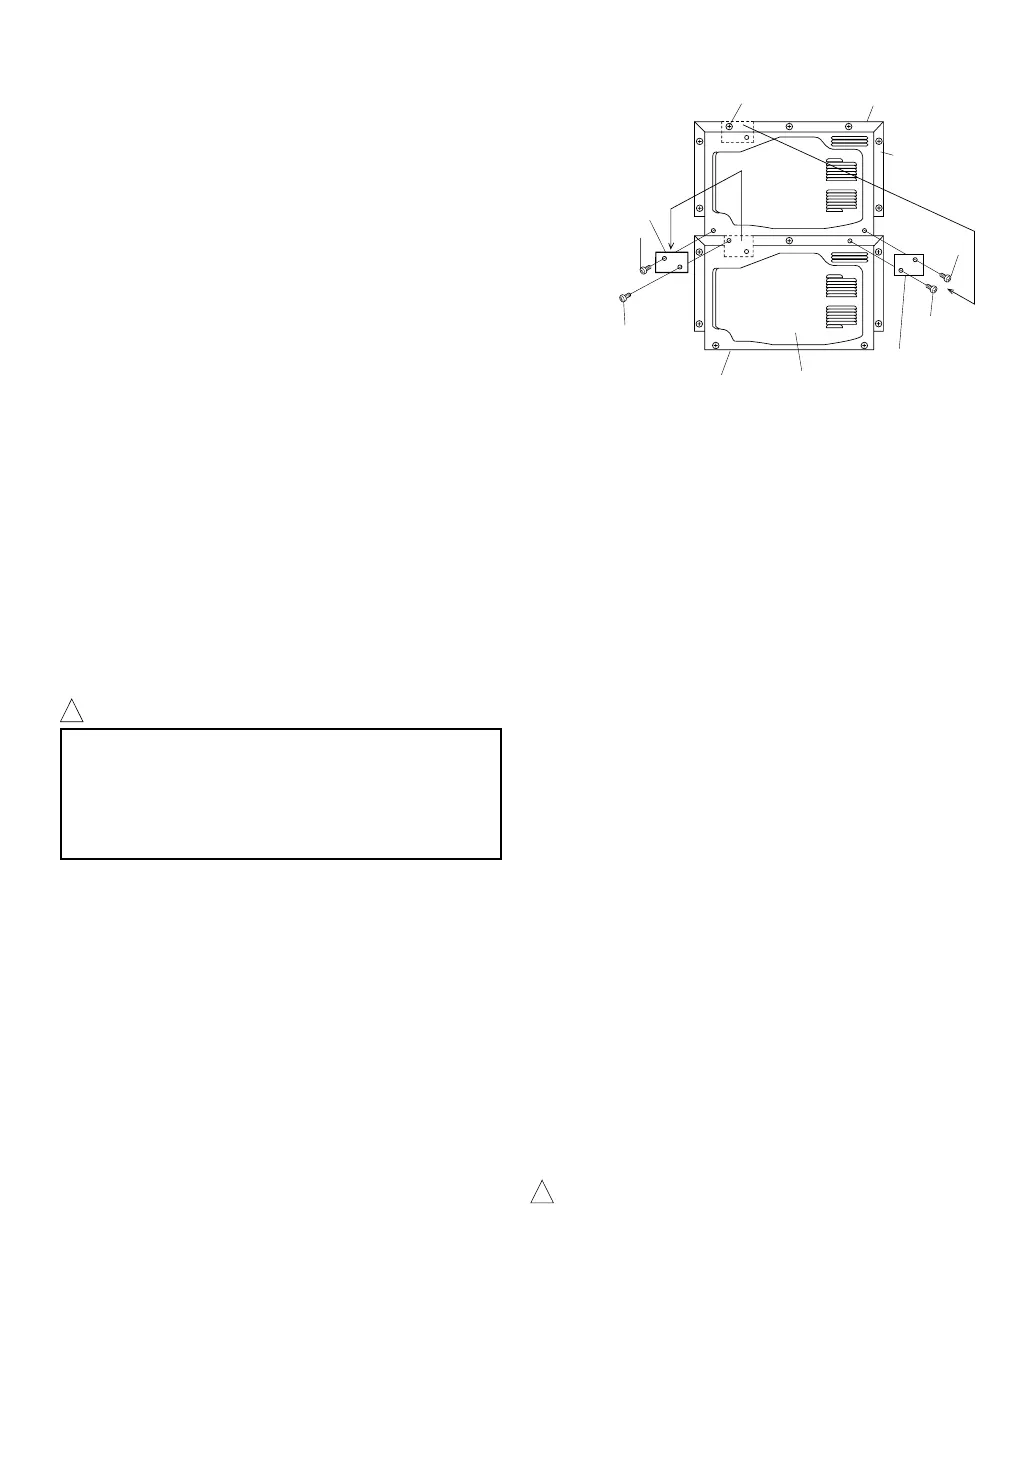
Figure A
Screw (d)
Screw (c)
Mounting plate B
Rear cabinet
Oven A
Screw (b)
Mounting plate A
Screw (a)
Oven B
Rear cabinet
Screw (a)
6 The socket must be readily accessible so that it can
be easily unplugged in an emergency.
7 Do not use the oven outdoors.
8 Two ovens can be installed together by placing one
on top of another. Follow these instructions.
8-1) Place the oven A and position the oven B on top of
the oven A as shown in the figure A.
8-2) Remove the single screw (a) holding the mounting
plate A to the rear cabinet of the oven A. And re-
move the mounting plate A.
8-3) Remove the single screw (b) from the rear cabinet
of the oven B, as shown in the figure A.
8-4) Reinstall the mounting plate A to the rear cabinet of
the oven B with the single screw (b) removed, as
shown in the figure A.
8-5) Hold the mounting plate A to the rear cabinet of the
oven A with the single screw (a), as shown in the
figure A.
8-6) Remove the screw (a) holding the mounting plate B
to the rear cabinet of the oven B. And remove the
mounting plate B from the oven B. See the figure A.
8-7) Install the screw (a) to its position again.
8-8) Remove the screw (c) from the oven A.
8-9) Remove the screw (d) from the oven B.
8-
10
) Turn the removed mounting plate B over and then
using the removed screw (c) and (d), attach the
mounting plate B, as shown in the figure A.
WARNING:
In situations where two ovens are installed together by
placing one on top of another,
1) Use the two mounting plates for fixing the two
ovens.
2) Make sure that the power supply cord is not caught
between the two ovens.
3) Do not install more than one oven on top of
another.
4) Do not lose the removed screws.
It is hazardous for anyone other than a Service Tech-
nician, approved by SHARP to carry out any service
or repair operation which involves the removal of a
cover which gives protection against exposure to mi-
crowave energy.
BUILDING-IN-KIT
This oven is not designed to be built into a kitchen unit.
IMPORTANT! ELECTRICAL CONNECTION
• Do not allow water to come into contact with the
power supply cord or plug.
• Insert the plug properly into the socket as the plug
may otherwise overheat and catch fire.
• Do not connect other appliances to the same socket
using an adaptor plug as it may cause the wiring to
overheat and catch fire.
• If the plug or socket is loose or the power supply
cord is damaged, do not operate the oven, it must be
replaced by the special power cord. Contact your
dealer or a Service Technician appointed by SHARP.
A defective plug, power supply cord or socket may
overheat and catch fire during operation or cause an
electrical shock.
• When removing the plug from the socket always grip
the plug, never the mains lead as this may damage
the power supply cord and the connections inside
the plug.
• The product is fitted with a non-rewireable (moulded)
plug. Should it not be suitable for the socket outlet in
your kitchen, remove the plug and fit an appropriate
type, observing the wiring code given in "To replace
the mains plug" on page 30.
The fuse from a cut-off plug should be removed and the
plug disposed of in safe manner. Under no circumstances
should the cut-off plug be inserted into a socket outlet as
serious electrical shock may occur. The plug must not be
used without the fuse cover fitted.
When replacing the plug please ensure that you use a BSI
or ASTA approved plug to BS1363, this should be fitted
with a brown coloured 13 amp fuse approved by BSI or
ASTA to BS1362. If you have any doubt about electrical
connection seek the help of a qualified electrician.
!
WARNING
THIS APPLIANCE MUST BE EARTHED.
To wire an appropriate plug, follow the wiring code given
in "To replace the mains plug" on page 30.
!
WARNING:
Downloaded from: http://www.usersmanualguide.com/
 Loading...