18
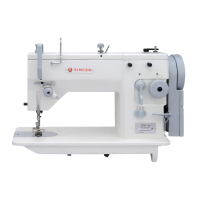
3.17
Stitch Width
Regulator
Figure 23
The width of zigzag stitches is con-
trolled with the spring biased stitch
width regulating lever ‘1’ (Figure
24).
Maximum zigzag width:
20U-105
/ 105C : 9.0 mm
20U-125 / 125C: 12.0 mm
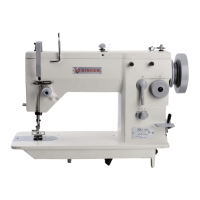
The two thumb screws ‘1’ and ‘2’
provided on front of the arm allow
you to control the width of zigzag
stitches.
Thumb screw ‘1’:
Using to control the wide
zigzag.
Thumb screw ‘2’:
Using to control the narrow
zigzag.
To obtain minimum to maximum
zigzag width (20U-105, 105C: 9mm
or 20U-125, 125C: 12mm), as the
following of Figure 27, first loosen
thumb screw ‘2’ to permit the stitch
width regulator lever ‘3’ to return
to its zero position at the ‘A’, and
retighten thumb screw.
Then loosen thumb screw ‘1’, turn
the stitch width regulator lever ‘3’
to clockwise as far as it will go and
while holding the regulator lever in
this position at the ‘B’, retighten
thumb screw ‘1’.
It can adjust the regulator of the
stitch width in the range from zero
to the maximum now.
3.18
Zigzag Stitch
Width
Control
Figure 24
A
B
Caution
Do not make any
needle position
adjustment while
the needle is in
the fabric.
Switch off the
machine.
1
1
3
2
Zigzag Sewi
ng Machine
|
Instruction Manual and Parts List
 Loading...