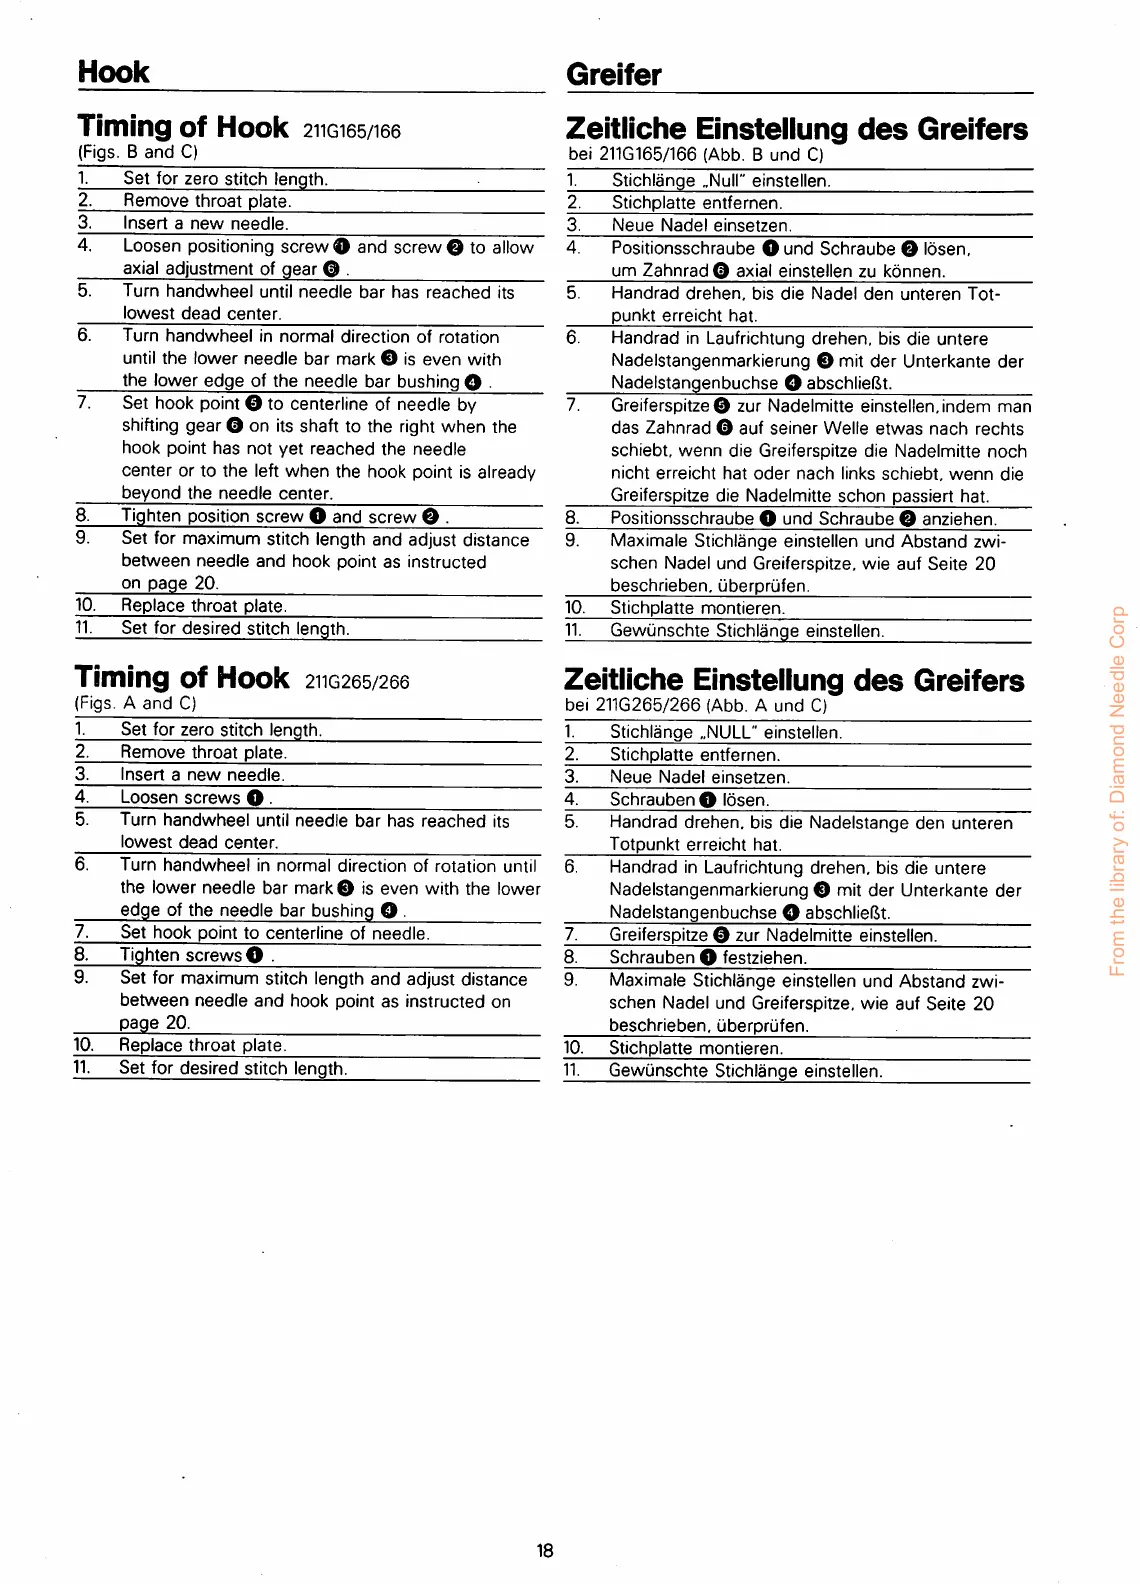
Hook
Greifer
Timing
of
Hook
211G165/166
(Figs. B
and
C)
Zeitliche
Einstellung
des
Greifers
bei 211G165/166 (Abb. B
und
C)
1.
Set
for
zero
stitch length.
1.
Stichlange
..Null" einstellen.
2.
Remove
throat
plate.
2.
Stichplatte
entfernen.
3.
Insert
a
new
needle.
3.
Neue
Nadel
einsetzen.
4.
Loosen positioning
screw®
and
screw©
to allow
axial
adjustment
of
gear
® .
4.
Positionsschraube
©
und
Schraube
© Idsen,
um
Zahnrad©
axial
einstellen
zu
konnen.
5.
Turn
handwheel
until
needle
bar
has
reached
its
lowest
dead
center.
5.
Handrad
drehen,
bis
die
Nadel
den
unteren
Tot-
punkt
erreicht
hat.
6.
Turn
handwheel
in
normal
direction
of
rotation
until
the
lower
needle
bar
mark
© is
even
with
the lower
edge
of the needle bar bushing © .
6.
Handrad
in Laufrichtung
drehen,
bis die
untere
Nadelstangenmarkierung © mit
der
Unterkante
der
Nadelstangenbuchse
© abschlieftt.
7.
Set hook point © to centerline of needle by
shifting
gear O on its shaft to the right when the
hook point
has
not
yet
reached
the
needle
center
or to
the
left
when
the hook point is already
beyond
the
needle
center.
7.
Greiferspitze @ zur Nadelmitte einstellen,
indem
man
das
Zahnrad
O
auf
seiner
Welle
etwas
nach
rechts
schiebt,
wenn
die Greiferspitze die
Nadelmitte
noch
nicht
erreicht
hat
oder
nach
links
schiebt,
wenn
die
Greiferspitze die Nadelmitte
schon
passiert hat.
8.
Tighten position
screw
O
and
screw
© .
8.
Positionsschraube
©
und
Schraube
©
anziehen.
9.
Set for maximum stitch length and adjust distance
between
needle
and
hook point as
instructed
on
page
20.
9.
Maximale
Stichlange
einstellen
und
Abstand
zwi-
schen
Nadel
und
Greiferspitze,
wie
auf
Seite
20
beschrieben,
uberprufen.
10.
Replace
throat
plate.
10.
Stichplatte
montieren.
11.
Set
for
desired
stitch length.
11.
Gewunschte
Stichlange einstellen.
Timing
of
Hook
2110265/266
(Figs. A
and
C)
Zeitliche
Einstellung
des
Greifers
bei
211G265/266
(Abb. A
und
C)
1.
Set
for zero stitch length.
1.
Stichlange
„NULL"
einstellen.
2.
Remove
throat
plate.
2.
Stichplatte
entfernen.
3.
Insert
a
new
needle.
3.
Neue
Nadel
einsetzen.
4.
Loosen
screws
©.
4.
Schrauben©
losen.
5.
Turn
handwheel
until
needle
bar
has
reached
its
lowest
dead
center.
5.
Handrad
drehen,
bis die
Nadelstange
den
unteren
Totpunkt
erreicht
hat.
6.
Turn
handwheel
in
normal
direction
of
rotation
until
the
lower
needle
bar
mark®
is
even
with
the
lower
edge of the needle bar bushing © .
6.
Handrad in Laufrichtung
drehen,
bis die
untere
Nadelstangenmarkierung © mit der Unterkante der
Nadelstangenbuchse © abschlieftt.
7.
Set
hook point to
centerline
of
needle.
7.
Greiferspitze © zur Nadelmitte einstellen.
8.
Tighten
screws
© .
8.
Schrauben
©
festziehen.
9.
Set for maximum stitch length and adjust distance
between
needle
and
hook point
as
instructed
on
page
20.
9.
Maximale Stichlange einstellen und Abstand zwi-
schen
Nadel
und
Greiferspitze,
wie
auf
Seite
20
beschrieben,
uberprufen.
10.
Replace
throat
plate.
10.
Stichplatte
montieren.
11.
Set for desired stitch length.
11.
Gewunschte
Stichlange einstellen.
18
From the library of: Diamond Needle Corp
 Loading...