6 MAINTENANCE, REPAIR
AND STORAGE
6.1 Warnings and Instructions
WARNING
■
There are no user-authorized repairs for the
charger. To reduce the risk of fire, electric
shock or other personal injury and property
damage:
►
Do not attempt to repair, open or disassem‐
ble the charger. There are no user-service‐
able parts inside.
►
Users may carry out only the cleaning and
maintenance operations described in this
manual.
■
To reduce the risk of electric shock:
► Unplug the charger from the electrical outlet
before inspecting or cleaning the charger.
► Regularly check the electrical contacts of
the charger and ensure that the insulation
of the power cord and plug are in good con‐
dition and show no signs of aging (brittle‐
ness), wear or damage.
►
Have a damaged power supply cord
replaced by an authorized STIHL servicing
dealer.
■
Improper storage can result in unauthorized
use, damage to the charger, and an increased
risk of fire, electric shock and other personal
injury or property damage.
►
If storing the battery in the charger, discon‐
nect the charger from the outlet.
► Store the charger indoors in a dry and
secure location.
► Keep it out of the reach of children or other
unauthorized persons.
SAVE THESE INSTRUCTIONS
7 CHARGING THE BAT‐
TERY
7.1 Setting up the Charger
WARNING
■ Read and follow the safety precautions on the
battery and charger and the warnings and
instructions in this manual, 5. To reduce the
risk of short circuit, which could lead to electric
shock, fire and explosion, make sure the
charger and its components are dry and not
damaged; operate the charger indoors at an
appropriate ambient temperature, 5.
WARNING
■ A typical household electrical circuit is
between 15 and 20 amps. A single STIHL
AL 501 charger draws approximately 4.8 amps
and an AL 301 approximately 4.4 amps. To
reduce the risk of fire from overloading an
electrical circuit:
►
Ensure the electrical system is rated to
withstand the expected electrical draw
before charging your battery.
►
Charge multiple batteries one at a time or
on separate circuits, unless you know your
circuit can handle the total expected draw
from multiple chargers.
WARNING
■ Since the battery and charger heat up during
the charging process, do not operate the
charger on a combustible surface or in a loca‐
tion where combustible gases, liquids, vapors,
dusts or other materials are present,
5.
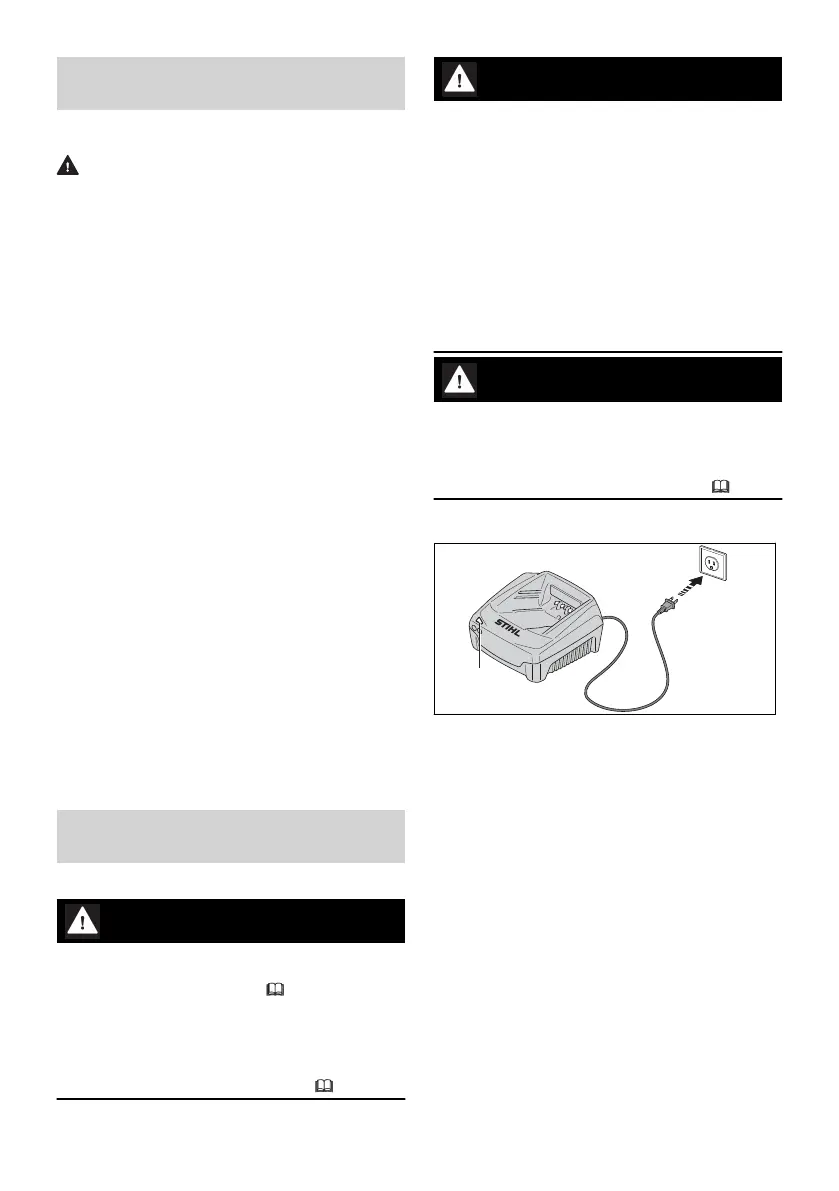
To set up the charger:
► Insert the plug (3) into a properly installed
electrical outlet (4) matching the voltage and
electrical frequency stated on the charger's
rating plate.
The charger runs a self-test immediately after it
is plugged in. The LED (1) will glow green for
about 1 second, then it will glow red briefly
before going out. Once the LED goes out, the
self-test is complete and the charger is ready to
charge the battery.
► Position the power supply cord (2) so that it
will not be stepped on, tripped over, come in
contact with sharp objects or moving parts or
otherwise be subjected to damage or stress.
6 MAINTENANCE, REPAIR AND STORAGE English
0458-010-8221-B 5
 Loading...