7.2 Charging
WARNING
■ STIHL batteries contain safety features and
devices which, if damaged, may allow the bat‐
tery to generate heat, rupture, leak, ignite or
explode. Never charge a malfunctioning, dam‐
aged, cracked, leaking or deformed battery or
use a charger that has been damaged,
5.
Make sure the charger and the battery to be
charged are both completely dry before charg‐
ing,
5.3. Follow all product-specific warn‐
ings and instructions accompanying your bat‐
tery.
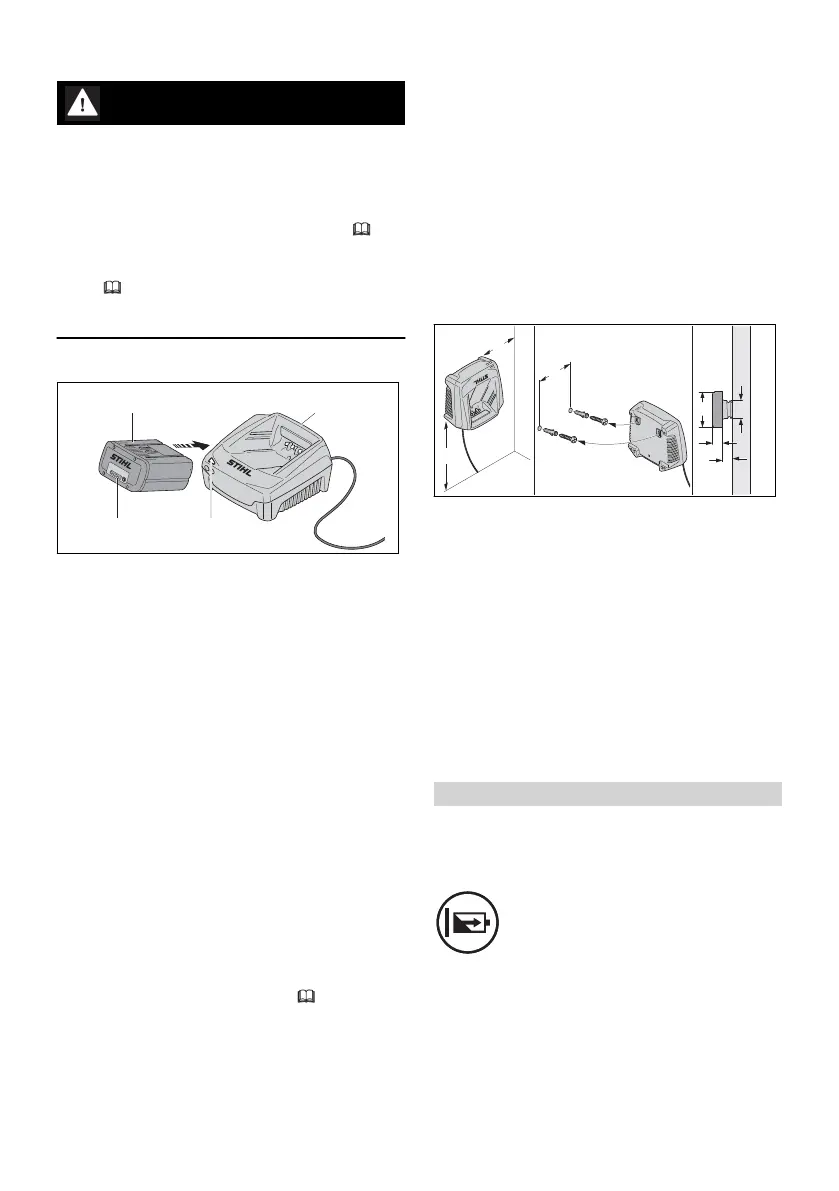
To charge the battery:
► Push the battery (2) into the charger (3) until it
stops.
The LED on the charger glows green when the
battery is charging.
The LEDs (1) on the battery glow green and
show the state of charge.
When the LEDs on the battery go out, the
charging process is complete and the charger
will shut itself off. The battery can be removed
from the charger.
► Disconnect the power supply cord from the
electrical outlet when the charger is not in use
for extended periods of time.
A battery is not fully charged when it ships from
the factory. STIHL recommends that you fully
charge the battery before using it the first time.
This charger is equipped with an integrated fan.
The fan may switch on and off automatically
while charging the battery.
Operate the charger indoors in a dry room. For
optimum performance, observe the recommen‐
ded ambient temperature ranges,
14.3.
The battery heats up during operation. If a hot
battery is inserted into the charger, it may be
necessary for it to cool down before charging
starts. The charging process begins only after
the battery has cooled down sufficiently.
Charging time depends on a number of factors,
including battery condition and the ambient tem‐
perature. For a complete list of approximate
charging times, see www.stihl.com/charging-
times.
7.3 Mounting the Charger on a
Wall
Before mounting, ensure that no electrical
cables, pipes or other service lines run in the wall
behind the charger.
To mount the wall charger:
e
f
f
d
2 31
b
c
a
0000099003_001
► Mount the charger indoors in a dry room near
an electrical outlet.
► Sink the screws into a wall stud. Use appropri‐
ate screw-in wall anchors or other similar
mounting devices if an appropriate wall stud is
not available.
► Align the charger as shown above. Mount to a
wall with the following dimensions:
–
a = minimum 18 in. (450 mm)
–
b = minimum 3.9 in. (100 mm)
–
c = 3.9 in. (100 mm)
–
d = 0.2 in. (4.5 mm)
–
e = 0.4 in. (9 mm)
–
f = 0.1 in. (2.5 mm)
8 LED DIAGNOSTICS
8.1 LED on the Charger
One LED shows the status of the charger. The
LED can glow green or flash red.
If the LED glows green continuously:
the battery is being charged.
or
The battery is too hot or too cold for
charging. To determine, check the
LEDs on the battery. If there is one
glowing red light, allow the battery to
warm up or cool down gradually at an
ambient temperature of about 50 °F to
68 °F (10 °C to 20 °C).
English 8 LED DIAGNOSTICS
6 0458-010-8221-B
 Loading...