EasyManua.ls Logo

Toshiba 34HFX83 User Manual

Toshiba 34HFX83
64 pages
To Next Page IconTo Next Page
To Previous Page IconTo Previous Page
Page #6 background imageLoading...
Page #6 background image
Introduction
Connecting
your TV
Using the
Remote Control
Setting up
your TV
Using the TV’s
Features
Appendix
Index
6
Introduction
Welcome to Toshiba
Congratulations! You have purchased one of the finest color TVs on
the market. The goal of this manual is to guide you through setting
up and operating your Toshiba TV as quickly as possible.
This manual applies to model 34HFX83. Before you start reading,
check your model number on the back of the TV.
Instructions in this manual are based on using the remote control.
You can also use the controls on the TV if they have the same name as
those on the remote control.
Please read all the safety and operating instructions carefully, and keep
the manual for future reference.
Exploring your new TV
You can operate your TV using the buttons on the front panel or the
remote control. The back panel and front panel (behind the door)
provide all the terminal connections you will need to connect other
equipment to your TV. See “Connecting your TV” on page 7.
CHANNELVOLUMEMENU
TV/VIDEO
R
L/MONO
AUDIOVIDEO
S-VIDEO
POWER
VIDEO-3 IN
OUT
IN
ANT
(
75
)
ANT-1 ANT-2OUT
L/
MONO
AUDIO
VIDEO
S-VIDEO
VIDEO 1
PB
PR
Y
COLOR
STREAM HD-1
COLOR
STREAM HD-2
R
VIDEO
S-VIDEO
VIDEO 2
L/
MONO
AUDIO
VIDEO
R
L
VAR
AUDIO
R
AUDIO
R
L
PB
PR
Y
AUDIO
R
L
L/
MONO
AUDIO
R
ON OFF
AUDIO CENTER
CHANNEL IN
DVI/HDCP IN
R
AUDIO
L
123
456
789
100/
0
ENT
TV
CABLE/SAT
VCR
POWER
+10
DVD
AUDIO1
AUDIO2
ACTION
MODE
PIC SIZE
MENU
LIGHT SLEEP
ENTER
FAV
CH
TV/
VCR
VOL
EXIT
DISC
CH RTN
DVD RTN
DVD CLEAR
SLOW/DIR
PAUSE/STEP
AM/FM
SKIP/SEARCH
PLAYREW FF
STOP
POP DIRECT CH
FREEZE
SPLIT
CH SCAN
SOURCE
SWAP
POP CH
REC
INPUT
RECALL
MUTE
L
I
N
K
T
H
E
A
T
E
R
F
A
V
O
R
I
T
E
I
N
F
O
G
U
I
D
E
S
E
T
U
P
T
I
T
L
E
S
U
B
T
I
T
L
E
A
U
D
I
O
FAV
Back
Front
Video-3
Video/audio inputs
(behind the door)
MENU x •zy
TV/VIDEO
DVI/HDCP IN
MENU
Variable Audio OUT
Audio Center Channel IN
ANT-1 IN
ANT OUT
ANT-2 IN
VIDEO 1/2
ColorStream
HD-1
ColorStream
HD-2
Video/
Audio OUT
Note regarding
Quick Connect Guide
The Quick Connect Guide
automatically appears on-screen
the first time the TV is turned on.
This feature provides on-screen
instructions to guide you through
initial setup of your TV.
To stop the Quick Connect
Guide, either press EXIT or turn off
the TV.
See page 25 for details.
Remote control
POWER
Power indicator
Remote sensor
Volume x
Channel
zy
CT-90164

Table of Contents

Other manuals for Toshiba 34HFX83

Question and Answer IconNeed help?

Do you have a question about the Toshiba 34HFX83 and is the answer not in the manual?

Toshiba 34HFX83 Specifications

General IconGeneral
BrandToshiba
Model34HFX83
CategoryCRT TV
LanguageEnglish

Summary

Safety Precautions

Important Safety Instructions

Essential guidelines to prevent hazards and ensure safe operation.

Child Safety

Safety advice for TV placement and usage.

Introduction

Welcome to Toshiba

Welcomes the user and introduces the manual.

Exploring your new TV

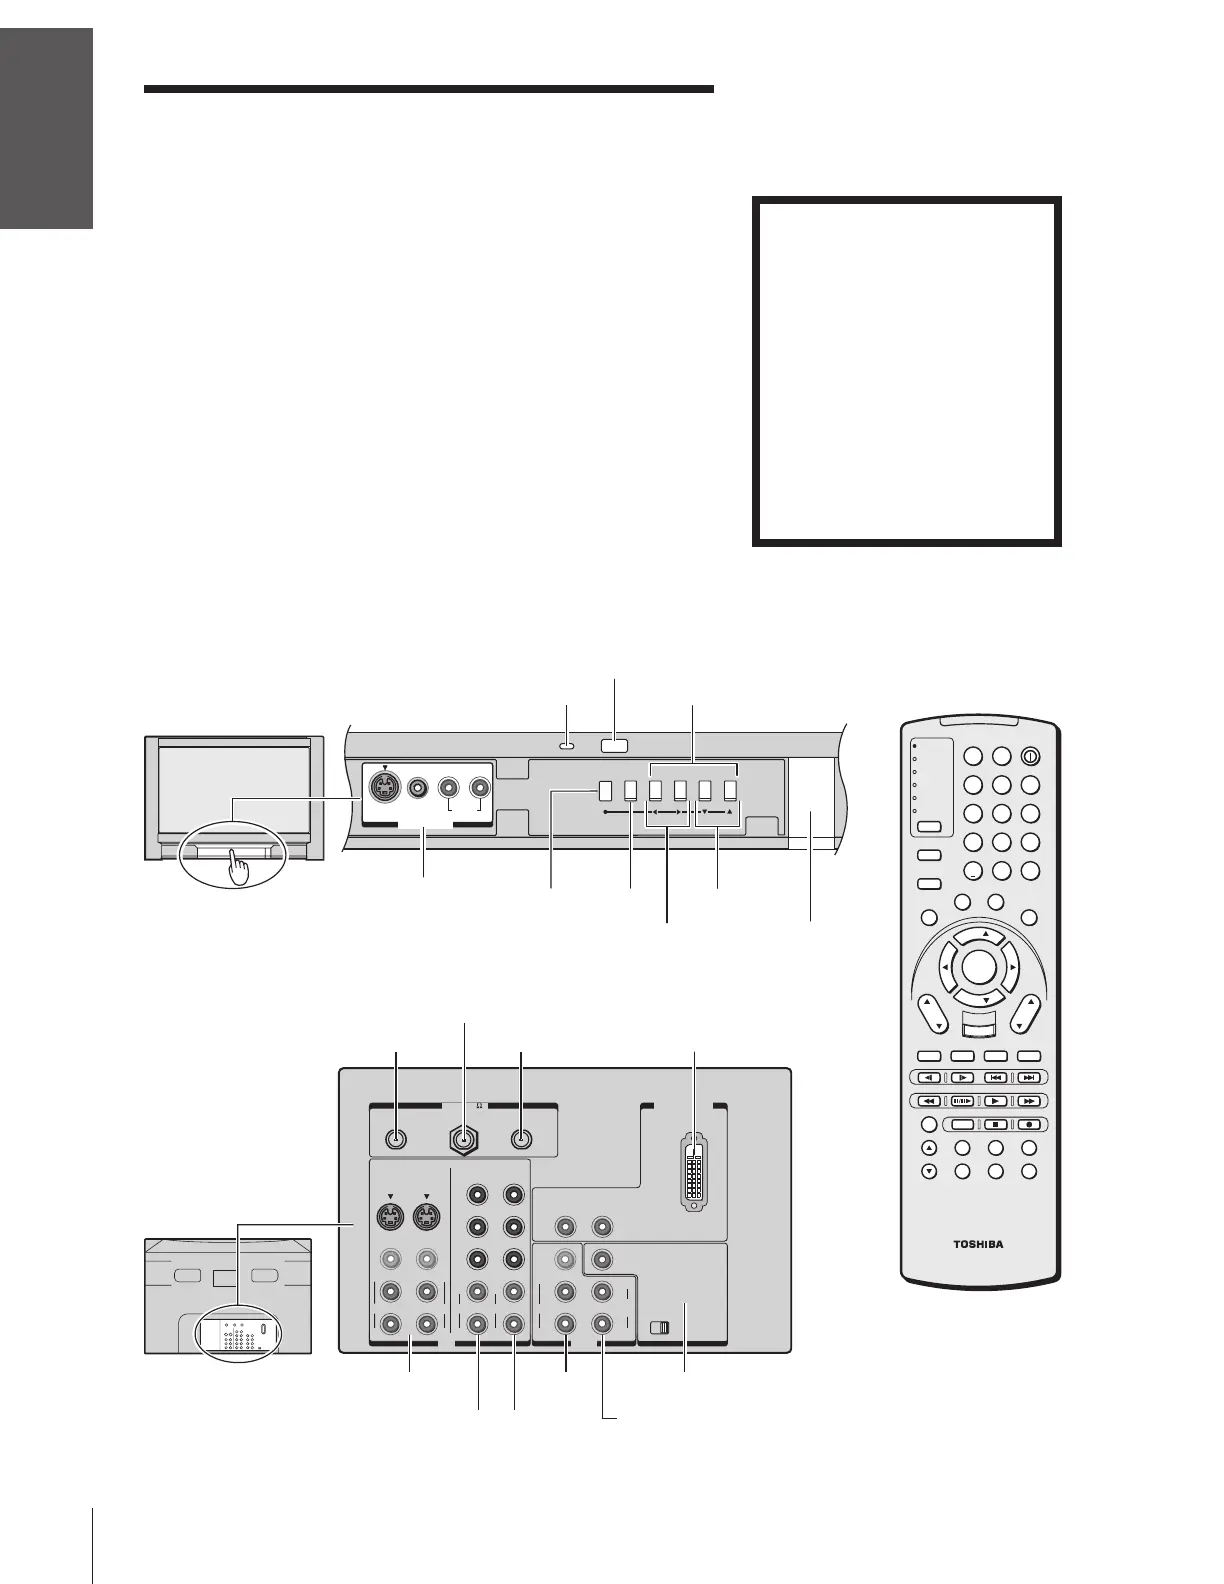
Overview of TV operation and connectivity.

Connecting your TV

Connecting a VCR

Instructions for connecting a VCR to the TV for viewing and recording.

Connecting a cable box

How to connect a cable box for basic and premium channels.

Connecting a DVD player or satellite receiver (without component video) and a VCR

Connecting external sources for viewing and recording.

Connecting a DVD player (with component video) and a VCR

Connecting DVD players with component video for enhanced picture quality.

Connecting a DTV receiver/set-top box (with component video) and a VCR

Connecting digital TV receivers for superior picture and sound.

Connecting two VCRs

Steps to connect two VCRs for dubbing or editing.

Connecting a camcorder

How to connect a camcorder to view recorded videos.

Connecting a device to the DVI/HDCP input

Connecting devices via DVI/HDCP for high-definition video.

Connecting an audio system

Connecting external audio systems for enhanced sound output.

Connecting an A/V receiver

Connecting A/V receivers for surround sound experience.

Using the remote control

Preparing the remote control for use

How to set up the remote for various devices.

Installing the remote control batteries

Guide on inserting batteries correctly into the remote.

Remote Control functional key chart

Chart detailing button functions for different device modes.

Programming the remote control for use with your audio/video devices

Steps to program the remote for non-Toshiba devices.

Searching and sampling the code of a device (8500)

Method to find the correct code for controlling other devices.

Volume Lock and Feature Reset

Features for locking volume and resetting remote functions.

Learning about the remote control

Explains the functions of various remote control buttons.

Setting up your TV

Learning about the menu system

Navigating and using the TV's on-screen menu system.

Changing the on-screen display language

How to select the language for menus and messages.

Selecting the antenna input

Choosing between ANT 1 and ANT 2 for signal sources.

Adding channels into the channel memory

Programming all active channels into the TV's memory.

Programming channels automatically

Automatically scans and stores all available channels.

Adding and erasing channels manually

Manually adding or removing specific channels from memory.

Using the Quick Connect Guide

On-screen guide for initial TV setup.

Changing channels

Methods for tuning into specific channels.

Changing channels using SpeedSurf

Quickly scanning programmed channels.

Adjusting the tilt correction feature

Correcting picture tilt due to magnetic interference.

Using the TV's features

Adjusting the channel settings

Options for managing channel tuning and memory.

Switching between two channels using Channel Return

Quickly switching between the last two viewed channels.

Switching between two channels using SurfLock™

Temporarily memorizing a channel for quick recall.

Programming your favorite channels

Setting up and scanning favorite channels.

Labeling channels

Assigning custom text labels to channels.

Viewing the wide-screen picture formats

Understanding and selecting different aspect ratios.

Selecting the picture size

Adjusting the picture size for optimal viewing.

Scrolling the Theater Wide picture (Theater Wide 2 and 3 only)

Adjusting the vertical position of stretched wide-screen images.

Using the auto aspect feature

Automatically adjusts picture size based on signal data.

Selecting the cinema mode

Optimizing picture for DVD movies with 3:2 pulldown.

Using the POP double-window feature

Watching two programs simultaneously on screen.

Switching the main and POP pictures

Swapping the main and picture-in-picture displays.

Freezing the POP picture

Displaying a still image in the picture-in-picture window.

Adjusting the size of the double-window

Changing the size of main and POP windows.

Using the programmed channel search function

Quickly scanning through programmed channels.

Using the favorite channel search function

Scanning through user-defined favorite channels.

About the auto favorite feature

Auto scan of favorite channels when in program lock mode.

Using the LOCKS menu

Entering the PIN code

Setting or entering the personal identification number for security features.

If you cannot remember your PIN code

Procedure to reset the PIN code if forgotten.

Using the V-CHIP menu

Setting parental controls for TV programs based on ratings.

TV RATING (Independent rating system for broadcasters)

Configuring parental controls based on broadcast content ratings.

MPAA RATING (Independent rating system for movies)

Configuring parental controls for movie content ratings.

BLOCKING OPTION

Options for blocking unrated or specific TV programs.

Unlocking programs temporarily

Temporarily overriding program locks using the PIN.

Locking channels

Preventing access to specific TV channels.

Locking video inputs

Restricting access to certain video input sources.

Using the game timer

Setting a time limit for video game usage.

Using the front panel lock feature

Disabling front panel controls to prevent accidental changes.

Changing the PIN code

Procedure to change the existing PIN code.

Adjusting the picture

Selecting the picture mode

Choosing predefined picture settings (Sports, Standard, Movie).

Adjusting the picture quality

Customizing picture settings like brightness, contrast, color.

Saving your new preferences

Saving custom picture settings for future use.

Using the flesh tone feature

Enhancing natural skin tones in the picture.

Using the CableClear™ DNR feature

Reducing visible interference and noise in the picture.

Selecting the Scan Velocity Modulation (SVM)

Adjusting picture sharpness and contrast.

Selecting the color temperature

Changing the overall color tint of the picture.

Selecting the display format (for 480p signals only)

Converting 480p signals to 540p or 1080i.

Resetting your picture adjustments

Restoring picture settings to factory defaults.

Selecting the video input source

Choosing the active video input signal.

Labeling the video input sources

Assigning custom names to video input ports.

Using the closed caption feature

Displaying dialogue, narration, and text on screen.

Adjusting the sound

Muting the sound

Temporarily reducing or turning off TV audio.

Selecting stereo/SAP broadcasts

Choosing between stereo, SAP, or mono audio broadcasts.

Enjoying the Dolby Virtual sound feature

Simulating surround sound through TV speakers.

Using the WOW™ surround sound feature

Enhancing audio with SRS Labs surround sound technologies.

Adjusting the sound quality

Customizing bass, treble, and balance for audio.

Resetting your audio adjustments

Restoring audio settings to factory defaults.

Using the CYCLONE® sub-woofer system

Adjusting the bass expansion level for the sub-woofer.

Turning off the built-in speakers

Disabling TV speakers when using external audio systems.

Selecting the AUDIO OUT sound

Choosing main or POP program audio for external output.

Using the StableSound® feature

Limiting volume changes to prevent sudden loudness.

Displaying TV status information on-screen

Showing current TV status like channel, time, and signal.

Viewing the demo mode

Demonstrates TV features automatically.

Understanding the auto power off feature

TV automatically turns off after a period of inactivity.

Understanding the last mode memory feature

TV remembers the last mode when power is restored.

Appendix

Specifications

Technical details and dimensions of the television.

Troubleshooting

Solutions for common TV problems and issues.

Limited United States Warranty

Limited Canada Warranty

Index

Related product manuals