Installer's
Guide
G.
FURNACE
IN
HORIZONTAL
LEFT
POSITION
A.
CAUTION
Both
the
coil
and
furnace
must
be
fully
supported.
Do
not
attempt
to
suspend
the
coil
using
the brackets.
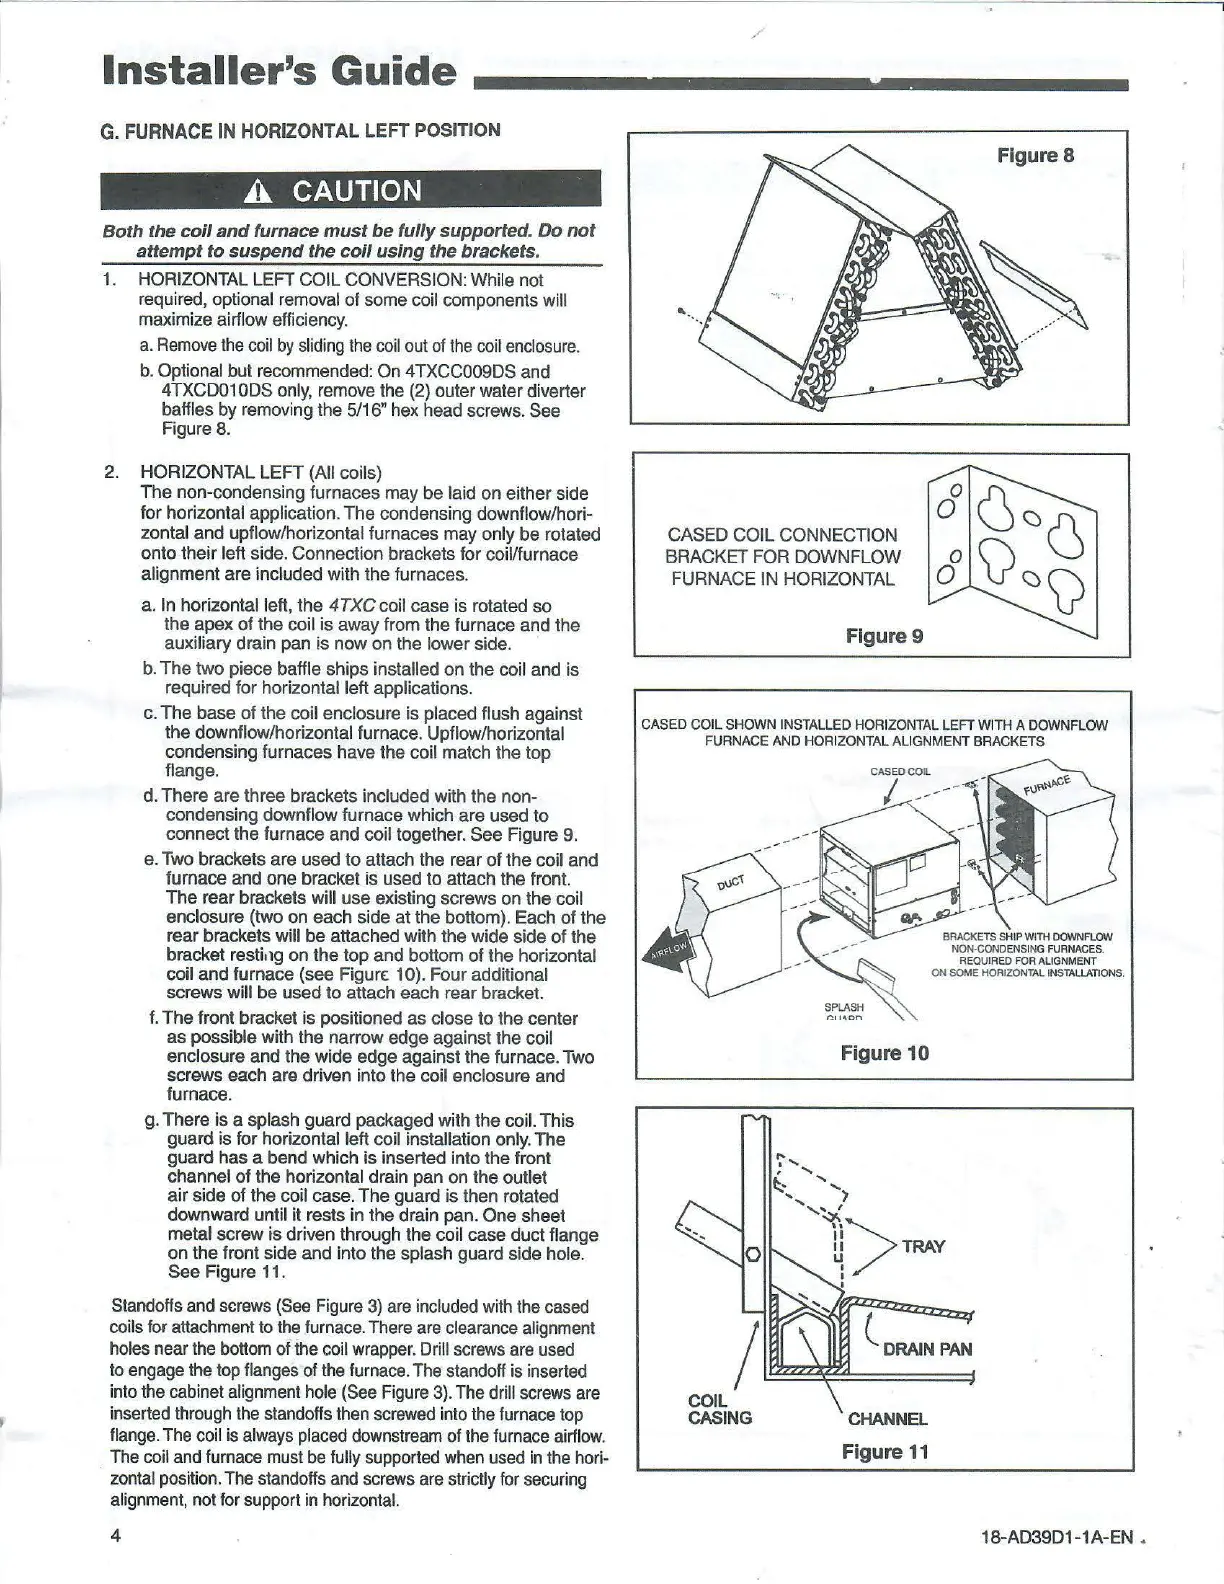
1. HORIZONTAL LEFT COIL CONVERSION: While
not
required, optional removal of some coil components will
maximize airflow efficiency.
a.
Remove
the coil
by
sliding the
coil
out of
the
coil enclosure.
b.
Optional but recommended: On 4TXCC009DS and
4TXCD01
ODS
only, remove the (2) outer water diverter
baffles by removing the 5/16" hex head screws. See
Figure 8.
2. HORIZONTAL
LEFT
(All coils)
The
non-condensing furnaces
may
be laid on either side
for
horizontal application.
The
condensing downflow/hori-
zontal
and
upflow/horizontal furnaces may
only
be
rotated
onto their
left side. Connection brackets for coil/furnace
alignment are included with the furnaces.
a.
In horizontal left,
the
4TXCcoil case is rotated so
the
apex
of
the coil
is
away from
the
furnace and the
auxiliary drain pan
is
now
on
the lower side.
b.
The
two piece baffle ships installed
on
the
coil
and
is
required
for
horizontal left applications.
c.
The
base
of
the coil enclosure is placed flush against
the
downflow/horizontal furnace. Upflow/horizontal
condensing furnaces have the coil match the
top
flange.
d.
There
are
three brackets included with the non-
condensing downflow furnace which
are
used
to
connect the furnace
and
coil together.
See
Figure
9.
e.
Two brackets are used
to
attach the rear
of
the
coil
and
furnace and one bracket
is
used to attach the front.
The
rear brackets will
use
existing screws on the coil
enclosure (two on
each
side
at
the bottom). Each
of
the
rear brackets
will
be
attached with the wide side
of
the
bracket
resti.1g
on
the top
and
bottom
of
the
horizontal
coil
and
furnace (see FigurE 1 0). Four additional
screws
will
be
used
to
attach each rear bracket.
f.
The
front bracket is positioned
as
close
to
the
center
as
possible with the narrow
edge
against the coil
enclosure
and
the
wide
edge against
the
furnace. Two
screws each
are
driven into the coil enclosure
and
furnace.
g.
There
is
a splash
guard
packaged with
the
coil.
This
guard
is for horizontal left coil installation only.
The
guard
has a
bend
which
is
inserted into
the
front
channel
of
the horizontal drain pan on the outlet
air
side
of
the
coil
case
.
The
guard is then rotated
downward
until it rests in the drain pan.
One
sheet
metal screw
is
driven through
the
coil
case
duct
flange
on
the
front side
and
into the splash
guard
side hole.
See
Figure
11
.
Standoffs and screws
(See
Figure 3) are included with the cased
coils for attachment to the furnace. There are clearance alignment
holes near the bottom of the coil wrapper. Drill screws are used
to engage the top flanges of the furnace. The standoff is inserted
into the cabinet
alignment hole (See Figure
3)
. The drill screws are
inserted through the standoffs then screwed into the furnace top
flange. The co
il
is always placed downstream of the furnace airflow.
The
coil and furnace must be fully supported when used
in
the hori-
zontal position. The standoffs and screws are strictly for securing
alignment, not for support
in
horizontal.
4
/
'
CASED COIL CONNECTION
BRACKET FOR DOWNFLOW
FURNACE IN HORIZONTAL
Figure 9
0
0
Figure 8
CASED
CO
IL
SHOWN
INSTALLED
HORIZONTAL
LEFT
WITH A
DOWN
FLOW
FURNACE
AND
HORIZONTAL A
LIGN
MENT BRACKETS
COIL
CASING
Figure 10
CHANNEL
Figure
11
BRACKETS SHIP
Willi
DOWN
FLOW
NO
N·CONDENSING FURNACES.
REQUIRED FOR ALIGNMENT
ON
SOME
HORIZONTAL INSTALLATIONS.
18-AD39D1-1 A-EN •
 Loading...