9 10
All rights reserved by Waydoo
All rights reserved by Waydoo
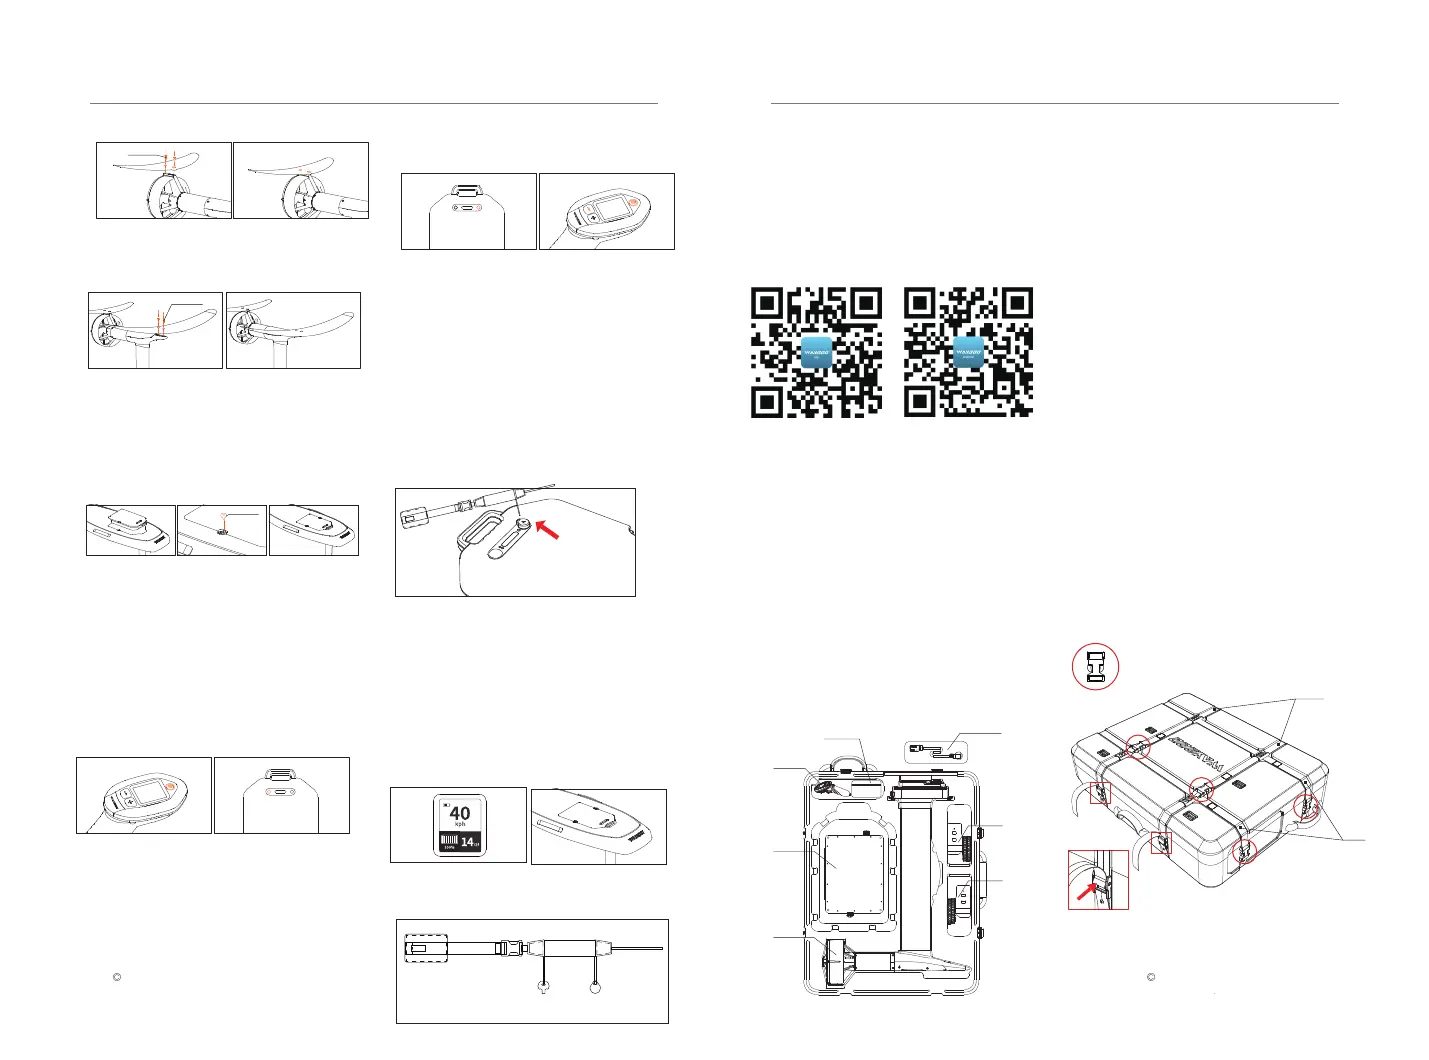
How to use the carrying case to carry the whole
Waydoo product
1. Face the PowerFlight battery compartment
upward and reset both Rotary Locks.
2. Insert the PowerFlight Battery into the
battery compartment. Turn both Rotary Locks
180-degrees to securely lock the battery in
place.
Note: Before installing, please make sure the
battery DC port is free of any water and
debris. ( Clean and dry it if necessary)
(4). Connecting the Controller Plus
Controller plus and Plus power kit have been
paired with each other before leaving the
factory. They will be automatically connected
when the PowerFlight battery and controller
plus are turned on. If the controller plus does
not connect to the plus power kit, please
manually pair them by following the standard
paring process.
This power kit carrying case also serves as a
wheeled carrying case with a handle for your
Efoil. Detachable-wheel and special
belt-fasten design, this carrying case allows
users to transport a complete set of Waydoo
Efoil products. Users can simply place the
power kit, PowerFlight battery, controller plus,
wings, etc. inside the carrying case, fasten the
board on the carrying case. Made of EPP
material, it avoids the collision and friction
between the board body and the carrying
case.
1. Press the Power Button on the Controller
Plus for 5 seconds. Power on the Controller
Plus.
The battery is designed with magnetic buttons,
which simulate short and long presses on physical
buttons by a magnet moving close and away from
the buttons.
Short press = move the magnet close to the button
for 1s and then move away
Long press = hold the magnet close to the button
for about 5s until the operation is complete
Note: A small number of batteries can be powered
on and paired through physical buttons.
2. Within 1 min after the battery is turned on,
short press and long pres the linking button.
When you hear a long beep from the buzzer, it
means that you enter the linking mode. (The
battery will need to be rebooted if the
operation is timeout. Perform the above step
again).
3. For Bluetooth pairing, simultaneously press
and hold the Power Button and “-”Button of
the Controller Plus. When the Bluetooth icon
disappears, it means the pairing is successful.
The Waydoo App is avaliable to download in
the Apple store and google play store.
https://play.google.com/store/apps/de-
tails?id=com.waydoo.waydoo_app
https://apps.apple.com/us/app/waydoo-ap-
p/id1538543262
Connect to the Waydoo app to activate your
Waydoo Flyer ONE Plus. If your WFO Plus is
not activated, you will be limited to a speed
gear of 4.
1. Press the flash lock to release the buckles and
separate the webbing to open the case.
2. Take out of the charger, and you can place the
battery on that compartment. Place the stabilizer
wing under the plus power kit. Place the front
wing on the upper cover, make sure it fits the
position, and fasten the belt.
3. Take out of two wheels.
4. Close the case. Connect the two sides of the
webbing by pushing the buckle A back together.
5. Fasten the board onto the carrying case.
- Press the quick-release spring lever to loosen
the strap.
- Put the board on the carrying case with EVA pad
and upper cover facing each other to ensure it is
non-slip.
- Push the buckle B back together and adjust the
length of the strap to ensure that the board is
tightly closed to the case. Then attach the Velcro
hook part to the loop part.
Note: make sure the rubber cover contacts with
the edge of the board
6. Simply pull the handle, and you can carry the
whole Waydoo product.
Components
1. Waydoo Lithium Battery Charger
2. Plus Power Kit 3. Controller plus
4. AC Power cord 5. Tool kit 6. Wheels
(2). Assembling the Wings
1. Attach the Stabilizer Wing on the stabilizer
mount and tighten the two M6*15 bolts
clockwise with the 4mm Hexagon Wrench.
(3). Installing the PowerFlight Battery
Carrying case
Download Waydoo app
2. Put the Front Wing on the front mount and
tighten the two M6*24 bolts clockwise with
the 4mm Hexagon Wrench.
3. Flip over the Board and proceed to the
next step.
M6*15 bolts
M6*24 bolts
Rotary locks
Tool Kit
1
2
3
5
4
6
6
Explorer/Patroller PLUS Power Kit USER GUIDES Explorer/Patroller PLUS Power Kit USER GUIDES
figure 1
Magnet
keychain
Magnet keychain
Controller Plus wrist strap
Press the flash lock to
release the buckles
Press the quick-release spring
lever to loosen the strap.
Buckle A
Buckle B
 Loading...