7
• Magnetkupplung auf Welle schie-
ben und festschrauben
• Verdichter mit Magnetkupplung in
Fahrzeuganlage einbauen.
• Verdichter (Riemenscheiben) aus-
richten.
• Befestigungsschrauben an
Bodenplatte anziehen.
• Verdichter gleichzeitig auf Saug-
und Hochdruckseite evakuieren, bis
bei abgesperrter Pumpe ein
Vakuum kleiner als 1,5 mbar beste-
hen bleibt.
• Absperrventile öffnen – zunächst
saugseitig – und anschließend
Dichtheitsprüfung vornehmen.
• Während Probelauf bei betriebs-
warmer Anlage den Ölstand im
Schauglas erneut überprüfen.
• Bei Bedarf Kältemittelfüllung ergänzen.
Genaue Vorgehensweise siehe
Betriebsanleitung KB-540.
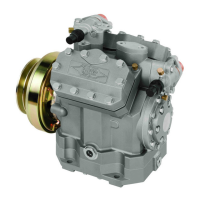
6.2 Magnetkupplung austauschen
(Zubehör)
Achtung!
Nur von BITZER zugelassene
Kupplungen verwenden.
• 4UFC(Y) .. 6TFC(Y): LA16, KK 73.1
6PFC(Y) .. 6NFC(Y): LA26, KK 73.4
Austausch am Beispiel der Kupplung
LA16 (Abb. 2):
Ausbau
Achtung!
Beim Abziehen der Kupplung
darf die Welle keinesfalls durch
Einsatz von Hebeln zur
Antriebsseite hin verschoben
werden!
• Die von BITZER empfohlenen
Kupplungen LINNIG LA16, LA26
und LANG KK 73.1 und KK 73.4
haben eine integrierte Abzieh-
vorrichtung:
• Spannschraube (10) soweit nach
links drehen, bis der Bund am
Seeger-K-Ring (9) aufliegt.
• Spannschraube (10) mit Kraft wei-
terdrehen, bis sich die Kupplung
von der Welle gelöst hat.
• Kupplung abnehmen.
Vorsicht!
Kupplung nicht fallen lassen!
Verletzungsgefahr!
• Magnet (4) abschrauben
(4 Befestigungsschrauben).
• Magnet und Kupplung prüfen, ggf.
ersetzen.
!
!
!
!
• Slide the magnetic clutch onto the
shaft and screw on tight
• Install the compressor together with
the magnetic clutch into the vehicle
unit.
• Align the compressor (pulleys).
• Tighten the fixing screws on the
bottom plate.
• Evacuate compressor contemporarily
from both the suction and high pres-
sure sides until a steady vacuum is
reached with the pump blocked off
that remains below 1.5 mbar.
• Open shut-off valve – first on the
suction side – and afterwards carry
out the tightness test.
• Check the oil level in the sight
glass while the unit is at operating
temperature during the test run.
• Top up refrigerant level, if needed.
For the detailed procedure, see ope-
rating instruction KB-540.
6.2 Replacement of magnetic
clutch (accessory)
Attention!
Only use clutches approved by
BITZER.
• 4UFC(Y) .. 6TFC(Y): LA16, KK 73.1
6PFC(Y) .. 6NFC(Y): LA26, KK 73.4
Example of replacing the clutch LA16
(Fig. 2):
Removal
Attention!
When removing the clutch, the
shaft must not be pushed
towards the drive side with the
use of levers!
• The clutches recommended by
BITZER LINNIG LA16, LA26 and
LANG KK 73.1 and KK 73.4 have
an integrated pulling device:
• Turn the straining screw (10) to the
left until the collar of the Seeger-K-
ring (9) lies flat.
• Further turn the straining screw
(10) hard enough until the clutch
has released itself from the shaft.
• Remove the clutch.
Caution!
Do not drop the clutch!
Risk of injury!
• Screw off the magnet (4)
(4 fixing screws).
• Check magnet and coupling, repla-
ce if necessary.
!
!
!
!
• Glisser l'embrayage électromagnétique
sur l'arbre et serrer les vis de maintien.
• Réinstaller le compresseur avec l'em-
brayage électromagnétique dans le circuit.
• Aligner le compresseur (poulies à gorges).
• Serrer les vis de fixation sur la plaque
de fond.
• Procéder à la mise à vide du compres-
seur, simultanément à l'aspiration et au
refoulement, jusqu'au maintien d'un
vide inférieur à 1,5 mbar quand la
pompe est hors service.
• Ouvrir les vannes d'arrêt – d'abord à
l'aspiration – puis procéder à l'essai
d'étanchéité.
• Recontrôler le niveau d'huile dans le
voyant durant la période d'essai, le systè-
me étant à température de service .
• Si nécessaire, faire l'appoint de la
charge en fluide frigorigène.
Voir instructions de service KB-540 pour
plus de détails sur la façon de procéder.
6.2 Remplacer l'embrayage
électromagnétique (accessoire)
Attention !
N'utilisez que des accouplements
homologués par BITZER.
• 4UFC(Y) .. 6TFC(Y): LA16, KK 73.1
6PFC(Y) .. 6NFC(Y): LA26, KK 73.4
Remplacement suivant l'exemple de l'em-
brayage LA16 (fig. 2):
Retrait
Attention !
Lors du retrait de l'embrayage, veil-
ler à ce que, en aucun cas, l'arbre
ne soit repoussé vers le coté de
l'entraînement sous l'effort exercé
par un bras de levier!
• Les embrayages préconisés par BIT-
ZER, LINNIG LA16, LA26 et LANG
KK73.1 et KK73.4 ont un dispositif de
démontage intégré:
• Tourner la vis de tension (10) vers la
gauche jusqu'à ce que l'épaulement
vienne buter sur le circlip (9).
• Continuer à tourner fermement la vis
de tension jusqu'à ce que l'embrayage
décolle de l'arbre.
• Retirer l'embrayage.
Prudence !
Ne pas laisser tomber l'embrayage!
Risque de blessures.
• Dévisser l'aimant (4)
(4 vis de fixation).
• Contrôler l'aimant et l'embrayage, et
remplacer le cas échéant.
!
!
!
!
 Loading...