42VQV
GB - 10
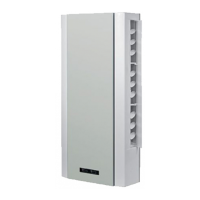
Electrical connections
42VQV 050 - 080
NB:
See outdoor unit installation
manual.
Minimum connection wire size between
indoor and outdoor units (mm
2
)
Model 1 2 3
42VQV
050 - 080
111
1 2 3
햲
Terminal box legend
1 Live connection indoor/outdoor unit
2 Neutral connection indoor/outdoor unit
3 Communication (high voltage)
햲 Interconnection cable (A07 RN-F)
햵 Room Controller/CZM connecting cable
(optional)
1
10
80
Address selector
If you are installing two indoor units in the same room and you
want them to operate in independent mode, it is necessary to
assign each unit its own address so that each unit can operate via
its own remote control.
For configuration, proceed as follows:
Configuration (of the unit)
• Press the and buttons of the infrared remote control and
hold them pressed for more than 5 seconds.
• The display will be cleared, the time segments will display the
first configuration item (rAdr = remote address) and the
temperature segments will display the default value of this
configuration item (Ab = control of both indoor units).
• Press either the
or button to change the default value (Ab)
to the new value (A) or (b).
• Press
button repeatedly until “UAdr” is displayed.
• Press either the
or button to change the default value of
CCN unit address (1) to the new value (1÷240).
• Press
button repeatedly until “ZONE” is displayed.
• Press either the
or button to change the default value of
Zone number (0) to the new value (0÷240).
• Press
button repeatedly until “A St” is displayed.
• Press either the
or button to change the default value of
auto restart in last mode (On) to the new value of start in OFF
mode (OF).
• LOOK OUT! Whichever configuration value changed must be
transmitted to the indoor unit pressing
button each time.
• Press
button to leave the configuration menu.
Configuration (of the remote controller)
• Press the and buttons of the infrared remote control and
hold them pressed for more than 5 seconds.
• The display will be cleared, the temperature segments will
display the first configuration item (CH = remote address) and
the time segments will display the default value of this
configuration item (Ab = control of both indoor units).
• Press either the
or button to change the default value (Ab)
to the new value (A) or (b).
• Press
button repeatedly until “tU” is displayed.
• Press either the
or button to change the default value of
temperatures in Degrees Celsius (C) to the new value Degrees
Fahrenheit (°F).
• Press button repeatedly until “Hr” is displayed.
• Press either the
or button to change the default value of
Maximum heating set point temperature admitted in Degrees
Celsius (32) or Degrees Fahrenheit (90) to the new value
Degrees Celsius (17÷32) or Degrees Fahrenheit (63÷90).
• Press
button repeatedly until “Cr” is displayed.
• Press either the
or button to change the default value of
minimum cooling set point temperature admitted in Degrees
Celsius (17) or Degrees Fahrenheit (63) to the new value Degrees
Celsius (17÷32) or Degrees Fahrenheit (63÷90).
• Press
botton repeatedly until “CL” is displayed.
• Press either the
or button to change the default value of
Time format as AM/PM (12) to the new value of 24 hours time
format (24).
• LOOK OUT! Whichever configuration value changed must be
confirmed pressing
button each time.
• Press
button to leave the configuration menu.
Note:
When 30 seconds have elapsed and no buttons have been
pressed, the remote control will automatically exit the
configuration menu and the procedure has to be restarted.
Fault code
The inside unit can detect any system fault and stop it at once.
The failure is recoverable based on the table VI below.
When a diagnostic is active, the green LED (P) and the yellow
LED (R) blink 0.5 seconds on, 0.5 seconds off and indicate a fault
code.
The yellow LED (R) indicates the tens digits.
The green LED (P) indicates the unit digits.
Address selector, fault code
햵
 Loading...