E-15
J
OFF
1
3
2
To print a stamp tape
1. Input the text you want to print.
2. Press FUNCTION and then 7
(STAMP).
• A mark appears next to the STAMP indicator on the display when mirror print-
ing is turned on.
• If the text you input in step 1 is too long to fit within the maximum length you
specified, an error message (page 21) appears when you press SET.
3. Press SET to print the stamp tape or ESC to abort the print operation and
return to the text input display in step 1.
• After the printing is complete, the Label Printer returns to the input display in
step 1.
4. Cut off the tape and affix it to the optional stamp holder.
• See the instructions that come with the optional stamp holder for information
about how to attach the stamp tape.
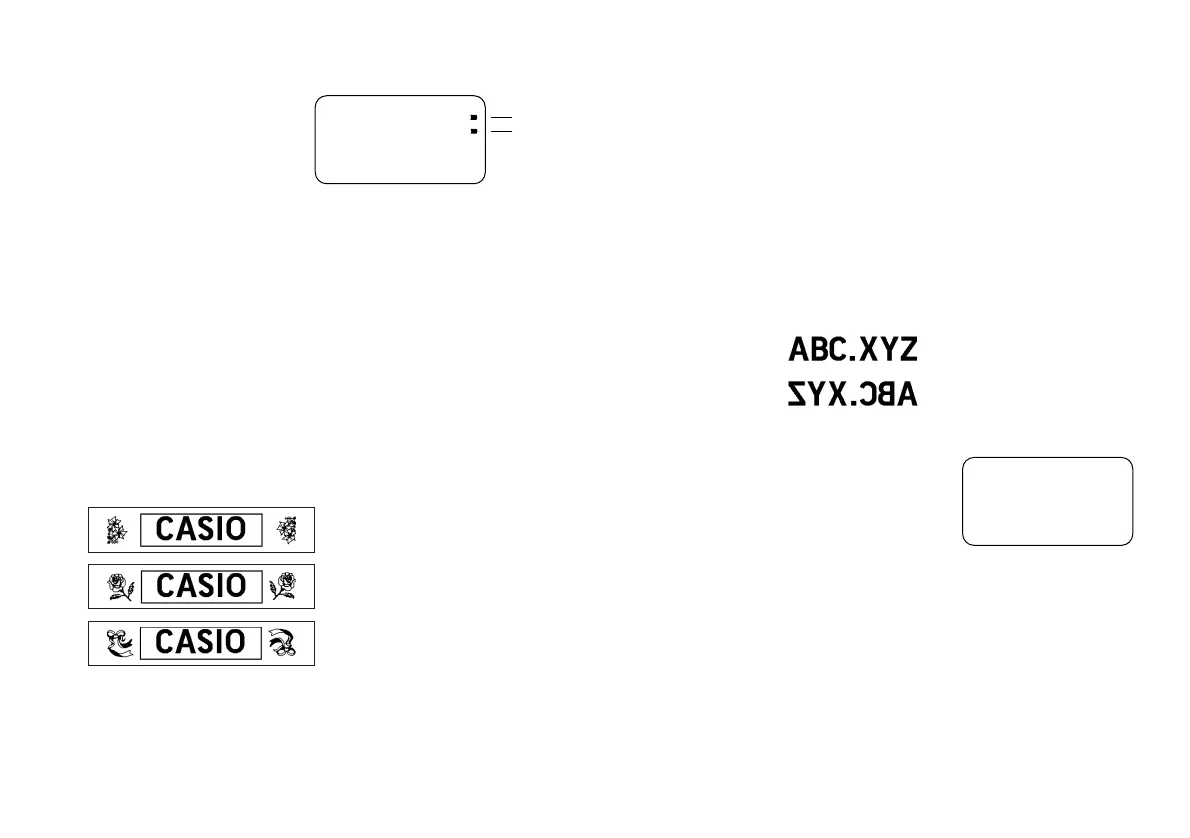
Frames
There are three frames that you can assign . The following shows examples of
each.
Important!
• Any text effect specification you make is applied to all the characters on the
display. You cannot make multiple specifications for specific characters.
To specify a frame.
1. Input the text .
2. Press FUNCTION 5 (FRAME) to display a menu of frames.
3. Use H and J to move the cursor to the frame you want to use.
4. When the cursor is located under the frame you want to specify, press SET
to select it . The text with the frame will be printed out, and return to the text
display.
Mirror Image Printing
When you specify mirror image for text, it is printed in reverse image. Use mir-
ror image when you plan to print on transparent tape, with the printing on the
inside. When viewed through the transparent tape, the text will appear normal.
You can also use mirror image printing when using iron-on transfer tape to print
iron-on transfers.
Normal
Mirror Image
To turn mirror image printing on and off
1. Press FUNCTION and then 8 (MIRROR).
2. Press H, J, K or L to change the setting shown on the display between
ON (mirror printing) and OFF (normal).
3. When the mirror image printing setting is the way you want it, press SET to
register it.
• A mark appears next to the MIRROR indicator on the display when mirror
printing is turned on.
• After you turn printing on, input text and perform the print operation as you
normally do (page 14) to produce mirror image tapes.
Other Printing Features and Operations
The following are other operations and settings that you may need to use when
printing.
PRN?
STAMP
MIRROR
 Loading...