NAMES AND FUNCTIONS OF PARTS
1. Power Switch (POWER)
When the power is turned on, "(00)" appears on the
TRACK NO. display, and if no disc is loaded, "(00 oooo )"
appears on the digital display.
If the power is turned on with a disc already loaded, the
total number of tracks on the disc is displayed on the
TRACK N0. display, the total time is displayed on the TIME
display, the numbers on the music calendar light up to the
number of tracks on the disc, and playback begins.
Whenever the power switch is in the OFF state, the
apparatus is still connected on AC line voltage.
Please be sure to unplug the cord when you leave home
for, say, a vacation.
2.
Disc Holde
Place the disc on the disc holder with the label facing up.
Use the open/close button to open and close the disc
holder.
The disc holder may also be closed by pressing the play
button or pause button.
3. Open/Close Button
The disc holder is opened and closed by pressing this
button.
Press this button once to open the disc holder, and once
again to close it.
When the disc holder is closed with a disc loaded, the disc
will rotate for a couple of seconds while the disc contents
are read. The number of tracks and total playback time on
the disc are then displayed on the digital display.
4. Remote Control Sensor (REMOTE SENSOR)
This sensor receives the infrared light transmitted from the
wireless remote control unit.
Point the separately sold RC-41 or RC-U620 remote control
unit at this sensor when operating it.
When a signal is transmitted from the remote control unit,
the remote control indicator in the display will light up
briefly.
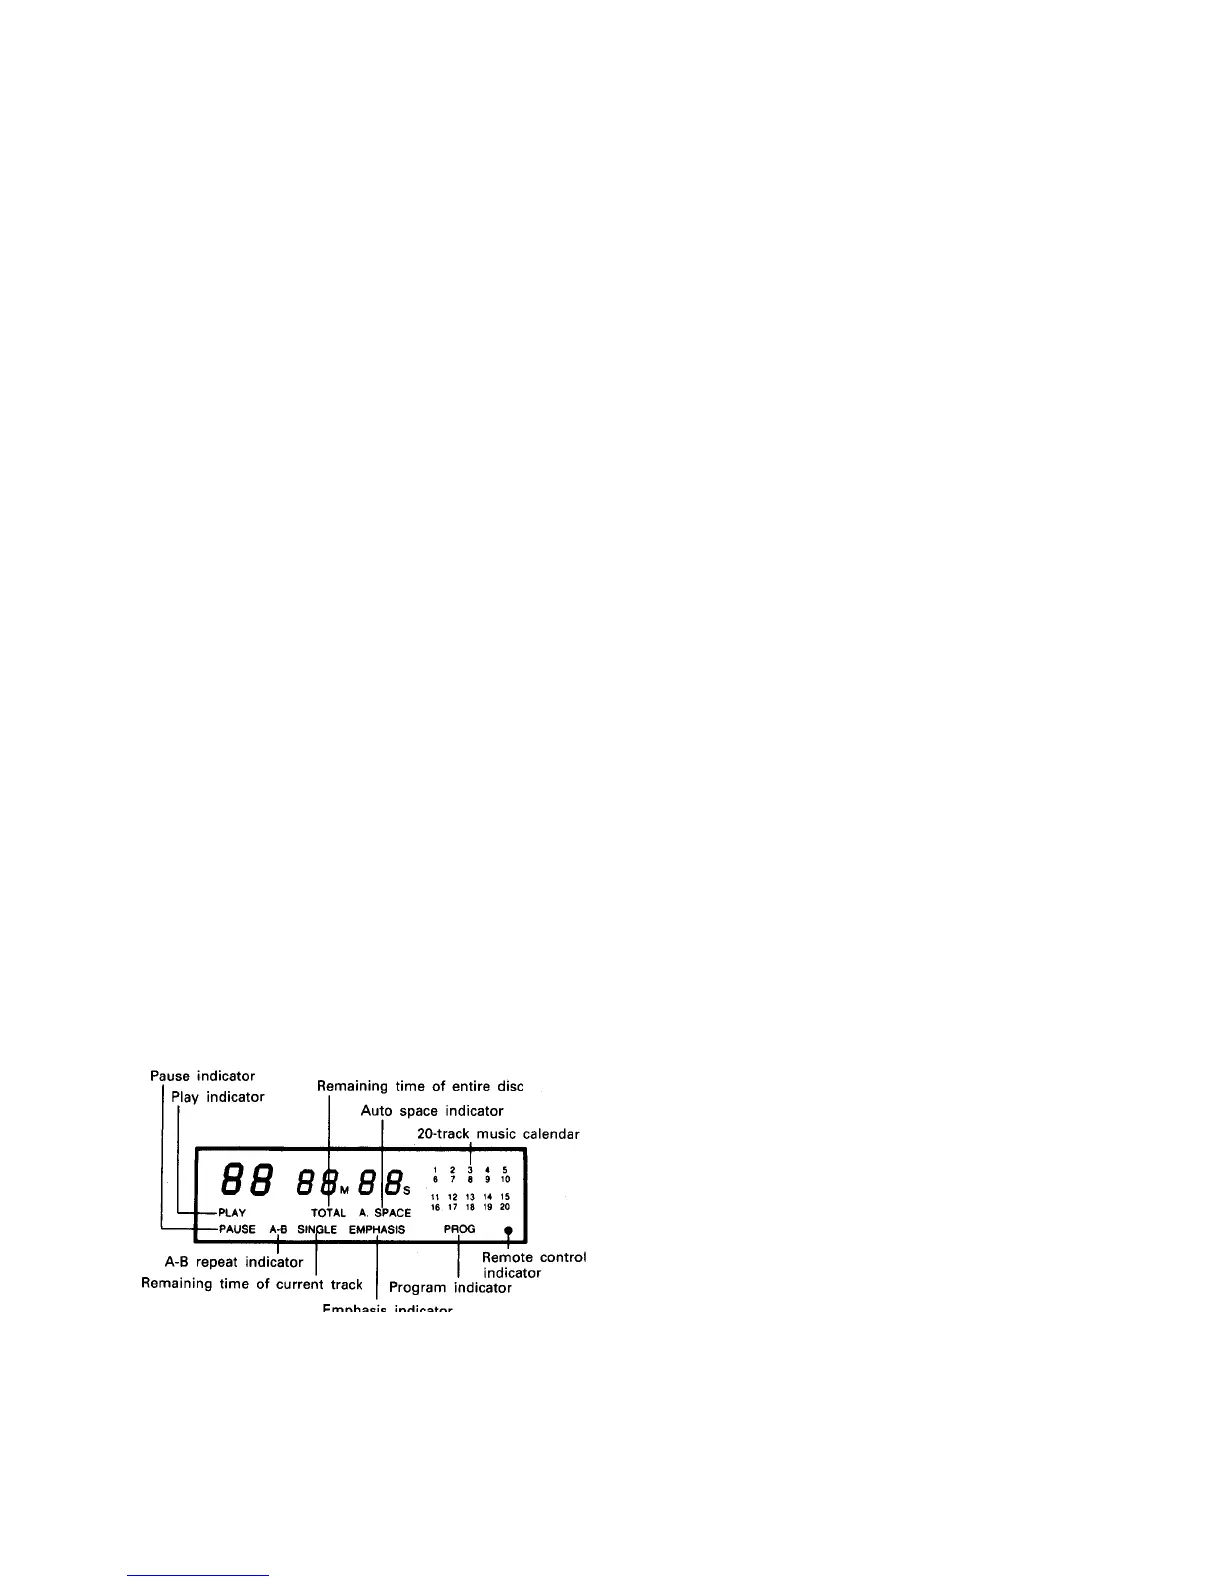
5.
Displa
The digital display is divided into sections, such as displays
for track number, playback time and calendar, as shown
below.
7.
Stop Button
Press this button to stop playback.
The disc will stop rotating, and the number of tracks and
total playing time of the disc are displayed on the TRACK
NO. and TIME displays, respectively.
• In case programmed playback is engaged when this button
is pressed, the number of tracks and total playing time of
the program are displayed.
8. Pause Button
Press this button to stop playback temporarily.
• If this button is pressed during playback, playback is
stopped temporarily, the
PLAY indicator goes out and the
PAUSE indicator lights.
Press this button or the play button again to continue
playback.
9. Number Buttons (1, 2, 3, 4, 5, 6, 7, 8, 9 and 10)
Use these buttons for the direct search and program
memory functions.
For direct search, press for example button 03 if you want
to hear track number 3. For track number 12, press
+10
then 2. To program tracks, press the PROG/ DIRECT
button 10 to set to the program mode.
10. Program Button (PROG/DIRECT)
Press this button when you want to enter tracks for
programmed playback. (Refer to page 10, 11 for details.)
11.
uto Edit Button
A. EDIT
• The tracks on a CD are automatically split into two halves,
Side A and Side B, like an analog disc, with the division at
the place between tracks which is closest to 1/2 the total
playing time, and with the tracks remaining in the same
order.
When this button is pressed in the stop mode, the total
playing time for the first half and the track numbers on the
calendar are displayed for approximately 2 seconds. Next,
the same is done for the second half, after which the unit
is automatically set to the pause mode at the beginning of
the first track. When the PLAY or PAUSE button is pressed,
playback begins, and the unit is automatically set to the
pause mode at the beginning of the first track of the
second half which was previously displayed. When the
PLAY or PAUSE button is pressed again, playback begins,
and the unit is automatically set to the stop mode at the
end of the last track on the disc.
• This function will only work for discs with a total of 20
tracks or less. Also, when this function is used the mode is
automatically set to the program mode, so direct search is
not possible.
• The auto edit function is cleared when the STOP button
is pressed.
• The data for the total playing time recorded on the disc
and the actual total playing time of the tracks differ, so
there may be a difference between the time displayed in
the stop mode (the total playing time) and the total of the
times of the first and second halves in the auto edit mode
about 2 seconds
.
6.
Play Button (PLAY)
• Press this button to start playback of a disc.
• When this button is pressed,
PLAY is displayed, and the
track number being played is displayed together with the
elapsed playback time of the track.
• Tracks are shown on the calendar display. Once a track
has been played, the corresponding track number goes
out
on the calendar dis
la
.
7
 Loading...