EasyManua.ls Logo

Electrolux 134700400 User Manual

Electrolux 134700400
20 pages
To Next Page IconTo Next Page
To Previous Page IconTo Previous Page
Page #4 background imageLoading...
Page #4 background image
4
Electrical system requirements
Water supply requirements
Grounding requirements
Drain system requirements
CIRCUIT - Individual, properly polarized and
grounded 15 amp. branch circuit fused with 15
amp. time delay fuse or circuit breaker.
POWERSUPPLY-2wire,withground,120volt
single phase, 60 Hz, Alternating Current.
OUTLETRECEPTACLE-Properlygrounded
3-prong receptacle to be located so the power
supply cord is accessible when the washer is in
an installed position.
Grounding type
wall receptacle
Power cord with
3-prong grounded plug
Do not, under
any circumstances,
cut, remove,
or bypass the
grounding prong.
Installation Requirements
NOTE
Because of potentially inconsistent voltage
capabilities, the use of this washer with power
created by gas powered generators, solar
powered generators, wind powered generators
or any other generator other than the local utility
company is not recommended.
NOTE
Drainhoseattachedtothewashercanreacha79
in. (201 cm) high standpipe. For higher standpipe,
use hose P/N 137098000, available from an
authorized parts distributor.
NOTE
GFI(GroundFaultInterrupter)receptacleisnot
required.
WARNING
ELECTRICALSHOCKHAZARD
Improper connection of the equipment grounding
conductor can result in a risk of electrical shock.
Check with a licensed electrician if you are in
doubt as to whether the appliance is properly
grounded.
The washer MUST be grounded. In the event 1.
of malfunction or breakdown, grounding will
reduce the risk of electrical shock by a path of
least resistance for electrical current.
Since your washer is equipped with a power 2.
supply cord having an equipment-grounding
conductor and a grounding plug, the plug
MUST be plugged into an appropriate, copper
wired receptacle that is properly installed and
grounded in accordance with all local codes and
ordinances or in the absence of local codes,
with the National Electrical Codes, ANSI/NFPA
70 (latest edition). If in doubt, call a licensed
electrician.DONOTcutofforalterthegrounding
prong on the power supply cord. In situations
where a two-slot receptacle is present, it is
the owner’s responsibility to have a licensed
electrician replace it with a properly grounded
three prong grounding type receptacle.
Hot and cold water faucets MUST be installed
within 42 inches (107 cm) of your washer’s water
inlet. The faucets MUST be 3/4 inch (1.9 cm) with
threading for laundry hose connection. Water pres-
sure MUST be between 30 and 120 psi. Pressure
difference between hot and cold cannot be more
than 10 psi. Your water department can advise you
of your water pressure.
Draincapableofeliminating17gals(64.3L)per1.
minute.
A standpipe diameter of 1-1/4 in. (3.18 cm) 2.
minimum.
The standpipe height above the floor should be: 3.
Minimum height: 24 in. (61 cm)
Maximum height: 96 in. (244 cm)
96”
(244cm)
max.
24”
(61cm)
min.
Question and Answer IconNeed help?

Do you have a question about the Electrolux 134700400 and is the answer not in the manual?

Electrolux 134700400 Specifications

General IconGeneral
BrandElectrolux
Model134700400
CategoryWasher
LanguageEnglish

Summary

Finding Information

Keep a Record for Quick Reference

Section to record purchase date, model, and serial numbers for easy access and future support.

Questions?

Contact information for toll-free telephone support and online support for the appliance.

Safety

Important Safety Instructions

Crucial safety warnings and precautions for appliance use, including definitions of safety symbols.

Pre-installation Requirements

Lists tools and materials needed before beginning the installation process for safe setup.

Installation Requirements

Electrical System Requirements

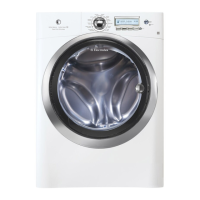
Details on power supply, circuit, and outlet specifications required for safe and proper operation.

Grounding Requirements

Emphasizes the necessity of proper grounding to prevent electrical shock hazards.

Water Supply Requirements

Specifies faucet type, pressure, and connection requirements for the water inlet hoses.

Drain System Requirements

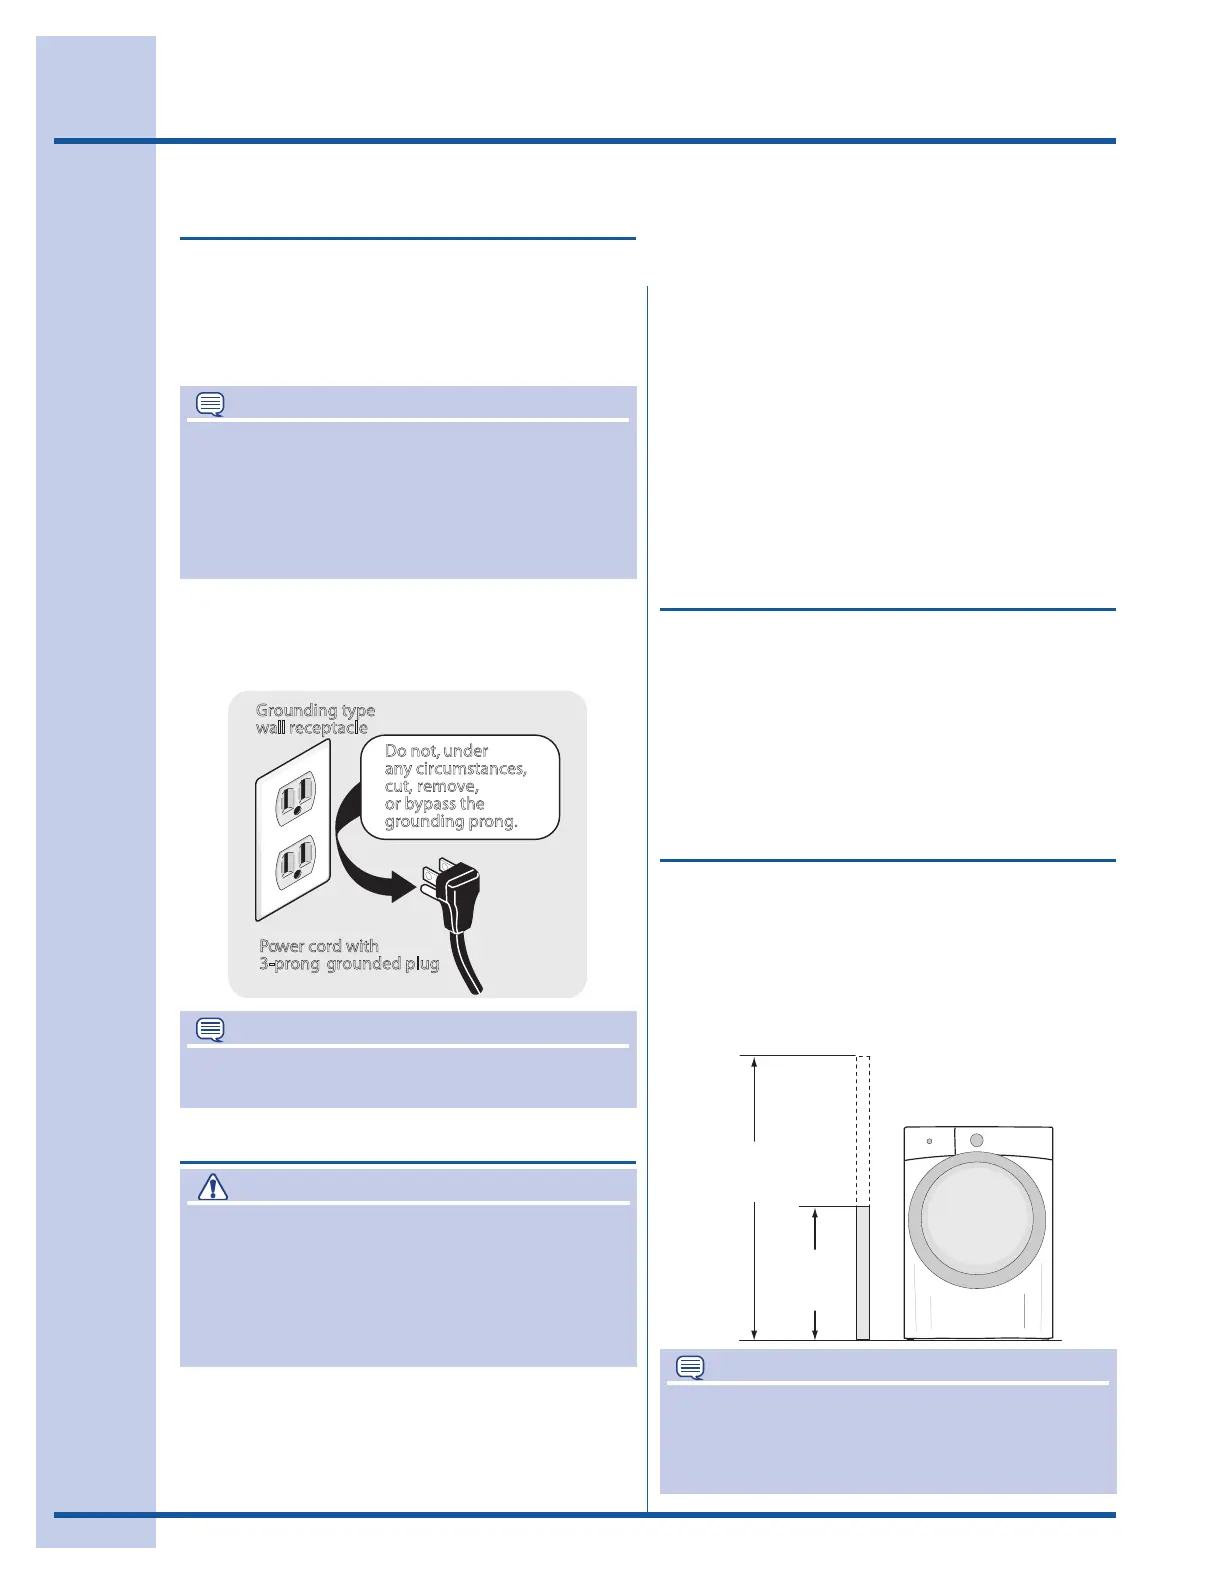
Outlines necessary specifications for the washer's drain system, including height and diameter.

Clearance Requirements

Provides minimum clearances needed around the washer for alcove, under-counter, and closet installations.

Installed Washer Dimensions

Illustrates the physical dimensions of the washer, including door swing and clearances.

Unpacking Washer

Removing Foam Packaging

Step-by-step guide on safely removing packaging materials and preparing the washer.

Removing Shipping Hardware

Instructions for removing internal shipping components like forks, spacers, and bolts.

Installing Hole Plugs

Guide on inserting protective hole plugs into the washer's back panel after unpacking.

Installation Instructions

Leveling Your Washer

Guide on how to properly level the washer to prevent noise and vibration during operation.

Connecting Inlet Water

Steps for connecting the hot and cold water supply hoses to the washer's inlet valves.

Connecting Drain and Electrical

Instructions for connecting the drain hose and plugging in the power cord safely.

Performing Installation Cycle

Steps to run an initial diagnostic cycle to confirm proper installation and functionality.

Reversing Door

Preparing to Reverse Door Swing

Steps to prepare for reversing the door, including safety checks and necessary tools.

Removing Door and Hardware

Detailed instructions for removing the door and its associated hardware from the washer.

Removing Hinge from Front Panel

Guide on how to detach the hinge assembly from the washer's front panel.

Removing Door Lock from Front Panel

Instructions for safely removing the door lock mechanism from the front panel.

Reattaching Door Lock to Front Panel

Steps to correctly reattach the door lock mechanism to the front panel.

Reattaching Hinge to Front Panel

Guide on how to properly reattach the hinge assembly to the washer's front panel.

Removing Striker Plate

Steps for removing the striker plate from the door during the reversal process.

Removing Latch Indicator

Instructions for removing the latch indicator component from the door.

Removing Hole Plug

Steps to remove a hole plug from the door as part of the reversal procedure.

Reinserting Latch Indicator

Steps for correctly reinserting the latch indicator into the opposite hole on the door.

Reattaching Striker Plate

Instructions for reattaching the striker plate to the door with screws.

Reinserting Hole Plug

Steps for correctly reinserting the hole plug into the opposite hole on the door.

Reattaching Door Assembly

Instructions for reattaching the main door assembly onto the hinge pins.

Reversing Trim Ring

Steps to reverse the orientation of the trim ring cover plate for the new door swing.

Reinstalling Trim Ring

Guide on how to properly reinstall the trim ring onto the door.

Reinstalling Trim Plug

Steps for reinstalling the trim plug onto the door after reversal.

Options

Accessories

Lists optional accessories such as pedestals, stacking kits, and drain hose extensions.

Replacement Parts

Information on how to order replacement parts and contact customer service.

Notes

Related product manuals