En-6
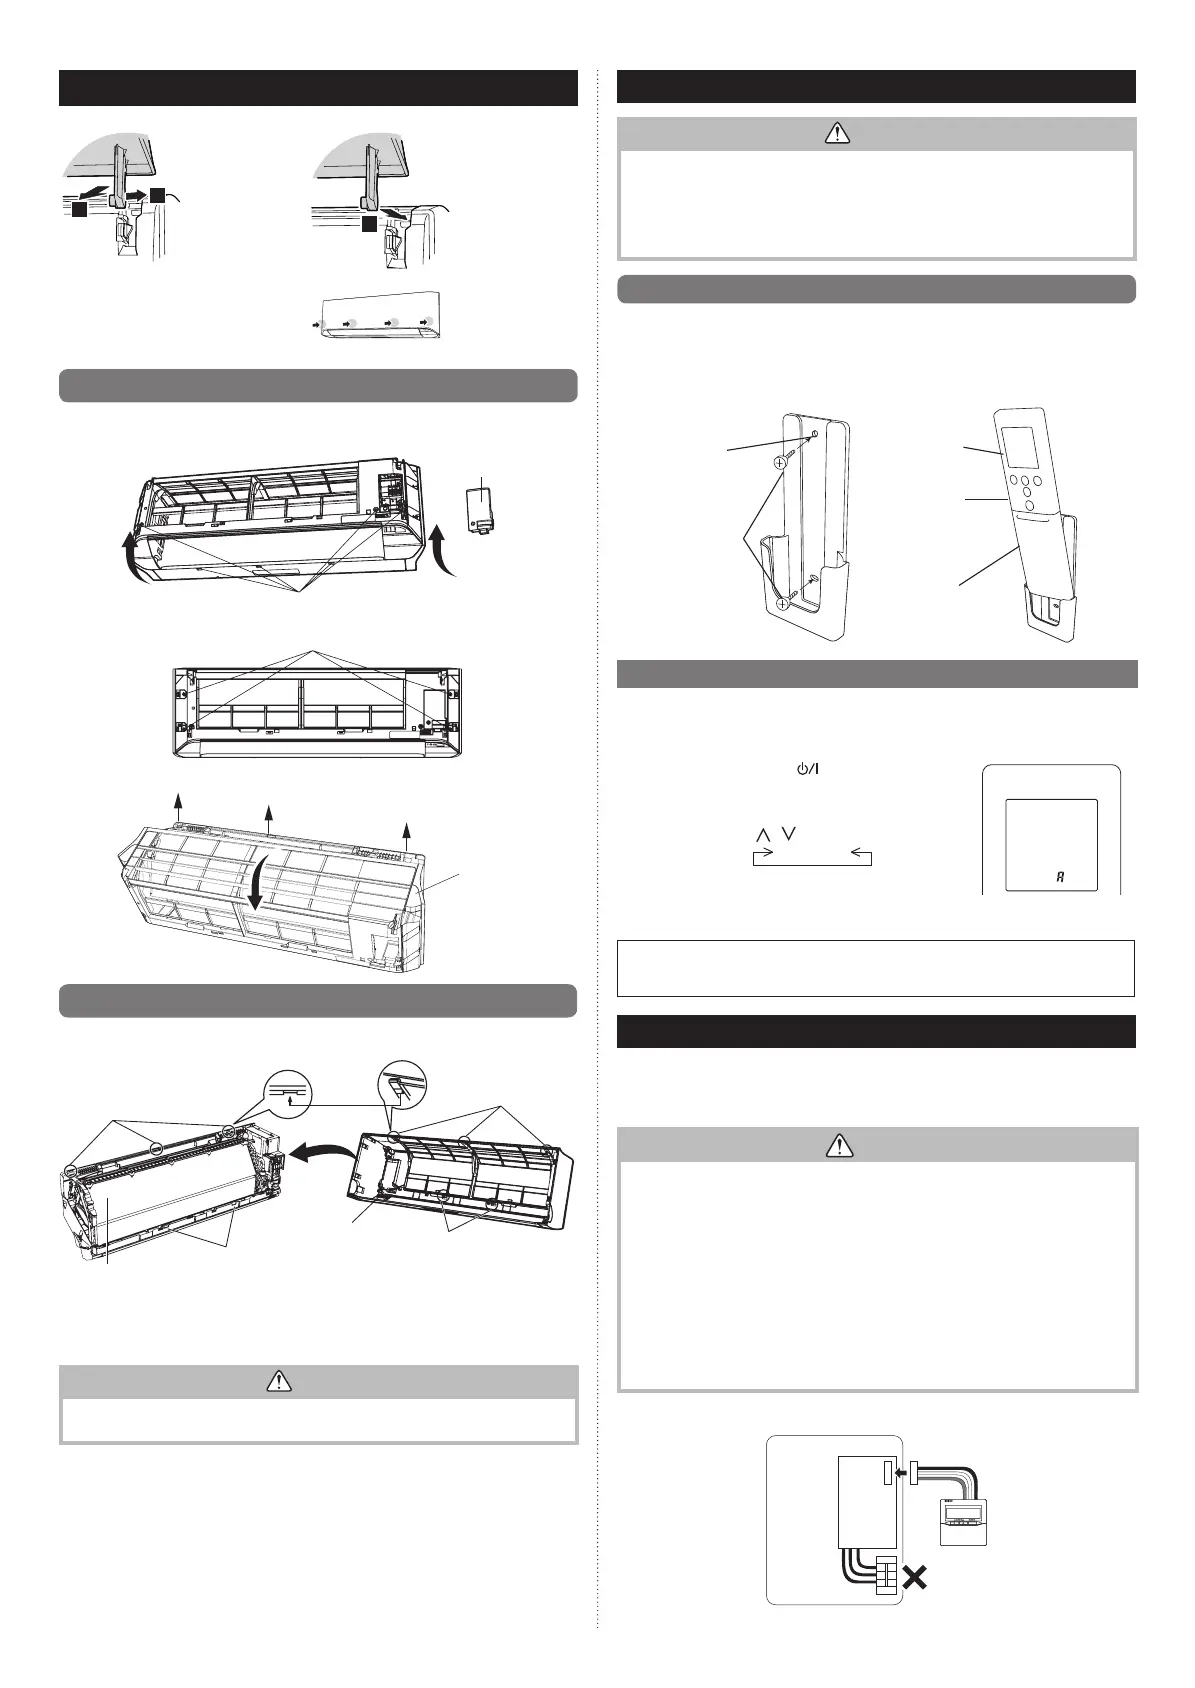
9. FRONT PANEL REMOVAL AND INSTALLATION
Intake grille removal Intake grille installation
b
a
Opentheintake
grille.Whilegently
pressingtheleft
andrightmounting
shaftsoftheintake
grilleoutward“a”,
removetheintake
grilleindirectionof
thearrow“b”.
c
Whileholdingthe
grillehorizontal,set
theleftandright
mountingshaftsinto
thepillowblocksat
thetopofthepanel
“c”.
Tolatcheachshaft
properly,insertthe
shaftuntilitsnaps.
Press4placeson
theintakegrilleto
closeitcompletely.
9.1. Front panel removal
(1) Removeintakegrille(Refertothe“Intakegrilleremoval”.)
(2) Removewirecover.
(3) Remove6screws.
Screws(6places)
4screws(Donotremove.)
Wirecover
(4) Pullthefrontpaneltothefront,thenraiseittoremove.
Frontpanel
9.2. Front panel installation
(1) First,t thelower part of the frontpanel, and insert top andbottom hooks. (3 top
sides,2center)
Indoorunit
Frontpanel
Latches(2places)
Centerhooks
(2places)
Tophooks
(3places)
Topholes(6places)
(2) Attachthe6screws.
(3) Attachthewirecover.
(4) Attachtheintakegrille.
CAUTION
InstalltheFrontpanelandIntakegrillesecurely.Ifinstallationisimperfect,theFront
panelorIntakegrillemayfalloffandcauseinjury.
10. REMOTE CONTROLLER INSTALLATION
CAUTION
•Checkthattheindoorunitcorrectlyreceivesthesignalfromtheremotecontroller,
theninstalltheremotecontrollerholder.
•Selecttheremotecontrollerholderselectionsitebypayingcarefulattentiontothe
following:
Avoidplacesindirectsunlight.
Selectaplacethatwillnotbeaffectedbytheheatfromastove,etc.
10.1. Remote controller holder installation
•
Installtheremotecontrolleramaximumdistanceof7mfromtheremotecontrollerre-
ceiver.However,wheninstallingtheremotecontroller,checkthatitoperatescorrectly.
•
I
nstalltheremotecontrollerholdertoawall,pillar,etc.withthetappingscrew.
Remote controller
holder xing
Remote
controllerholder
Tappingscrew
(small)
Remote controller
mounting
Remote
controller
2
Push
1
Set
10.2. Remote controller custom setting
Usethefollowingstepstoselectthecustomcodeoftheremotecontroller.(Notethatthe
airconditionercannotreceiveasignaliftheairconditionerhasnotbeensetforthematch-
ingcustomcode.)
(1) Pressthe“START/STOP(
)”buttonuntilonlythe
clockisdisplayedontheremotecontrollerdisplay.
(2) Pressthe“MODE”buttonforatleast5secondstodis-
playthecurrentcustomcode(initiallysettoA).
(3) Pressthe“TEMP.”(
/ )buttonstochangethecus-
tomcodebetween
A↔B↔C↔D
.
Matchthecodeonthedisplaytotheairconditioner
customcode.
(4) Pressthe“MODE”buttonagaintoreturntotheclock
display.Thecustomcodewillbechanged.
•Ifnobuttonsarepressedwithin30secondsafterthecustomcodeisdisplayed,the
systemreturnstotheoriginalclockdisplay.Inthiscase,startagainfromstep1.
•TheairconditionercustomcodeissettoApriortoshipment.
11. OPTIONAL KIT INSTALLATION
Thisairconditionercanbeconnectedwiththefollowingoptionalkits.
• Wiredremotecontroller
• Simpleremotecontroller
• Externalconnectkit
CAUTION
•Beforeinstalling,besuretodisconnectallpowersupply.
•Don’ttouchtheheatexchanger.
•Duringinstallingorremovingoperation,besurenottohavewirecaughtbypartsor
drawithard.Oritmayresulttroublestotheair-conditioner.
•Avoidplaceindirectsunlight.
•Selectplacethatwillnotbeaffectedbytheheatfromastove,etc.
•Beforesettinguptheoptionalkit,pleaseconrmwhetherair-conditionercanreceive
thesignal.
•Donotconnectthewiredremotecontrollertotheterminalforpowersupply.
•Whenconnectingthewiredremotecontrollerwiththeindoorunit,usetheconnecting
cable(suppliedwithwiredremotecontrollerorsimpleremotecontroller).
•Recommendedcablelengthofwiredremotecontrolleris10m.Makesuretoinsulate
theconnectingpartwhenextendingthecable.
• Whenyouusewiredremotecontroller,somefunctionsmaynotbeused.
•
Donotconnectpowersupplywiththeterminal.
INDOORUNIT
PCB
TERMINAL
9333005225_IM_2L.indb 6 10/12/2017 08:48:51

 Loading...