INSTALLATION
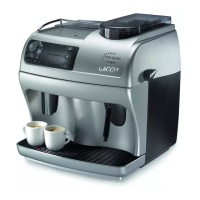
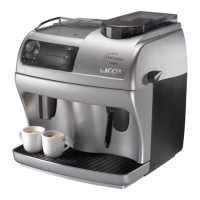
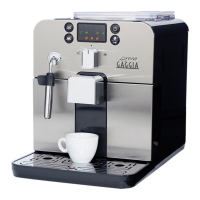
Key to machine components
Coffee bean container
Coffee bean container lid
Grinder adjustment knob
Dose adjustment knob
Ground coffee dispenser lid
Cup shelf
Power switch (ON/OFF)
Water container lid
Water container
Dregs box
Power cable
Water tray + grill
Water tray level float
Height-adjustable coffee dispenser
Steam/hot water tube
Front door
Steam knob
Coffee dispenser unit
Ground coffee measuring spoon
Cleaning brush
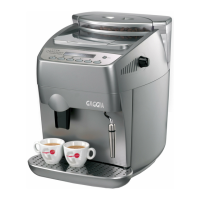
Control panel
Warning light
Knob for regulating the quantity of coffee
dispensed in one cup
Coffee dispensing button
Coffee temperature / function ready light
Ground coffee selector button
Ground coffee light
Steam selector button
Steam temperature light
Machine ON light
4 INSTALLATION
For your own safety and the safety of others,
you must strictly comply with the “Safety Rules”
described in chap.3.
4.1 Package
The original packaging was designed and made to
protect the machine during shipping.
We recommend keeping it for future transport pur-
poses.
4.2 Preliminary operations
• Remove the water tray (12) with grating from the
packaging materials.
• Take the coffee machine out of its packing
and position it in a suitable place that meets
the requirements described in the safety rules
(chap.3.).
• Insert the water tray (12) into the slot provided on
the machine; make sure that the tray, the dregs
box (10) and the coffee dispensing unit (18)
are correctly fitted and that the front door (16)
is closed.
• Fit the cover of the coffee bean hopper (2) onto the
coffee bean hopper (1).
Keep the cleaning brush (20) and the ground coffee
measuring spoon (19) to hand.
• Before plugging in the machine, make sure the
power switch (7) is set to -0-.
If the red light (21) flashes when you turn on the
machine, it means that one of the above-described
parts has not been correctly fitted in place.
Important note: It is important to read the
contents of Chapter 14, which explains in
detail the meaning of all machine signals provided
to the user by the lights on the control panel.
4.3 Turning on for the first time
• Lift out the water container (9) and remove the
lid (8). Rinse it out and fill it with fresh drinking water,
making sure you do overfill it. Lower the container
back into place inside the machine and replace the
lid (8).
Fill the container (9) only with cool, still
water. Hot water or other liquids may
damage the container and/or the machine. Always
make sure there is enough water inside the
container before starting the machine.
 Loading...