Step-by-step installation instructions.
Filtration Drain Connection Installations
Customer Service Troubleshooting Tips
Operating Instructions
Safety Instructions
Installation Instructions
Customer Service Troubleshooting Tips
Installation Instructions
Safety Instructions
Operating Instructions
Customer Service Troubleshooting Tips
Installation Instructions
Safety Instructions
Operating Instructions
Check and comply with all state and local plumbing codes as
you plan.
CAUTION:
The options detailed below are the ONLY
approved installation configurations. Do not use any drain
saddle device.
NOTE:
Failure to follow these Installation Instructions will void
the Warranty, and the Installer will be responsible for any
service, repair, or damages caused thereby.
Preferred Installation Options
(Options A, B and C)
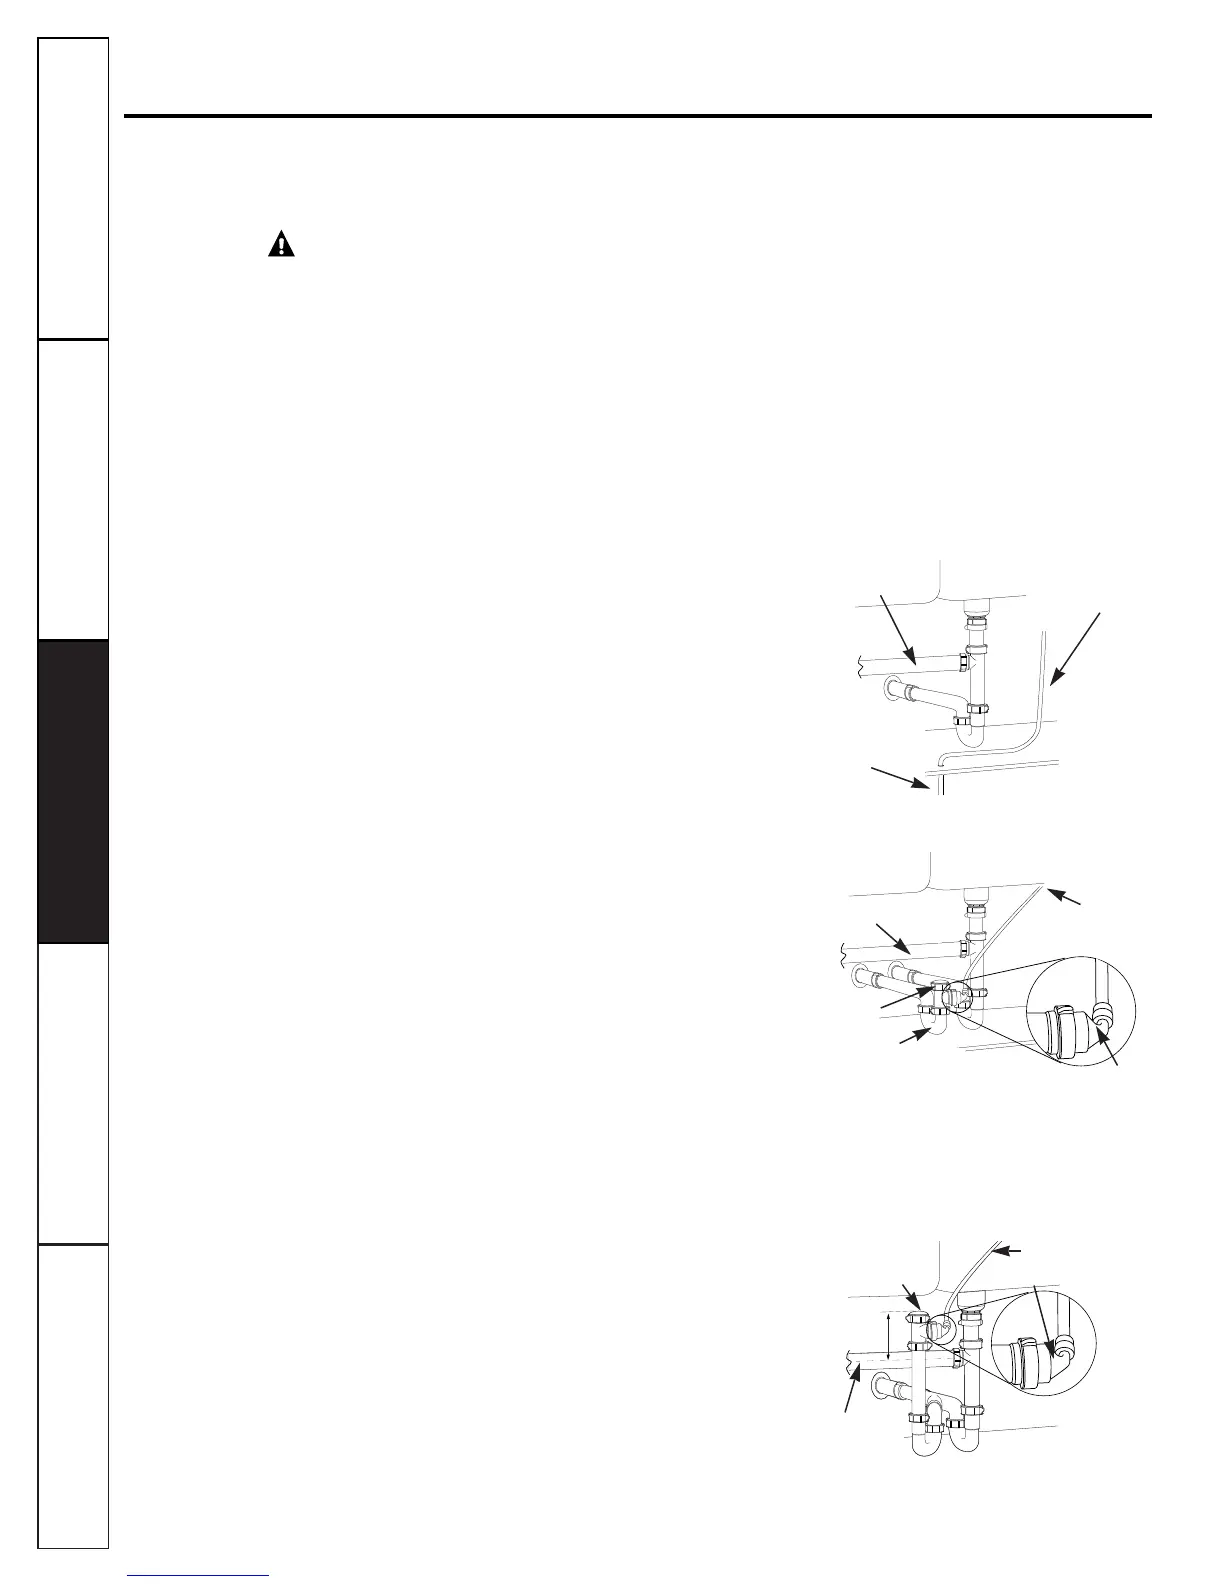
OPTION A.
BASEMENT ACCESS INSTALLATION (Fig. 3A)
Route the drain line DIRECTLY from the Reverse Osmosis
system to a standpipe in the basement, by-passing the air gap
provided in the faucet. The drain line may also be routed in the
basement to a floor drain or washtub, provided that the air gap
in the basement is maintained. Avoid dips, loops or low spots
in the drain line. The basement air gap and drain installation
configuration must conform to all local codes. Special air gap
fittings are available to connect the drain line to the top of
the standpipe.
OPTION B.
SEPARATE VENT INSTALLATION—
2 P-TRAP (DRY-VENTED) (Fig. 3B)
Install a separate dry-vented p-trap under the sink to be used
exclusively for the Reverse Osmosis drain line. A dry-vented
p-trap is a p-trap that has its own vent/stack. Attach the
provided drain line adapter to the p-trap and secure it with
the slip joint nut and washer as shown. Route the drain line
from the air gap to the drain line adapter ensuring that there
are no dips, loops or low spots in the line, which could result in
a clogged drain line. The drain line adapter should be aligned
vertically such that the hose connection points in a direction
45° off vertical. (See Fig. 3E.) The drain line must be routed
through the air gap provided in the RO water faucet.
OPTION C.
SHARED VENT INSTALLATION—
2 P-TRAP (WET-VENTED) (Fig. 3C)
Install a p-trap under the sink to be used exclusively for the
Reverse Osmosis drain line. A wet-vented p-trap is a p-trap that
shares a common vent/stack. Attach the provided drain line
adapter to the p-trap and secure it with the slip joint nut and
washer as shown. Route the drain line from the air gap to the
drain line adapter ensuring that there are no dips, loops or low
spots in the line, which could result in a clogged drain line. The
drain line adapter should be aligned vertically such that the
hose connection points in a direction 45° off vertical. (See
Fig. 3E.) The drain line must be routed through the air gap
provided in the RO water faucet. Locate the p-trap as high as
possible (minimum of 4″ above horizontal pipe from second
sink or disposer).
Fig. 3A.
Fig. 3B.
Fig. 3C.
From second
sink or disposer
From second sink or
disposer
From second
sink or disposer
From
faucet air
gap
Drain line from
Reverse Osmosis
by-passing faucet
air gap
Maintain air gap
at drain point in
basement
Drain line adapter
Separate p-trap
Cap (not
included)
Cap (not
included)
4″
Min.
From faucet air gap
Drain line adapter
12
 Loading...