EasyManua.ls Logo

GE LOGIQ F8 Service Manual

GE LOGIQ F8
167 pages
To Next Page IconTo Next Page
To Previous Page IconTo Previous Page
Page #99 background image
GE LOGIQ F SERIES
DIRECTION 5446617-100, REVISION 10 BASIC SERVICE MANUAL
Chapter 4 - Functional Checks 4 - 23
4-3-10 Basic Measurements
NOTE: The following instructions assume that you first scan the patient and then press Freeze.
4-3-10-1 Distance and Tissue Depth Measurements
1.) Press Measure once, an active caliper displays.
2.) To position the active caliper at the start point (distance) or the most anterior point (tissue
depth), move the Trackball.
3.) To fix the start point, press Set. The system fixes the first caliper and displays a second active
caliper.
4.) To position the second active caliper at the end point (distance) or the most posterior point
(tissue depth), move the Trackball.
5.) To complete the measurement, press Set. The system displays the distance or tissue depth
value in the measurement results window.
Before you complete a measurement:
To toggle between active calipers, press Cursor Select.
To erase the second caliper and the current data measured and start the measurement again, press
Clear once.
NOTE: To rotate through and activate previously fixed calipers, adjust Cursor Select.
NOTE: After you complete the measurement, to erase all data that has been measured to this point,
but not data entered onto worksheets, select Clear.
4-3-10-2 Circumference/Area (Ellipse) Measurement
1.) Press MEASURE once; an active caliper displays.
2.) To position the active caliper, move the TRACKBALL.
3.) To fix the start point, press SET. The system fixes the first caliper and displays a second active
caliper.
4.) To position the second caliper, move the TRACKBALL.
5.) Adjust the ELLIPSE; an ellipse with an initial circle shape appears.
NOTE: Be careful not to press the Ellipse control as this activates the Body Pattern.
6.) To position the ellipse and to size the measured axes (move the calipers), move the
TRACKBALL.
7.) To increase the size, adjust the ELLIPSE upward button. To decrease the size, adjust the
ELLIPSE downward button.
8.) To toggle between active calipers, press MEASURE.
9.) To complete the measurement, press SET. The system displays the circumference and area
in the measurement results window.
Before you complete a measurement:
- To erase the ellipse and the current data measured, press CLEAR once. The original caliper
is displayed to restart the measurement.
- To exit the measurement function without completing the measurement, press CLEAR a
second time.

Table of Contents

Question and Answer IconNeed help?

Do you have a question about the GE LOGIQ F8 and is the answer not in the manual?
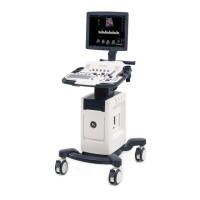
GE LOGIQ F8 Specifications

General IconGeneral
TypeUltrasound System
Probe Ports3 active probe ports
Probe Connectors3
PortabilityPortable
Operating Temperature10°C to 40°C
Relative Humidity30% to 85% (non-condensing)
Power Requirements100-240 V AC, 50/60 Hz
Imaging ModesColor Doppler, Power Doppler
ApplicationsAbdominal, Vascular, Cardiac, Musculoskeletal, Small Parts
Frequency Range2.0 MHz - 18.0 MHz (dependent on transducer)
Storage Temperature-20°C to 60°C

Summary

Introduction

Overview

Provides an overview of Chapter 1 and the manual's purpose.

Important Conventions

Explains book conventions, hazard icons, and safety messages.

Safety Considerations

Details human, mechanical, and electrical safety precautions.

EMC, EMI, and ESD

Discusses electromagnetic compatibility, interference, and static discharge prevention.

Lockout/Tagout (LOTO) requirements

Outlines procedures for applying Lockout/Tagout for service.

Customer Assistance

Provides contact information for support and troubleshooting.

Site Preparations

Overview

Introduces site preparation requirements for installation.

General Console Requirements

Covers environmental and electrical requirements for the console.

Facility Needs

Details purchaser responsibilities and required facility features.

System Setup

Overview

Outlines information needed for unit installation and setup procedures.

Setup Reminders

Provides reminders and average installation times.

Receiving and Unpacking the Equipment

Details procedures for receiving and unpacking the system.

Preparing for Installation

Covers verification, inspection, and EMI protection before installation.

Completing the Installation

Guides through powering on/off and connecting probes.

System Configuration

Details system specifications, optional peripherals, and connector panels.

Software/Option Configuration

Refers to the User Manual for software and option configuration.

Connectivity Installation Worksheet

Provides a worksheet for network connectivity setup.

Loading Base Image Software

Refers to procedures for loading base image software.

Software Version check out

Explains how to check system software version.

Paperwork

Covers documentation and user manual checks.

Functional Checks

Overview

Introduces procedures for checking system functions and diagnostics.

Required Equipment

Lists equipment needed for functional tests.

General Procedure

Details general procedures like power on/off, date/time check, and mode controls.

Components and Functions (Theory)

Overview

Explains system concepts, component arrangement, and subsystem functions.

Block Diagram

Presents system and software block diagrams.

Common Service Platform

Describes the common software modules for service.

Service Adjustments

Overview

Introduces scanner testing and adjustment procedures.

Monitor Adjustments

Provides procedures for adjusting monitor brightness and light.

Diagnostics/Troubleshooting

Overview

Details tools and software for maintaining image quality and system operation.

Gathering Trouble Data

Explains how to capture trouble images and system data for analysis.

Screen Captures

Guides on capturing screen images and setting up print keys.

Common Diagnostics

Covers utilities like disruptive mode and system shutdown.

Network Configuration

Details procedures for connecting the system to a network.

Replacement Procedures

Overview

Introduces procedures for replacing modules and subsystems.

DISASSEMBLY/RE-ASSEMBLY

Provides warnings and cautions for disassembly.

Renewal Parts

Overview

Provides an overview of renewal parts for the LOGIQ F Series.

List of Abbreviations

Lists abbreviations used in the renewal parts section.

Care & Maintenance

Overview

Discusses periodic maintenance and the purpose of care.

Why do Maintenance

Explains the importance of keeping records and quality assurance.

Maintenance Task Schedule

Outlines the recommended customer care and maintenance schedule.

Tools Required

Lists standard GE tool kits and special tools for maintenance.

When There's Too Much Leakage Current...

Provides troubleshooting steps for leakage current failures.

Related product manuals