Installation Instructions
10
PLUMBING INFORMATION
WATER SUPPLY REQUIREMENTS
• HOT AND COLD WATER FAUCETS – Must be within 42” of
the appliance water inlet hose connections. The faucets
PXVW EH µ JDUGHQ KRVHW\SH VR LQOHW KRVHV FDQ EH
connected.
• WATER PRESSURE – Must be between 10 and 120 pounds
per square inch with a maximum unbalance pressure,
KRWYVFROGÀRZLQJRISRXQGVSHUVTXDUHLQFK
• WATER TEMPERATURE – Water heater should be set to
GHOLYHU ) & LQ WKH ZDVKHU ZKHQ +27 ZDVK LV
selected.
6+872)) 9$/9(6 ² %RWK KRW DQG FROG ZDWHU VKXWRȺ
YDOYHVIDXFHWVVKRXOGEHVXSSOLHG
• LOCATION – Do not install appliance in an area where the
WHPSHUDWXUHZLOOIDOOEHORZIUHH]LQJ,IDSSOLDQFHLVVWRUHG
RUWUDQVSRUWHGLQIUHH]LQJWHPSHUDWXUHVEHVXUHDOOZDWHU
IURPWKH¿OODQGGUDLQV\VWHPVKDVEHHQUHPRYHG
DRAIN REQUIREMENTS
• DRAIN RATE – The drain or standpipe must be capable
RI DFFHSWLQJ D GLVFKDUJHDW WKH UDWH RI JDOORQV SHU
minute.
'5$,1+(,*+7²7KHGUDLQKHLJKWPXVWEHµPLQLPXP
DQGµPD[LPXP
• STANDPIPE DIAMETER – The standpipe diameter must
EHµPLQLPXP7KHUH0867EHDQDLU JDSDURXQG
WKHGUDLQKRVHLQWKHVWDQGSLSH$VQXJ¿WFDQFDXVHD
siphoning action.
6,3+21%5($..,7²)RUDGUDLQIDFLOLW\OHVVWKDQµKLJK
the hose, coupling and clamps provided in the machine
must be used and, in addition, a siphon break MUST be
LQVWDOOHGRQWKHEDFNRIWKHPDFKLQH8VH6LSKRQ%UHDN
Kit WH49X228 and follow instructions in the kit.
7
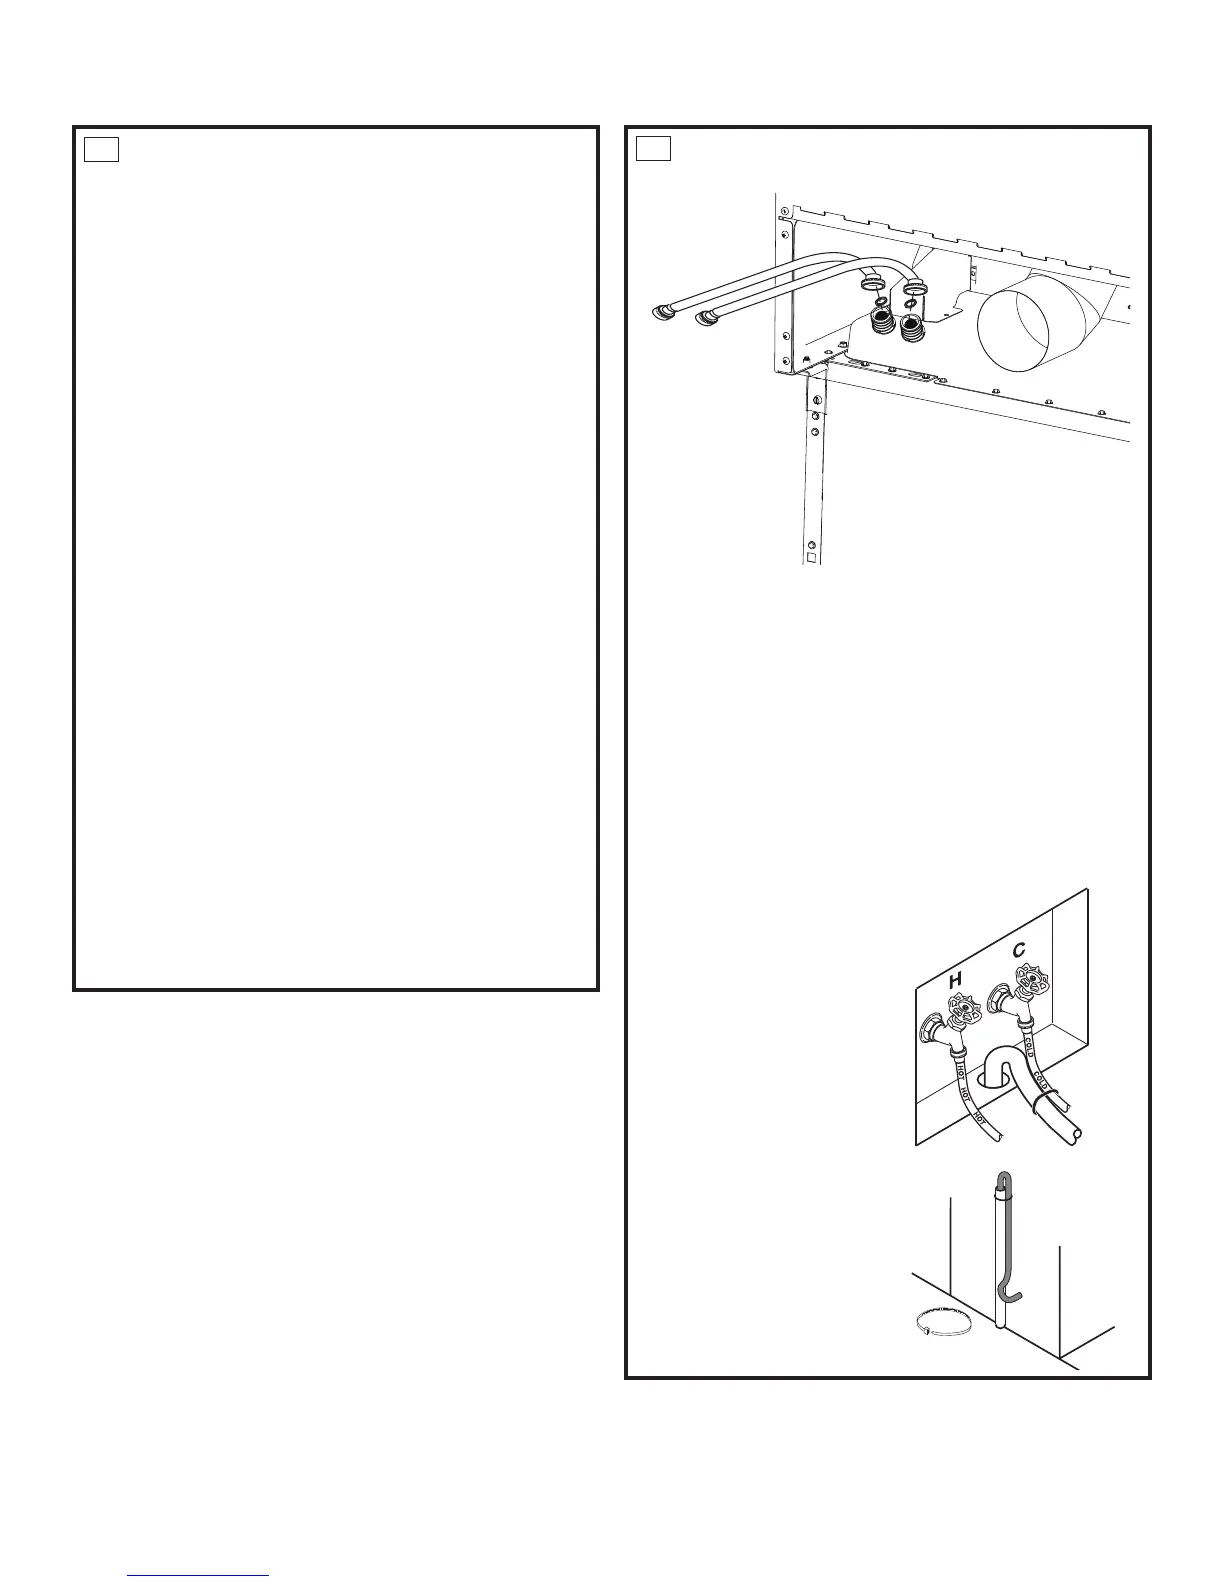
CONNECTING TO PLUMBING FACILITIES
If not installed, install rubber washer in one end of hot water hose.
Thread hot water hose onto connection labeled H at top rear
of washer. Hand tighten, plus an additional 1/8 turn with pliers.
If not installed, install rubber washer in one end of cold water
hose. Thread cold water hose onto connection labeled C at top
rear of washer. Hand tighten, plus an additional 1/8 turn with
pliers.
0RYHDSSOLDQFHDVFORVHWR¿QDOORFDWLRQDVSRVVLEOHOHDYLQJURRP
for you to make water, drain, electrical and vent connections to
your home.
8
C
H
HOT
HOT
HOT
HOT
COLD
COLD
COLD
COLD
NOTE: If longer drain hose
is required, order drain hose
extension kit, part number
:+;&RQQHFWDGGLWLRQDO
GUDLQKRVHFRQWDLQHGLQNLWWR
original hose with hose clamp
FRQWDLQHGLQNLW
Insert free end of drain hose into
drain opening of your home up
WRGUDLQKRVHVWRSSHUGRQRW
remove hose stopper it prevents
VLSKRQLQJ,IZDWHUYDOYHVDQG
drain are built into wall, fasten
drain hose to one of water
hoses with cable tie provided
ULEEHGVLGHRQLQVLGH,I\RXU
drain is a standpipe, fasten drain
hose to standpipe with cable tie
provided.
 Loading...